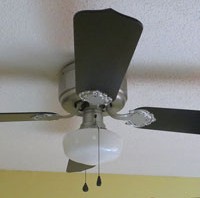
In all my picture taking of what I’ve done to the kitchen, I have carefully avoided one thing — the ceiling fan. You can see why. It was like an ugly albatross hanging there.
I was dead set against spending money on a new one and when I’d look at it I’d mentally mumble something along the lines of “The next people who own the house can do something about that…” But it bugged me that it had absolutely nothing to do with anything I’d done to the rest of the kitchen.
So I looked online to see if anyone had painted a fan and there were a few who had. My concern was about spraying paint into the motor and what effect that would have, but no one seemed to address that.
I picked up a $5 can of Valspar Brushed Nickel Spray Paint, a new set of fan and light pulls in black and thought for $8 I’d see if I could make the fan look a little better and at least go with the brushed nickel light fixtures over the sink and island.
Disassembling and cleaning
I removed the fan blades and the light fixture. I lucked out and the housing came off and I could leave the heavy fan motor hanging. Everything was filthy so they had to be cleaned first. I thoroughly dusted the motor to remove cobwebs and thick dust. The metal parts cleaned up easily. I started washing the blades and black stuff started rolling off the side that had been on top. I realized there was a layer of black, greasy dust on the tops and edges of the blades — it was gross and paint would never stick to it. I had to use a scrubby and scrub hard to get it off.
Partially removed black grease on edge of fan blad
I was completely undecided what color to paint the blades, black or white, and set them aside to dry and worked on the metal parts.
Painting
I took the metal parts outside and sprayed the blade brackets, light fixture, and motor cover. I liked the brush nickel paint so much I decided I would probably paint a couple of living room lamp with it when I paint my end tables. If you added a clear top coat to give it some shine I think it would look exactly like the other brushed nickel fixtures I had. I decided to skip that step for the fan though.
In an effort to not have to take the motor down I sprayed some of the paint in a plastic cup and ran in the house and painted the exposed metal on the motor housing that led to the light. There were so many wires crammed inside I didn’t want to remove it. I had to move fast before the paint dried in the cup. It didn’t look perfect, but it looked good enough for up on the ceiling where no one would see it closely.
Two coats of paint and the metal parts were ready to go.
Fan Blades
After looking at images of brushed nickel fans on the internet I decided black was the only good color for the blades. Since there’s black hardware in the kitchen it would go well too. I sprayed the plain side of the blades and edges and left the decorative side as is. I had leftover black paint from the chalkboard I had made for the kitchen.
Putting it back together
I attached the motor cover and the light fixture and didn’t think my hand painted part looked too bad.
The CFL bulb was for testing that I had wired the light fixture correctly. I hated that CFL and replaced it.
Here’s the finished fan. Granted it’s still a really ugly fan, but at least it goes with the kitchen now. I couldn’t believe what a cheap, easy, and quick project this was. If you have a ceiling fan that doesn’t match – Paint it!
Making stuff from PVC is a fun project. You cut it, sand it, glue it, and paint it. All you need is ideas.
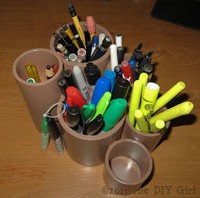
I purchased a couple lengths of PVC, 2″ and 3″, and several caps to make a free form pen holder for my office and individual tool/pen holders for my sewing table. I had PVC cement at home.
I used my compound miter saw to cut the pipe since I wanted smooth edges. I sanded the bottom and top edges and glued the caps in place. This is the first time I’ve tried angle cuts for one of the tool holder so it would lean forward.
Caps glued in
I bought plastic spray paint in a Khaki color and sprayed the PVC inside and out.
Here’s what they look like after I filled them up. I may need to make another low one. The second one in the picture ended up in the kitchen to hold chalk for my new chalkboard.
This is the one I had already made for my office. I glued the individual sections together so it’s one piece. I love being able to have separate holders for different things. Makes it easier to grab stuff.
I develop sites for clients on my own host server which happens to be HostMonster. Been with them for years and haven’t had any problems, so while there are cheaper options, I figure why fix something that isn’t broken. When working for a client I share the url for their test site so they can view and approve the work. When the site it completed I move it to their server.
FYI – I’ve been recommending PowWeb most of the time for small business sites because they have good prices. When you go to sign up you should leave the sign-up page at least once because PowWeb often will offer a lower price if you’ll stay on the page. After you signed up they will contact you and usually offer extended deals. I’ve been setting up clients for 3 years hosting at less the $125. I find their interface intuitive, they aren’t constantly trying to gouge you for add-ons like GoDaddy (I would never use them), and when I call for technical support I am not on hold for a long time and they are extremely helpful. I love their tech support.
Because I haven’t moved a site in a while I looked at the WordPress Codex for direction and found their Codex less than thorough. Sometimes is seems like people don’t take into account the different levels of experience and if you have to perform brain surgery they offer directions like Step 1. Perform the surgery, Step 2. Finish the surgery. Oh gee, thanks. I think I need to know a tad more than that. Feel free to peruse their instructions.
Since I flogged my way through it today I thought I would write it up to make it a little easier for myself next time and maybe help some others. Keep in mind that everything changes – WordPress, MySQL, host servers – so while these directions worked perfectly today, they may need variations somewhere down the road.
If you would like to change hosting and not have to reinvent the wheel, this really isn’t that bad of a process if you’re new to it. You’ll need:
Text editor
FTP software like Filezilla
Safe Search Replace (where to find it is in the directions)
access to your old host server
access to your new host server
at least a basic knowledge of MySQL or an adventurous spirit
at least a basic knowledge of phpMyAdmin or an adventurous spirit
If you’re already scratching your head wondering what the heck all these are, you might want to get help before proceeding. I’m completely self-taught, but there’s always the risk of really buggering things up. I choose to live with that risk — you may not.
Making the move
Warning 1: Make sure you have a backup of your old blog’s WordPress database before proceeding!
Here’s a PDF of these instructions if you’d like to print it out.
Part A – Moving WP Files and Database from old hosting to new hosting
This will involve getting the old WP files and database onto your local computer and then uploading it onto the new server. This is a little redundant, but I would rather err on the side of caution so don’t skip steps. It may save your butt later.
1. Download WordPress installation: Download a backup of your entire WordPress installation (all the WP files from the old site) to your hard drive. Name a folder something appropriate to indicate this is your OLD blog (I use FileZilla to FTP files back and forth from my computer to the hosting service).
2. Export a backup of your database: Export a backup of your database to same OLD blog folder. This will be a .sql file or a .zip if you compressed a large database. While logged into your old hosting server use MySQL, go to phpMyAdmin, select your database (not one of the tables) in the left hand column, go to Export Tab, depending on the phpMyAdmin interface you will either:
a. Leave “Quick – display minimal options” checked and simply click Go and it will let you name the download
MySQL interface in HostMonster
b. or you will need to leave everything as is and go to bottom of screen, check “Save as file”, then click Go and save your file.
MySQL interface on PowWeb
This is your safety net. Make sure you keep it safe and don’t overwrite the files!
3. Change URLs in old blog: Log into your OLD blog on the old server and go to SETTINGS and change the url for both WordPress Address (URL) and Site Address (URL) to the URL for the site on the new server. You will not be able to log into WP on your old site after this.
Time to get the files that will go to the new server.
4. Download your entire WordPress installation: After changing the URLs in the WP Settings,download your entire WordPress installation AGAIN (all the WP files from the old site) to your hard drive and name a new folder appropriately to indicate that this is your NEW blog’s installation files.
5. Export your database: Export your database once again (but keep the old one safe) using same instructions as Step 2 and put this export in the same folder as the newly downloaded WordPress installation.
6. Create a new database: This process varies among hosting servers so I can’t offer images. Go to your new host server and create a new database in MySQL. It will be easiest if you use the same DB_NAME, DB_USER, and DB_PASSWORD as on the old server. If you are unsure what they are, go to the wp-config.php in the WordPress installation files and verify it. If you change them be sure to note down the EXACT ones you use.
7. Import the database: Import the database export you got from the old server to the newly created database on the new server using phpMyAdmin/Import. Choose file (newly exported database in new blog folder), leave all other settings the same, and click Go.
8. Using a different database name/user/password: If you used a different database name and/or user (see previous step), edit wp-config.php in your NEW blog’s installation folder appropriately. I use Notpad++ for editing files and love it. And it’s free 🙂 (Be aware that using the Windows notepad can embed unwanted code that will not work sometimes. Never use word processing software.)
a. Make sure DB_NAME, DB_USER, and DB_PASSWORD match what you set up when you created the new database on your new hosting server.
b. Upload this file to the WP directory on your new hosting server.
Part B – Changing URLs in Database
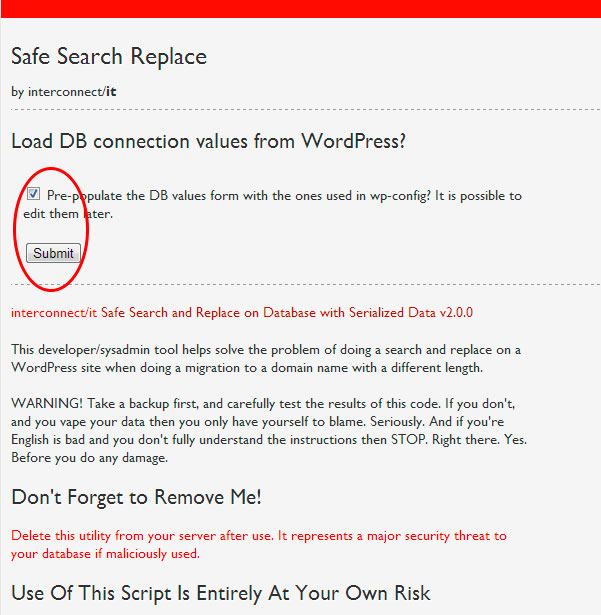
The use of Safe Search Replace was recommended by WordPress in the Codex so I thought I’d give it a try. Wow — talk about painless. Just make sure you give it the correct information to avoid GIGO (garbage in garbage out).
2. Change the name of Safe Search Replace searchreplacedb2.php to something else. I used “url-rename.php” (changing the name is recommended by them because apparently hackers look for this file so they can hack your site).
3. Go to Safe Search Replace by entering www.your-url.com/url-rename.php or whatever you named the .php file. I left Pre-populate checked and clicked submit (Note the “Don’t forget to remove me” reminder near the bottom of the image).
4. Enter database information: The next screen will ask for the following information (I didn’t get a screenshot of this):
Your Server Name:
Database Name:
Database Username:
Database Password:
I went to PowWeb/CPPanel/MySQL – choose database – generate code option on right to verify the values for Safe Search Replace. Where this is located will vary in different host servers and may require a call to tech support to make sure you have the right information. Make sure this is correct. Don’t be afraid to call tech support — that’s what you pay for. If you’re brand new to this tell the person you speak to so they can break it down to terms you understand.
While you’re at it, make sure you have corrected wp-config.php. Pull it up in an editor and verify.
5. Changing urls: When asked what to find and replace enter old url and new url (I didn’t get a screenshot of this):
www.old-url.com
www.new-url.com
Let the program do its magic.
6: DELETE the url-rename.php (or whatever you called the php file) or sneaky, dishonest people will use it.
Congratulations!
That’s it. You should be able to type in the new URL and the site will come up just as it appeared on the old host server with all the posts, images, and pages. Go to wp-admin and enter the same user and password as on the old server and you can edit the site.
Pretty painless, all things considered. Moving the WordPress Installation files is a piece of cake, using Safe Search Replace made moving the database a piece of cake as well.
If you have basic questions, email me and I’ll see if I can help.
When I completed all the work on the kitchen I felt it looked empty and was screaming for an island. The big issue for me is that I didn’t want to invest a whole lot of money in it. I shopped around and figured out it would cost between a minimum of $200-300 to get a size that would compliment the kitchen. I checked thrift shops and flea markets and couldn’t find anything that would work, so back to the drawing board — literally.
The design
Since this would be my first building project ever, I based my island design on a workbench I had found at FamilyHandyman.com. Since I’d never put anything like this together before I figured simple and rustic were appropriate for my skill level and my lack of tool as in no nailer and no table saw.
The whole island would be driven by the top I chose. I did a search and found a Grizzly workbench top for $89 plus $14 shipping that was 24 in. x 36 in. It looked great online and had excellent reviews so I decided when I had the base completed that would be the top I’d get.
I did my own plan so I could figure sizes depending on how much overhang I wanted the top to have. I went with 1 in. on the corners.
Once I knew how big it was going to be I figured out how much the lumber would cost.
Building the base
I didn’t want to invest in a lot of tools, but I clearly needed decent clamps to hold the corners together. After checking at the big box stores and being appalled by how much they wanted for a 12 in. clamp I went to Harbor Freight and got 4 clamps for less than they wanted for one since I had a coupon for $1.99 each. What a deal and I like the clamps — I’ve even reversed them and used them as a spreader on one project, so they’re pretty versatile.
I wanted to screw the base together since I don’t have a nailer. I have always thought I sucked at using a drill to power in screws — perhaps I was using crappy screws.
I got the lumber at Lowe’s and purchased the screws shown on the left. The come with their own square driver bit. I loved the screws.
I cut the legs pieces with my compound miter saw. After cutting I measured and marked each leg so I put the screws in the exact same place on each leg in case they showed when the base was complete. I clamped and glued the legs before adding 3 screws in each leg. The screw side of each leg would be on the side so the front facing part of the leg would look good. Then I assembled the base.
Once the frame was complete, I measured what I needed for the shelf on the bottom, bought a board at Lowe’s and had them cut it to the exact size I needed. My way of getting around not having a table saw.
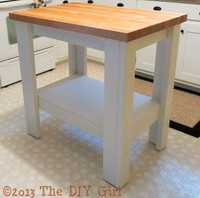
I primed and painted the base the same color as I had painted the kitchen cabinets and while it was drying I ordered the butcher block top to finish it off.
Grizzly Butcher Block Top
The experience of getting the top started reminding me of the materials odyssey for the doing the Shaker update on my kitchen cabinets.
I was so excited when the top arrived. I opened the box and the butcher block was absolutely gorgeous. I removed the broken pieces of the corner protector and found that UPS had dropped the top so hard on one end that even with Grizzly’s great packaging one corner was chipped off.
I called Grizzly, not Amazon even though that’s where I ordered it, because I simply didn’t know what to do. There was no way I could re-package it to send back after cutting the plastic strapping.
The people at Grizzly were wonderful. I emailed pics of the damage and they said they’d send out a replacement and let UPS know to pick up the damaged one.
The second top arrived and had been dropped so hard on one end both corners were mashed in. I was very frustrated. I had a finished base sitting in my kitchen with no top and I was 100% confident that UPS would damage another one if Grizzly was even willing to ship it.
I spoke to the folks at Grizzly and they were willing to send another, but would add additional packaging. The third top arrived and the outside box was torn and trashed in places, but the extra layers of bubble wrap and the second box took all the punishment and the third butcher block top was in perfect condition. Thank you kind people at Grizzly! Shame on you careless people at UPS.
While waiting for the butcher block top I had added nylon feet to the base so it would slide easily on the floor. That maple butcher block weighs a ton so it was a good workout hefting the top onto the base. I used L brackets to secure the top to the base and it was all done. Finally. And I think it looks perfect in the kitchen — of course I’m a little prejudiced…
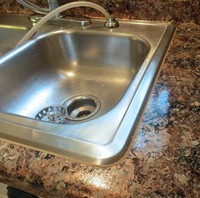
I’m sorry I don’t have “before” pictures, but the sink in this house was so bad when I bought it that I didn’t think it could be salvaged. Whatever workmen had been in the house had used the sink to dump everything and clean everything. It was in horrible condition with drywall mud and paint caked in places. It was terribly discolored from chemicals that had been washed down it. I thought the sink would have to be replaced and I was seriously concerned about the condition of the septic tank, but that’s another issue.
I am a strong believer in Barkeepers Friend for stainless steel sinks. If you’ve neglected the sink or inherited one with lots of stains and build it the stuff works wonders. It doesn’t happen the first time you use it, but if you keep using Barkeepers friend you will see the sink look better and better all the time. If you haven’t used it before, be sure to wear gloves. It has oxalic acid in it and it could burn and irritate your skin.
I’d chipped off all the paint and other stuff that was stuck to the sink being careful not to scratch it anymore than it already was and then started scouring it. It took a while, but I ended up being relieved that it was coming around and I wouldn’t have to buy a new one.
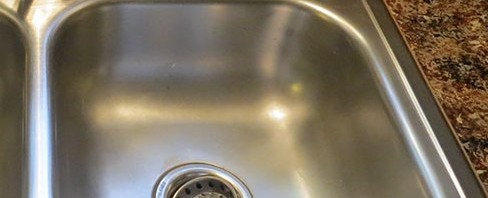
Bar Keepers Friend + Magic Eraser = Gorgeous Stainless Steel
Then one afternoon I was cleaning up the sink from painting and there was a magic eraser sitting out. For some reason I decided to use it along with Bar Keepers Friend. Wow — it took my sink to a whole new level of bright and clean. Except for scratches it looked virtually brand new. It destroyed the magic eraser, but it was worth it.
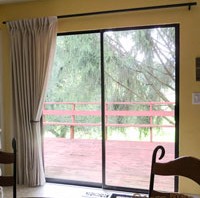
This isn’t a DIY post, but suggestions of how to put curtains on a large window without spending a fortune. Not even close to a fortune.
I had some left over canvas and had already made a roman shade for the kitchen window over the sink so I wanted to stick with the canvas theme for the sliding door in the kitchen. I shopped curtains and rods and they were a lot more money than I was interested in spending on a house that I plan to sell in the not too distant future so I started researching how to do it for as little money as possible and still have it look great.
Curtain
I checked around and ended up getting a 9′ x 12′ canvas painters drop cloth at Harbor Freight for $14.99. Lowe’s and Home Depot sell them for around $20.
I wanted one solid curtain that would slide to one side of the sliding glass door. The only problem with the drop cloth was it’s size made it a beast to wash, iron, and run through the sewing machine.
I opted for a tab top curtain so that I wouldn’t have to purchase rings or any other hardware to hang it. I put the tabs on the back of the header so they don’t show when the curtain is hanging. $15 dollars for a curtain that covers a large window — what a deal.
There are a ton of great DIY blogs entries about using canvas drop clothes and making tab top curtains so you can bone up on ideas before starting your project.
Curtain Rod
Another blog supplied me with the idea to use metal conduit for the rod. I went to Lowe’s and purchased a 10 foot section of 1″ conduit for $6.77. I had already measured and determined what length I wanted the rod to be and was lucky enough to find a nice man at Lowe’s who cut it to size before I left the store.
I would have preferred a matte black to paint it with, but I already had a nearly full can of a hammered glossy black Rustoleum so I used that. Otherwise it would have been another $4 for paint.
You can spend some money on finding something fun to use as finials. I dug around the garage and found some wooden knobs that I sprayed with the same black paint and glued them in the ends of the conduit. Since one end was against the wall and the other end not far from the upper cabinets I didn’t feel they were a focal point.
Curtain Rod Brackets
1″ conduit is fairly heavy so I wanted strong supporting brackets for it. I ruled out the type of bracket on the left because it seemed like I could end up bending it down with repeatedly pulling the curtain back and forth.
I found the brackets on the right at Ebay for $5 each (I thought that was a somewhat ridiculous price).The design seemed like it would do a better job of supporting the heavy conduit. They were a matte black so I sprayed them with the Rustoleum so the rod and brackets would match. I mounted them with a good hollow wall anchor to make sure I wouldn’t be pulling them out of the wall.
The Result
I spent some time pleating the curtain after it was hung and for a grand total of $32 I have a great window covering on my sliding glass door that matches the curtain over the sink. I’m very happy with the result and that I will enjoy having and will be an asset when selling the house.
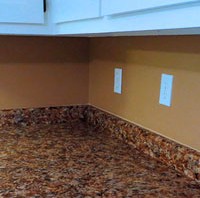
I was looking for a low-cost solution for the kitchen backsplash. I had painted the walls a gold that matches the color in my countertops using Benjamin Moore chalkboard paint, but wasn’t sure where I wanted to go from there. Maybe do some artwork with chalk or just settle for being able to jot down shopping items?
I had been thinking about the large decal mural my niece-in-law Brandy had done and was browsing decals for ideas.
Shopping and decision-making
Dali Decal website
Then I found Dali Decals.These folks have some great decals and the mini poppies that I loved were only $10 a set. I ordered two sets. When I clicked on the page they have an image of the decals as a backsplash and even allowed you to change the cabinet color, sink color (I had to pretend it was my countertops I had just painted with Giani paint), wall color, and then the poppy color to test your ideas. Different decals have different options.
This was a life saver for me — I had thought about trying to pick up the copper I put in the countertops, but all combinations I tried looked awful. I kept changing things until I found I like picking up the gold in the counters as the wall color and then black flowers to tie with the black cabinet hardware and pull out the black in my counters.
The decals and set up
It takes a while to get the decals. I suspect they wait until there are orders and then cut them so it was about a week and a half before they arrived. The shipping date was several days after the order date.
The decals came on 4 sheets, so I cut the individual flowers out and used painters tape to tape them on the wall and decide where I wanted them. I wanted them somewhat randomly spaced so it wouldn’t look too regimented. Once that was done, I used a level to make a chalk line for each flower so they’d be straight and I spaced them about 3/8″ from the top of backsplash and stove top so I could wipe down the counter backsplash and even re-caulk and not have a problem with the flowers. I don’t know if chalk was a bad idea since it could interfere with adhesion, but they all seem to be firmly stuck to the wall.
Cut decal, provided squeegee, painters tape, chalk for applying the decals
Working on decal application – flowers taped up and Nikki supervising
You first remove a stiff paper backing from each decal, smooth the decals on the wall where you want them, use the squeegee to firmly attach each decal to the wall, and then carefully remove the transfer paper from the top of the decal. I had to be really careful to not pull the little petals and stems away from the wall. If anything seemed to be pulling up I stopped and used the squeegee more. It’s pretty easy.
Working on decal application – flowers taped up and Nikki supervising
Standing back and admiring
After 2 sets of decals I think it’s too sparse so I ordered 2 more sets
I put my tools away, put appliances back in place, stood back at the doorway to the kitchen to admire my handiwork and had two thoughts. 1. I really liked the flowers for an economical, cute backsplash and black was the right choice. 2. They were too sparse. There simply wasn’t enough of them for the space.
I got online to order another two sets in the hopes that going from 20 to 40 flowers would be enough.
Two more sets applied
I added the two additional sets and I’m satisfied with the look. Keep in mind this is a house that I purchased as a foreclosure and my goal here is to fix it up and sell it for a profit. I don’t want to put and arm and a leg into unless I absolutely have to.
I didn’t think I’d like the appearance of clear acrylic (recommended by Giani) around my sink so I ended up ordering color matched caulk (see my post Matching caulk after Giani Granite Paint) so it was way, way past 12 hours by the time I caulked my sink. To be honest — I was putting it off because I dreaded doing it. I thought this would need to be “freehand” caulking with no wipe down and I didn’t see myself doing a good job at that, especially in the nearly impossible-to-get-to back edge of the sink. And I didn’t want to look at a lousy caulk job around my sink that would detract from the gorgeous countertops. I checked with Giani Just to make sure I didn’t steer anyone in the wrong direction I called Giani to ask about their directions on caulking the sink after using their products to paint the surrounding countertops.
Their directions say:
Roll on your final Topcoat., then wait . . . – 1 hour and carefully remove tape – be sure to score the tape’s edge while pulling it up – 12 hours and apply clear acrylic caulk around sink’s rim to seal out water – one day before using your countertops and dishwasher – three days before setting small appliances back on your countertops
When I spoke to Giani they said the 12 hours was an absolute minimum, but your could do it any time after that. Personally — I wouldn’t mess with it until it had dried longer. If the top coat wasn’t completely set up you could make a real mess. Method for caulking As I said — I had a low level of confidence for doing it freehand so I used painters tape. Painters tape is great for straight lines but what about rounded corners. I drew up a template using a bottle (ended up being a vitamin bottle) that was the same roundness as the corner. I used the template to cut pieces of wide painters tape that would span the corners.
Once the tape was marked with a Sharpie I found scissors didn’t work for cutting because the tape stuck to them. I went to using my rotary cutter and carefully making the turn on the corner and that worked great. Here’s what the taped sink looked like when I was done.
taped and ready to caulk
I left a little over an 1/8th inch gap. This wasn’t precise because I don’t think there’s a way to be precise, but it was close enough. Next I applied caulk all the way around — I took no care to do it perfectly because I was going to flatten it out anyway. I used the tip a spoon (experiment with the right curvature) and ran it all around the sink to push the caulk firmly into the gap and smooth it.
caulk applied with no precision at all
I allowed the caulk to dry for just a few minutes so it wouldn’t be too runny and make a mess when the tape was pulled. I got a grocery bag ready by hanging from an upper cupboard handle so I could dispose of the tape easily. I then very carefully pulled the tape straight up and away from the sink. Remember the order you tape the sink and reverse it for the tape removal. The tape is really messy, so be careful to not get it all over — you might want to wear gloves. I ended up being really glad I planned in advance and had a bag handy for disposal. The good thing about waiting quite a while after doing the countertops was the Giani top coat was so hard that nothing pulled up with the tape. I have no idea how long you have to wait so this won’t be a problem. It’s been about 4 weeks since I did the top coat. The results Here are the final pics of how the caulk turned out. Yes, it was a lot of work for a little caulk job, but it would be a shame to ruin the appearance of the countertops. The caulk looks perfect — even on the back edge. Doesn’t the countertop look great too :-)?
Caulking sink after Giani Granite Paint – The DIY GirlCaulking sink after Giani Granite Paint – The DIY GirlCaulking sink after Giani Granite Paint – The DIY Girl
The Giani instructions for painting the countertops were very clear they expected you to caulk around the sink and along the backsplash when the paint completely dry. Duh. I didn’t dawn on me that my custom paint job wasn’t going to match any of the limited selection of colors at the big box stores — they carry white, almond and clear caulk, none of which would look good or cover the gap between the backsplash and wall that didn’t have a perfect paint edge. I needed an opaque caulk that would cover the paint edge and it needed to be a waterproof caulk to work in the kitchen where it would be getting wet.
I had matched the Inca gold color from Giani and painted the backsplash area that color, so my caulk needed to be Inca gold. I found a mix yourself caulk online, but when reading the details, I found out it was not waterproof. That wouldn’t work.
Color Rite
I researched more and found Color Rite adhesives. Their caulk is waterproof and available in a huge palette of colors. I sent them a paint chip of the color so they could match it for me. No custom color was required since they had a stock color that would match my paint and the Inca Gold Giani paint.
I spoke several times to the people at Color Rite and they were great to deal with on every call. The cost of the caulk isn’t jaw dropping, but you better be sitting down when they tell you the price of shipping. They were apologetic, but said the residential rates they got with UPS were high and they simply passed them on to the customer with no mark up. Around $13 for the caulk and $15 for shipping. For someone who refuses to order much of anything unless the shipping is free, this was a heart stopper, but I wanted their matching caulk.
And the color is absolutely perfect, the gold in my countertops, the gold on the walls, and the caulk all match beautifully (the caulk was still wet in the pictures so it looks lighter). But I felt like I was applying gold – the metal, not the color.
This leaves only one more step to go on the kitchen makeover – the backsplash.
I tried Facebook and other than seeing pictures of the family I just couldn’t get into it. I tried Twitter and felt it was an incredible interruption for which I wasn’t garnering a whole lot of useful information. I rate myself pretty much a failure at social media — it just doesn’t seem to be how my brain and personality work.
Enter Pinterest. I had heard of it, but never really examined the site. I was researching ideas for mu DIY projects realized I was running into a lot of images from Pinterest that would link to the original blog or article that explained the process. It was love at first site. I am a very visual person — don’t tell me about a project, show me a picture. Better still, demonstrate how you did it. Maybe that’s why the one form of social media that seems to really work well for me is Pinterest.
Talk about a great filing system for visual images — set up a board on a particular topic (mine so far are storage ideas, decor ideas, recipes and how to for cleaning, how to (instructions), camping, garden and outdoors, cool products, sewing, crochet, entertaining, and holiday decor as can be seen at pinterest.com/IamTheDIYGirl/boards/. When you find a picture or technique that you love just Pin It and it’s saved to the appropriate board so you can easily find it later. It’s a great big filing cabinet filled with pictures that most often lead to how to do it. I am truly in love.
So I’ve added the pin it button to my browser and am working at making my post images more Pinterest friendly. Big thank you to the folks at Pinterest — what a great idea. But an even bigger thanks to the people who pin all the great ideas.

 So I looked online to see if anyone had painted a fan and there were a few who had. My concern was about spraying paint into the motor and what effect that would have, but no one seemed to address that.