
When I completed all the work on the kitchen I felt it looked empty and was screaming for an island. The big issue for me is that I didn’t want to invest a whole lot of money in it. I shopped around and figured out it would cost between a minimum of $200-300 to get a size that would compliment the kitchen. I checked thrift shops and flea markets and couldn’t find anything that would work, so back to the drawing board — literally.
The design
Since this would be my first building project ever, I based my island design on a workbench I had found at FamilyHandyman.com. Since I’d never put anything like this together before I figured simple and rustic were appropriate for my skill level and my lack of tool as in no nailer and no table saw.
The whole island would be driven by the top I chose. I did a search and found a Grizzly workbench top for $89 plus $14 shipping that was 24 in. x 36 in. It looked great online and had excellent reviews so I decided when I had the base completed that would be the top I’d get.
I did my own plan so I could figure sizes depending on how much overhang I wanted the top to have. I went with 1 in. on the corners.

Once I knew how big it was going to be I figured out how much the lumber would cost.

Building the base
 I didn’t want to invest in a lot of tools, but I clearly needed decent clamps to hold the corners together. After checking at the big box stores and being appalled by how much they wanted for a 12 in. clamp I went to Harbor Freight and got 4 clamps for less than they wanted for one since I had a coupon for $1.99 each. What a deal and I like the clamps — I’ve even reversed them and used them as a spreader on one project, so they’re pretty versatile.
I wanted to screw the base together since I don’t have a nailer. I have always thought I sucked at using a drill to power in screws — perhaps I was using crappy screws.
I got the lumber at Lowe’s and purchased the screws shown on the left. The come with their own square driver bit. I loved the screws.
I cut the legs pieces with my compound miter saw. After cutting I measured and marked each leg so I put the screws in the exact same place on each leg in case they showed when the base was complete. I clamped and glued the legs before adding 3 screws in each leg. The screw side of each leg would be on the side so the front facing part of the leg would look good. Then I assembled the base.


Once the frame was complete, I measured what I needed for the shelf on the bottom, bought a board at Lowe’s and had them cut it to the exact size I needed. My way of getting around not having a table saw.
I primed and painted the base the same color as I had painted the kitchen cabinets and while it was drying I ordered the butcher block top to finish it off.
Grizzly Butcher Block Top
The experience of getting the top started reminding me of the materials odyssey for the doing the Shaker update on my kitchen cabinets.
I was so excited when the top arrived. I opened the box and the butcher block was absolutely gorgeous. I removed the broken pieces of the corner protector and found that UPS had dropped the top so hard on one end that even with Grizzly’s great packaging one corner was chipped off.
I called Grizzly, not Amazon even though that’s where I ordered it, because I simply didn’t know what to do. There was no way I could re-package it to send back after cutting the plastic strapping.
The people at Grizzly were wonderful. I emailed pics of the damage and they said they’d send out a replacement and let UPS know to pick up the damaged one.
The second top arrived and had been dropped so hard on one end both corners were mashed in. I was very frustrated. I had a finished base sitting in my kitchen with no top and I was 100% confident that UPS would damage another one if Grizzly was even willing to ship it.
I spoke to the folks at Grizzly and they were willing to send another, but would add additional packaging. The third top arrived and the outside box was torn and trashed in places, but the extra layers of bubble wrap and the second box took all the punishment and the third butcher block top was in perfect condition. Thank you kind people at Grizzly! Shame on you careless people at UPS.
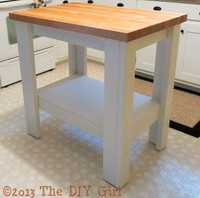
While waiting for the butcher block top I had added nylon feet to the base so it would slide easily on the floor. That maple butcher block weighs a ton so it was a good workout hefting the top onto the base. I used L brackets to secure the top to the base and it was all done. Finally. And I think it looks perfect in the kitchen — of course I’m a little prejudiced…
Total project cost
| QTY | ITEM | EA | COST |
| 6 | 2 x 4 | 2.86 | 17.16 |
| 1 | wood screws 2 1/2″ box of 50 | 7.97 | 7.97 |
| 1 | wood for shelf | 15.00 | 15.00 |
| primer and paint (leftover from cabinets) | – | – | |
| Total for base | 40.13 | ||
| 1 | butcher block top – Grizzly G9912 | 104.00 | 104.00 |
| Total for island | 144.13 |


