This isn’t a DIY post, but suggestions of how to put curtains on a large window without spending a fortune. Not even close to a fortune.
I had some left over canvas and had already made a roman shade for the kitchen window over the sink so I wanted to stick with the canvas theme for the sliding door in the kitchen. I shopped curtains and rods and they were a lot more money than I was interested in spending on a house that I plan to sell in the not too distant future so I started researching how to do it for as little money as possible and still have it look great.
Curtain
 I checked around and ended up getting a 9′ x 12′ canvas painters drop cloth at Harbor Freight for $14.99. Lowe’s and Home Depot sell them for around $20.
I wanted one solid curtain that would slide to one side of the sliding glass door. The only problem with the drop cloth was it’s size made it a beast to wash, iron, and run through the sewing machine.
I opted for a tab top curtain so that I wouldn’t have to purchase rings or any other hardware to hang it. I put the tabs on the back of the header so they don’t show when the curtain is hanging. $15 dollars for a curtain that covers a large window — what a deal.
There are a ton of great DIY blogs entries about using canvas drop clothes and making tab top curtains so you can bone up on ideas before starting your project.
Curtain Rod
 Another blog supplied me with the idea to use metal conduit for the rod. I went to Lowe’s and purchased a 10 foot section of 1″ conduit for $6.77. I had already measured and determined what length I wanted the rod to be and was lucky enough to find a nice man at Lowe’s who cut it to size before I left the store.
I would have preferred a matte black to paint it with, but I already had a nearly full can of a hammered glossy black Rustoleum so I used that. Otherwise it would have been another $4 for paint.
You can spend some money on finding something fun to use as finials. I dug around the garage and found some wooden knobs that I sprayed with the same black paint and glued them in the ends of the conduit. Since one end was against the wall and the other end not far from the upper cabinets I didn’t feel they were a focal point.
Curtain Rod Brackets
 1″ conduit is fairly heavy so I wanted strong supporting brackets for it. I ruled out the type of bracket on the left because it seemed like I could end up bending it down with repeatedly pulling the curtain back and forth.
 I found the brackets on the right at Ebay for $5 each (I thought that was a somewhat ridiculous price).The design seemed like it would do a better job of supporting the heavy conduit. They were a matte black so I sprayed them with the Rustoleum so the rod and brackets would match. I mounted them with a good hollow wall anchor to make sure I wouldn’t be pulling them out of the wall.
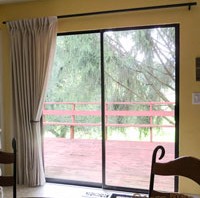
The Result
I spent some time pleating the curtain after it was hung and for a grand total of $32 I have a great window covering on my sliding glass door that matches the curtain over the sink. I’m very happy with the result and that I will enjoy having and will be an asset when selling the house.


Comments
5 responses to “Ideas for low cost curtain and curtain rod”
Great idea
No racket in the middle? I really don’t want a middle racket but am finding I need it for support?
The conduit is so strong there’s no need for a center bracket. There was no bowing at all.
Love the idea! I was just going to use a flat sheet but I like this better! What does tab top mean? I see you didn’t spend any extra money for it but there aren’t any pictures of what they look like. Did you have to iron it to make the pleats so perfect?
Duh – I didn’t show how I sewed the tabs. This website shows a good example: http://mochihome.com/general/real-life-makeover-diy-hidden-tab-top-curtains/ except I didn’t want to buy anything so I sewed strips made of the painter’s drop cloth fabric. Figure out what size pleats you want and place the tabs the distance apart that will give you the correct pleat.
I learned how to pleat curtains from my mother who was a curtain perfectionist. As soon as you hang the curtains arrange the pleats exactly how you want them using straight pins to hold them in place. I usually put pins near top, middle and bottom with 2 or three pleats pinned together. Leave them pinned for a week and try unpinning to see if they hold the pleat – it depends on the fabric and weather. If they don’t hold just leave them pinned longer. It looks funny for a while, but you’ll end up with great pleats.
Let me know if you have more questions.