This may well become one of my favorite pictures of Nikki lying in the sunlight. It was a pain stepping around her but you gotta love that she’s a constant companion.
I decided since the cabinet frames were painted and I was hitting a brick wall on finding 1/4″ MDF at a lumber yard that would cut it into 3″ strips so I could update the cabinet doors that I should go ahead and unpack some boxes so I could cook more.
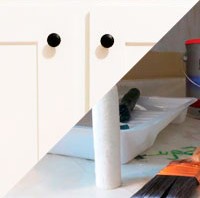
Unpacking the boxes would also make it easier for me to get to the walls to remove the remaining chair rail, repair the drywall, and paint the walls. You can see the chair rail running along the wall behind the microwave.
Besides, it was a blessed relief to have a full set of dishes, silverware, food prep, and backing dishes. Amazing how much you miss the stuff when you don’t have it.
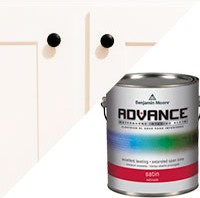
After everything was put away it was time to get the chair rail off and repair the drywall where it had been. This was going to be especially important since I was using a satin paint that would show all the flaws in the drywall. I was planning on getting Clark + Kensington from Ace Hardware again.
Repairs
Future home for light over sink, soffit scraped clean of popcorn, primed and ready for paint
I filled all the holes and spread a thin coat of mud to eliminate any sign of where the chair rail had been. I then sanded it with a drywall sanding screen, filled a few problem areas, allowed that to dry, and sanded again. The kitchen walls were easy (other than the sanding dust).
I had an electrician out to add outlets along the backsplash, wire an outlet for a light over the sink and run a switch for it. I hung the new sink light.
I’d removed the board that had hidden a cheap flourescent light over the sink that had a cord going to one of the backsplash outlets. Not only was this ugly, but violated code.
Popcorn on soffit and ugly board over sink
I had already sprayed the soffits with water and then scraped off the popcorn texture so I could paint them the same color as the walls. Removing popcorn is a messy job. Who puts popcorn on soffits???
The last thing I did was caulk along the baseboards all around the room. I taped off the cabinets and the baseboards after the caulk had dried and I was ready to paint. Woohoo!
I won’t go into detail — after everything else I’ve written about painting kitchen cabinets it would be about interesting as, well, watching paint dry. So just some observations.
Read the label
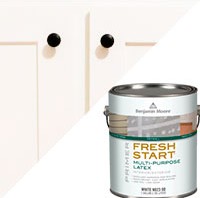
As mentioned I am using Benjamin Moore’s ADVANCE Waterborne Interior Alkyd Paint – Satin Finish (792). I got curious about Alkyd — their site says Water Reducible Alkyd. Apparently the major components of an alkyd coating are fatty acids and triglyceride oils and are not petroleum products, but slow the drying time so you end up with a harder finish. On kitchen cabinets this is a good thing.
If you try the paint be sure to read the label. It is water clean up, but because of the alkyd oil they recommend a final rinse in mineral spirits for your tools. This is how my tools looked yesterday after soaking in paint for the 3 hours it took me to do the second coat.
Cleaned and ready for next coat
The other important difference is the drying time. They say a minimum of 16 hours before sanding and applying another coat. I let it dry longer since the house is only around 65 degrees.
Technique
I feel the second coat went better, but that was because it got down to a routine that I knew worked. The upper cabinets take the longest, partly because I’m painting the shelf fronts, partly because the bottoms of the upper cabinets need to be painted, and partly because there are more of them. The base cabinets probably only took 45 minutes, including painting the toe kick area.
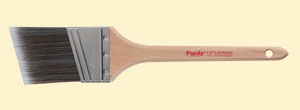
I did treat myself to a new short handled brush to make easier working inside the cabinets edges — I purchased a Purdy XL Cub. The stubby handle is great for working in small spaces.
I suggest a very, very light touch with the roller to prevent runs. There are so many edges and corners when painting cabinets that any pressure could unknowingly leave a load of paint that will run after you have moved on to the next section.
With great sadness I gave up on using a foam brush and went back to my old stand by — quality bristle brushes. I may have had to spend time cleaning, but the application was so superior I was glad I made the switch. The XL Cub did a such a nice job.
Cleaning
The mohair roller and brush clean up first with soap and warm water. I always use Dawn dish detergent because it contains grease and oil cutters. After getting as much moisture out as possible with a towel, I then dunked both in mineral spirits and squeezed that out. They look virtually unused after cleaning.
If you use a painter’s tool with the crescent shape to get water out of the little rollers be very gentle. I was too rough after the primer and started loosening tufts and felt the smart thing was to discard that roller or the loose tufts would end up in the paint. I quit using the painter’s tool and used my hands only to remove water and it worked a lot better. The painter’s tool is a new thing for me and I’m not good with it yet.
The plastic rolling tray, brush, and roller are all in perfectly good condition to be used again.
Over the years I have replaced quite a few ceiling lights with a ceiling fan/light. Since I tend to be frugal with my air conditioning dollars, fans are important for comfort in the hotter months.
Ceiling lights don’t require a whole lot of support, unless they have to be a chandelier so support is the biggest issue when replacing a standard ceiling fixture with a fan. It’s not just the weight of the fan, but the vibration and movement when it’s running.
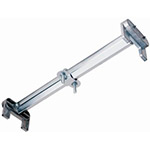
I have had great luck using the Reiker 33000. It’s a really solid support that inserts through the standard opening for ceiling fixtures and then you turn it to extend it out to embed the feet into the rafters on either side of the hole. Once properly installed you can hang from the support, so it definitely will hold the weight of a fan.
After it’s properly installed all you need to do is install an electrical box, pulled the wires through and start the fan installation. This is, of course, all done with the breaker switch in the off position from the time you start to remove the old light fixture and until you have completed the fan install. No getting knocked off the ladder by an electrical zap.
My most recent conversion to a fan was the most problematic I’ve encountered. The flimsy support for the existing fixture was nailed in and required a trip into the attic to remove the old support. From that point forward the install could be completed from the room.
Fan selection
Fan from Lowe’s
Since I am most likely updating this house to sell I don’t want to invest in expensive fixtures so I decided to try the Harbor Breeze 52-in Armitage White Ceiling Fan with Light Kit from Lowe’s. It sells in my area for $38.88. It’s a cute fan when installed, but I have no idea how it will hold up with use. I will report on how it works after using it for a few months.
The installation instructions were excellent and the fan installed easily. The wiring diagrams were very straight forward.
I like how the light looks and so far the fan itself runs very quietly.
As long as you are comfortable with electrical wiring, this conversion is something any homeowner can do on their own.
This is purely an opinion and maybe a discussion point, but I’m pretty much opposed to the extended use of paper towels.
I have been at the homes of friends and watched in amazement as they roll off yards of paper towels to wipe up things and then throw the whole mess in the trash. The whole time I’m puzzled why they didn’t just wipe it up with rags.
When I use paper towels
I try to use rags as much as possible and try to limit my use of paper towels to things that are too gross to put in the washing machine.
In the end — there aren’t that many things that can’t go in the washer and it takes me forever to go through a roll of paper towels. I use paper towels to cool some cookies on when removed from the oven. Other than that — like I said, it takes me a long time to use a roll of paper towels.
Camping is an exception, since disposability is plus..
When I don’t use paper towels
This all needs to be balanced out with the fact I have an abundance of rags. My mother was a smoker and when she died I brought her towels home and watched them disintegrate along the edges that had been exposed to the smoke. (Boy — is that an anti-smoking example or what? If it eats fabric what the heck is it doing to lungs?) All those towels have been reduced to rags.
But my non-use of paper towels is also based on my use of toilet paper to clean up the rare instance of dog poop in the house. I figure that can be flushed down with the rest of the poop.
Dog vomit? I clean it up with rags and wash them. Even oily crap from working on automotive stuff. I wash them alone, but I wash them.
My reasoning
I don’t want to add to the mountains of landfill with piles of paper towels from my home. I don’t want to spend the money on rolls of paper towels when I have an ample supply of rags in my house.
My thinking could be all wrong — maybe the energy to heat the water, the water used to wash the rags, and the power to run the dryer to dry the rags is far worse than paper towels in the landfill.
I’m just doing what I think is best for the environment and I thinking reusing beats constant disposing almost every time.
I recently read a post by another blogger who stated she only uses disposable rollers and foam brushes. She admitted it wasn’t “green”, but it was easy.
While I agree (and love) the ease, there are overriding issues with these two brush types.
Why I hate bristle brushes
When I was a little girl my skills were not deemed good enough to paint, but they were deemed good enough for clean up. So while the big people painted, the pans, rollers, and brushes were handed to me to clean. And the big people were picky. Needless to say I got really good at cleaning.
The funny thing is how the nasty tasks you’re stuck with as a child become the tasks you absolutely abhor as an adult. I can get through the biggest painting project without batting an eye, but I totally blanch at the clean up that inevitably follows. If I felt okay with it, throwing it all away would be absolute bliss for me. Unfortunately I still have those brushes of incredible quality that my dad used to paint with so I am forced to care for them.
Forced isn’t really an accurate term — I lovingly care for those brushes because in doing so I remember the man who used them and taught me how to use them with skill. Still hate the whole brush cleaning process. Sorry daddy.
Why I love (quality) bristle brushes
There’s more to foam brushes vs. brushes you clean and keep than “easy” or “green” — there’s quality of application.
I’m not buying that anyone can cut in along the ceiling with a foam brush. I also don’t believe anyone can get paint up into tight corners with a foam brush. Top this off with the fact that they quickly break down and don’t last long enough to complete a big project.
Case in point: I’ve been painting kitchen cabinets for the first time in my life. I bought high quality mohair rollers (which I would want to clean) and tried to get by with foam brushes for all the corners, etc.
There were several problems with the foam brush. It didn’t apply a nice coat of paint to the cabinets where I used it. When I was working on the bottom of the cabinets (the most dreaded part of this operation) I could not, for the life of me, force paint up into the corners. Wouldn’t you think foam would do a better job than bristle? Wrong. No matter how much I tried, I couldn’t get paint up there.
On the second coat of paint for the cabinets I switched to a quality bristly brush. Where I had been totally unable to fill paint into the corners, it flowed in with no problem. Where the foam brush provided smeared coverage of boards that couldn’t be rolled, the brush flowed paint on with smooth coverage.
One the baseboards (where I was trying to cover black with snow white) the brush flowed paint on with thorough coverage.
It was a thing of beauty.
Final analysis
While I absolutely detest cleaning brushes after a paint job, I have such good results when cutting in around ceilings, windows, doors, and baseboards, filling paint into corners that I will suffer the pain of cleaning brushes for the outstanding application.
Where do I think foam brushes are perfect? I always keep a stash of touch up paint (in old peanut butter jars that have rubber seals) and a good quantity of foam brushes for touching up spots on the walls to keep them looking perfect. That way me and the dogs don’t have to be perfect. Accidentally slam a chair into the wall? Throw a dog toy that marks the wall? No worries — take a few minutes every once in a while to touch up the marks.
Big project? Use a high quality brush that’s appropriate for the type of paint you’re going to use. Personally, I love Purdy brushes, but I suspect Wooster and others are also good.
And be patient with yourself. Learning to cut in is a skill that includes knowing what side of the brush to load the paint on, how much paint to load, and how to angle the brush. It takes practice, but once learned provides beautiful results. And painting can become fun. I’m not sure the clean up can ever be fun…
I have been very frustrated that other blogs have introduced the idea of a Shaker kitchen cabinet update and then provided next to NO details on how to do it. No mention of what wood, what thickness, what width strips, how they cut it, what type of adhesive they used. Nothing. Very frustrating.
So for better or worse, I’m going to provide excrutiating detail of what I do with this Shaker kitchen cabinet update. I will tell you what I do and whether it works or not.
The paint
Since I want the paint to bind really well to the cabinets my plan is to err way on the side of caution with drying time.
I put the primer on yesterday, so I allowed the cabinets to dry overnight before painting.
After reading the post at Young House Love on cabinet painting I purchased Benjamin Moore’s Fresh Start Primer and Benjamin Moore’s Advance Waterborne Interior Alkyd Paint – Satin Finish. The primer went on yesterday and I applied the first coat of paint today. For both primer and paint I’m working with a mohair blend roller for the smoothest finish possible.
I followed the same routine I used for the primer written up in a previous post. The primer had allowed a lot of the green paint on the cabinets to show through, but this first coat of paint finally covered it up. I was not sorry to say goodbye to the green paint.
I am hoping I can get by with 2 coats of paint over the primer, but will do a 3rd coat if it’s needed to cover well. I will allow a lot of drying time between coats (more than specified on the can) to make sure I get good adhesion.
First coat
Here’s how the cabinets are looking after a coat of primer and one coat of paint. The can says 16 hours drying time — I gave it 24 hours.
First coat of paint
Second Coat
I took a day off to let my hands recover. Between the split skin on my thumbs from all the drywall work and the oops cut I added today when carving the polystyrene I think my hands need a day off to recover. It would give the paint more time to dry.
Second coat of paint
The second coat looks great. Note how nice the trim I added at the top of the cabinets looks with a coat of paint on it 🙂 It all looked good enough that I pushed the stove and refrigerator back even though I feel I need to put another coat on the bottoms of the upper cabinets. I’ve been laying on the counters to do that so the appliances won’t make a difference.
So far I’m happy with what I chose to paint. I think painting the front edges of the shelves in the upper cabinets is going to give them a great appearance when the doors are open.
I do think I will roll a third coat of paint on the fronts of all the cabinets because I’m applying such thin coats.
Now if I can find someone to help me cut the wood I need to make-over the door and drawer fronts. So far I’m not having any luck. I’ve started wondering if I should just them white as is and see how that looks.
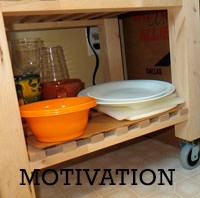
I moved here knowing I didn’t like the kitchen in a lot of ways. So my way of figuratively holding a gun to my head was to pack a temporary kitchen kit with the promise I would not unpack the kitchen boxes until the cabinets were painted.
My cooking area and cabinet area
That kitchen kit:
1 dinner plate
1 sandwich plate
4 plastic bowls
1 soup cup
2 coffee cups
3 water glasses
2 knives
2 spoons
2 forks
3 food prep knives
1 12″ skillet
1 8″ skillet
1 pan
That’s it. Okay — I did include a wine bottle opener and plastic wine glass. I needed to celebrate my move, after all. As one person commented — I’m not exactly entertaining large groups. I’m cooking simple meals like chicken, veggies, and pasta. I have access to the microwave, toaster oven, and stove.
The only unpacked dishes
I’ve posted a lot of pictures of my progress on the kitchen that show the refrigerator and stove pulled out for painting. I’m amazed how easily the stove slides — they put friendly feet on them. The last few days I’ve been cooking with it out in the middle of kitchen. It’s a little weird, but it works.
I can’t use the dishwasher because I only have two plates, but everything stacks neatly on the shelf of the microwave cart I purchased at Ikea. I’ve got that going for me.
So am I motivated to get the cabinets painted? You bet I am. I would be thrilled to simply have the kitchen cleaned up and no longer looking like a construction zone.
I am toying with the idea I can unpack the boxes as soon as the cabinet frames are done and then add the doors and drawers as I get them completed. That should be a little mess when I drill for the hinges, but that should vacuum up easily.
Motivation thy name is minimal equipment. It’s sort of been like camping indoors with a big difference — I have a full refrigerator and freezer 🙂
While painting I realized this would be the time to do something about the gaps between the tops of the wall cabinets and the soffit above them. I wanted molding, but it needed to be fairly narrow so it wouldn’t interfere with the cabinet doors.
I went to the store shopping for wood molding but couldn’t find the simple cove look I wanted in primed pine and unwillingly stumbled onto what may be one of my new favorite things — polystyrene molding. As I drove home with the molding I figured I had made a mistake. It probably would disintegrate when I cut it and clearly look like plastic when installed. I almost turned around to get something else.
Since it was only $3.19 per eight foot section I tried a preliminary cut on my miter saw to see if it would even work. I was pleased with the result.
The the fascia boards along the sink aren’t flush with the side walls of the cabinets and extend out about 1/8th of an inch. The polystyrene was very easy to cut with a skill knife to notch out so the trim would fit flush. At this point I was thinking maybe the polystyrene wasn’t so bad.
I did a little checking online and it was recommended to use caulk to basically glue it in place.
Installing
The molding is so light in weight that it was easy for me, working alone, to place the caulked strips in place and press them until the caulking held. The corners mitered easily As you can see in the picture below.
By the time I was about half done I was in love with the stuff. It was so easy to work with, it cut great, It looked great on the wall. It’s the perfect trim to finish off the cabinets and it cost under $10.
I wasn’t able to completely finish because I ran out of caulk. The trim is installed, but I need to run a bead of caulk about and below the trim to blend it into the wall over the stove and refrigerator.
I can’t believe how great it looks. The next coat of paint on the cabinets will make it look like it’s always been a part of them.
I’m already thinking of more projects for foam molding — like the cornice I would like to make for the living room window.
Area I had to carve to fit flush to cabinets
If you’d like to see a really great how-to video on working with foam molding check out this video by Ron Hazelton:
I believe the first thing you need to do when contemplating painting cabinets is to take a real long look and decide how much. Just the face of the cabinet frames and the outside of the doors? Paint everything including the insides.
Personally, even if you held a really big gun (and I mean something like a bazooka) you could not make me paint the inside of cabinets and fortunately I have cabinets with decent interiors.
How much do you want to paint?
So how much did I want to paint. The current green is only on the outside of the doors and I had already decided I wanted to paint both sides of the doors. Next the cabinet frames. I want them to really feel like white cabinets when I open the doors (hence painting the inside of the doors) so I scrutinized where I wanted to draw the line on white. I wanted to let difficulty dictate it — not going to go there if it was too hard to do.
The shelves on the base cabinets were recessed so I wasn’t worried about them. The design of the base cabinets made it easy to paint the inside of the door opening. I felt the upper cabinets needed the same treatment — paint the inside of the door opening. Paint the front of the shelves? The are covered with trims that cups the front edge of the shelves so I decided to paint the top, front, and bottom of this trim.
You have to make these decisions first so you know what to prep. The more you paint the more you prep — unless you’re painting everything.
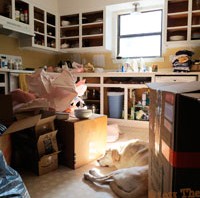
I covered the table and all the boxes of my packed kitchen with plastic and taped plastic over the doorway to to living room to try to contain the sanding dust.
Hardware removed and everything washed
It’s important that all grease, oils, and dirt be removed so that nothing interferes with the paint adhering, so after I had removed the doors and drawers and taken off all the hardware I used a strong solution of Dawn dish washing soap (known for it’s grease cutting) and a scrubbie pad and scrubbed the living daylights out of every surface I was going to paint.
After washing I went back and thoroughly rinsed everything to make sure there was no soap residue left on the surfaces. Again — maybe this was overkill since I was going to be sanding, but after seeing the sides of the stove I chose to err on the side of caution. Nothing would be worse than painting all the cabinets and several months down the road have the paint start peeling.
cabinets sanded
I used my palm sander with 60 grit sandpaper and went over all the surfaces I planned to paint. I followed up with 220 grit paper to smooth the surface.
It may have been overkill but after cleaning up all the sanding dust, I followed this with wiping all the surfaces with deglosser. I know there are VOC versions of this stuff and I would recommend getting it. I had the non-VOC version and the fumes were horrible. The rag I used went outside as soon as I finished.
Last thing to do was to tape off the bottom shelved of the wall cabinets to delineate the inside of the opening from the floor of the cabinet.
taped edge
FYI – I dreaded pulling out the stove. I wasn’t sure how it would slide over the floor and expected the floor underneath it to be gross. The floor wasn’t gross. The sides of the stove were disgusting. Lots and lots of cooking grease has run down the sides and never been cleaned. Note to self — if you live somewhere with a stove, pull the things out once a year and clean the sides. I’ve lived with a built-in oven and cooktop previous to this, so never had to deal with it.
Note the grease running down the sides
Ready for Primer
After a lot of sanding, washing, and deglossing I felt the cabinet frames were ready for primer. Painting cabinets is such a big job I wanted to make sure the paint stuck really well.I didn’t mention, but I also sanded and deglossed the black toe kick board under the cabinets so I could get it painted white to match the cabinets.
Putting on the primer
Painting the frames is covering a lot of narrow areas. I opted to use a wool small roller to get the smoothest finish possible. You have to use a really light touch with the roller to avoid runs. I used a brush to get the corner of the openings, along the wall, and the sides of the shelf trim close to the door openings. Then I rolled the inside of the door openings and the shelf trim top, bottom, and front, and finally the front of the wall cabinets. Since I had pulled the stove out it was easy to reach the inside of the cabinets facing the stove.
Cabinets with primer coat
The last thing I did on the wall cabinets was paint the bottoms. They consisted of a lot of cutting in with a brush and then rolling the bottom wood.
I moved on to the base cabinets, using a brush again to do the inside corners of the openings, rolled the inside of the door openings, rolled the fronts and then the toe kick area. Yikes. Painting cabinets is tedious, tedious, tedious…
A note about primer. Some people think you have to completely blot out the surface below the primer. The primer I was using was meant to be a binding layer between the old paint and the new paint — not completely cover the old paint. I confirmed this with the folks at Benjamin Moore. So while I did make sure I had an even layer of primer on all surfaces, you could still see the green through it. Benjamin Moore told me a second coat of primer is not necessary.
The worst part of painting cabinets
Without question the worst part of the process is the under side of the wall cabinets. I ended up clearing off the counters and laying on my back so I could see what I was doing and it was still a pain. There is so much that has to be painted with a brush because of the insets. I don’t feel like it looks all that great, but I don’t figure too many people are going to perusing the bottom of my cabinets so as long as they’re white, I’m not going to worry about it.
Note the additional electrical outlets on the backsplash on either side of the sink and the old-fashioned board is gone over the sink 🙂
Need I mention how hard it is to use a kitchen while you’re doing this kind of project. If it wasn’t for the stove surface, I’m not sure what I would have done…
I had gotten a quote from an electrician for installing the bathroom fan/heater/light, adding a wired box with switch for a light over the kitchen sink, and adding a couple of outlets on the back splash that only had 2 outlets.
He had quoted $200 which I thought was really reasonable.
Two guys were here for 4 hours. The light and outlets in the kitchen went in easily. They pulled the wall cabinet off the wall on the right side of the sink so they could hide the holes they would have to make to get the wire into the soffit over the sink.
The bathroom light was a different story and I ended up being so glad I had bailed on trying to do it myself. They had a heck of a time getting the old housing out and installing the new housing. Since there were separate switches for the fan, the light, and the heater, I was glad it was them figuring that mess of wires out instead of me. It took them a while but I now have a functioning unit. I bought it at Amazon since that was the best price I could find.
An add-on
While they were up in the attic I asked them to remove the bracket for the living room ceiling light that was blocking my attempts to put in a fan support bar and add a ceiling fan to the living room.
The very best part
The most important part was I had a successful experience with getting a quote, getting the work down, and not getting jacked around as far as the bill. The electrician said he had to figure out the bill comparing what was quoted versus what they had done. I gulped. I figured the bill was going to go way up. I had added things. They were here for 4 hours. Oh no.
He came in and said he thought $200 was correct. Two guys working 4 hours with an added request. I almost jumped up and down.
Next
I didn’t feel I could move forward with the kitchen until I had the light and outlets taken care of. Now I can get going on painting the cabinets!

 Unpacking the boxes would also make it easier for me to get to the walls to remove the remaining chair rail, repair the drywall, and paint the walls. You can see the chair rail running along the wall behind the microwave.
 I filled all the holes and spread a thin coat of mud to eliminate any sign of where the chair rail had been. I then sanded it with a drywall sanding screen, filled a few problem areas, allowed that to dry, and sanded again. The kitchen walls were easy (other than the sanding dust).