Symptoms of the problem
I drive a 2006 Xterra and noticed this past winter the struts that hold the rear hatch door up were wearing out after I whacked my head on it a few times. The weather warmed up and the struts started doing a better job of holding up the door, but on cooler mornings I was slamming my head again so it was time to figure out how to change them.
Research
I started looking on the internet for my specific vehicle model and year and found several forum posts on the subject. I was interested in not paying any more than I absolutely had to for the struts and was happy when I found a post on thenewx.org that mentioned ordering parts from McMaster-Carr.
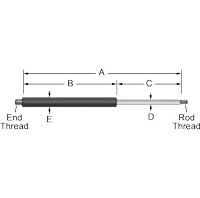
“Ordered part # 9416K147 from McMaster-Carr
Gas Spring with Threaded Ends 175 Force 18.18″ Extended Leanth, 7.87″ Stroke $16.32 each (X2)
Also needed (for my 08) part # 9416K79
10mm Ball Socket, M8 Therad, Steel for, Gas Spring with Threaded Ends (Need 2)Only tool I needed was a small flat head screwdriver.”


I love McMaster-Carr which proudly touts that it carries over 490,000 products. I have ordered specialty bolts for my motorcycle from them in the past, so I had no worries about the quality of the parts they carry.
Verification
I wasn’t about to order the items without verifying they would work on my Xterra so I removed one strut to measure it and checked the size of the threads.
There is a metal clip that holds each end of the strut in place. There is a small groove provided for you to insert a screwdriver in order to pop the clip loose. Once it’s away from the end you have to carefully wedge it off the strut. You don’t want to destroy the clips since they will be used again on the new struts.
Lift Selection
The guys on the Xterra forums were raving about the slightly longer, stronger lifts and since I was so tired of slamming my head into the hatch I decided to go with that option. It amounted to 175 pounds of lift compared to standard 150 pounds. One guy mentioned his wife and kids had no trouble with the stronger 175 pound lifts. I have one thing to say… he must have big, burly wife and kids.
The first time I closed the hatch I almost couldn’t do it. Gone were the days of pushing it down with one hand. Now I have to use both hands and try to make sure I don’t have my keys in my hand so I don’t scratch the paint on my hatch. I have to admit I burst out laughing that first time. Well, I wanted stronger lifts. Be careful what you ask for…
A little longer length is okay. The hatch door opens higher and even tall guys could walk under it. But in my opinion, 150 pounds of lift strength is enough — unless you want an upper body work out each time you close your hatch. Oh well, I’ll live with it.
Installation
I love McMaster-Carr — I had the struts in 2 days so time to install:
- Open the hatch and prop it up with a ladder and something on top to pad it.
- When removing the original lifts make a note of which end goes up and which one goes down. Mine were different.
- Unclip the stock lifts by putting a flat head screwdriver under the metal ring that holds them and gently prying it off. Be gentle since you need to use them again. I’d recommend wearing safety glasses since these are strong clips and could pop off and put an eye out.
- Unscrew the ends from the original lifts. I had to put the lifts in my vice and use a channel lock to get the ends loose.
- Screw the ends onto the new lifts.
- Snap the new lifts onto hatch ball tips making sure to install in the correct direction.
- Replace the retaining clips. These are strong little buggers and I had a heck of a time getting them back on. It helped that the upper ones could be slid down into place.
- Once all four clips are installed remove the ladder and open and close the hatch several times to loosen the new lifts.
Conclusion
I tried using a pair of pliers to open those tough little clips a little and had one go flying off, hit the house and sailed off into the groundcover (the car was out on the driveway). I figured that clip was a goner and I would have to go to the dealer to get a new one. Believe it or not, I found it. Let this serve as a warning as to how strong and springy these clips are and protect your eyes and be careful to not lose one while you’re doing the install
I couldn’t get one of the clips back on and finally asked a friend to do it when he stopped by. They really are tough little buggers.
All in all, this is basically an easy repair and there’s no need to pay the price for OEM struts from the dealer. If I can do it (with a little assistance), anyone can.
Note 8/12/2013: As far as going with the stronger struts as recommended on the forums. There was one guy who said his wife and kids could close the hatch with no problem. Well, they must be big burly people because I have to manhandle my hatch down now. No more one handed closing — it takes both hands to pull it down. I’d stick with the normal pressure strut if I had to do it again.


Comments
3 responses to “Replacing hatch struts on vehicle”
Hi DIY Girl,
I am about to do this project on my 2005 Xterra. I noticed you said you needed the ball sockets for the ’08. I read in a forum that I wouldn’t need any new ball sockets for an ’05. Does that sound right to you?
Brian, you are correct that I didn’t use the ball sockets on my 2006 Xterra (still have them and would happily mail to anyone who needs them). Just the struts was all that was needed and great care to not send the retaining clips flying off into outer space on both the removal and install.
Thanks for the verification, DIY Girl!