Category: Tech

Tech Repairs and Suggestions for Electronics, Appliances, etc.

  • Droid Incredible 2 won’t turn on

    Droid Incredible 2 won’t turn on

    I have a Verizon Droid Incredible 2. I have loved the phone — it’s fairly slim and has a good set of features.

    Droid Incredible 2 won't turn on - TheDIYGirl.comI moved recently from Texas to Tennessee and started having problems with the phone. I plugged the USB into my computer and it didn’t seem to hold a charge all that well.

    After a couple of weeks I went to check it while it was charging and it wouldn’t turn on. It wouldn’t do anything. I was upset.

    I checked online and people said they pulled the battery for a while with mixed results. I left the battery out overnight and the phone still wouldn’t start the next morning. It wouldn’t do much of anything. I would try to power it on and the Verizon “red eye” would show and not go one step further.

    I was bummed. I hadn’t gotten it wet. I hadn’t done anything funky with it. And the phone just died.

    So I asked myself what had I done differently lately that could be pissing off my previously flawless phone. While at my house in Texas I had always charged from an electrical outlet. After a few days in Tennessee I started charging from my computer USB . That was the only change I could come up with.

    So I took my basically dead phone and plugged it in to an electrical outlet. It powered up and after charging has behave perfectly as it always has. My assumption, and I could be wrong, it did NOT like charging from a USB.

    My phone could be an anomaly, I could be some bizarre exception — but if I owned a problematic Droid Incredible 2 that wouldn’t start I would be to try charging from an electrical outlet and see if that resolved the problem.

    Personally — I won’t be charging my Droid Incredible 2 from the computer USB except in emergency situations.

  • Replacing hatch struts on vehicle

    Replacing hatch struts on vehicle

    Symptoms of the problem

    I drive a 2006 Xterra and noticed this past winter the struts that hold the rear hatch door up were wearing out after I whacked my head on it a few times. The weather warmed up and the struts started doing a better job of holding up the door, but on cooler mornings I was slamming my head again so it was time to figure out how to change them.

    Research

    I started looking on the internet for my specific vehicle model and year and found several forum posts on the subject. I was interested in not paying any more than I absolutely had to for the struts and was happy when I found a post on thenewx.org that mentioned ordering parts from McMaster-Carr.

    Replacing hatch struts on vehicle - TheDIYGirl.com“Ordered part # 9416K147 from McMaster-Carr
    Gas Spring with Threaded Ends 175 Force 18.18″ Extended Leanth, 7.87″ Stroke $16.32 each (X2)


    Replacing hatch struts on vehicle - TheDIYGirl.comAlso needed (for my 08) part # 9416K79 
    10mm Ball Socket, M8 Therad, Steel for, Gas Spring with Threaded Ends (Need 2)

    Only tool I needed was a small flat head screwdriver.”


    I love McMaster-Carr which proudly touts that it carries over 490,000 products. I have ordered specialty bolts for my motorcycle from them in the past, so I had no worries about the quality of the parts they carry.

    Verification

    I wasn’t about to order the items without verifying they would work on my Xterra so I removed one strut to measure it and checked the size of the threads.

    There is a metal clip that holds each end of the strut in place. There is a small groove provided for you to insert a screwdriver in order to pop the clip loose. Once it’s away from the end you have to carefully wedge it off the strut. You don’t want to destroy the clips since they will be used again on the new struts.

    Lift Selection

    The guys on the Xterra forums were raving about the slightly longer, stronger lifts and since I was so tired of slamming my head into the hatch I decided to go with that option. It amounted to 175 pounds of lift compared to standard 150 pounds. One guy mentioned his wife and kids had no trouble with the stronger 175 pound lifts. I have one thing to say… he must have big, burly wife and kids.

    The first time I closed the hatch I almost couldn’t do it. Gone were the days of pushing it down with one hand. Now I have to use both hands and try to make sure I don’t have my keys in my hand so I don’t scratch the paint on my hatch. I have to admit I burst out laughing that first time. Well, I wanted stronger lifts. Be careful what you ask for…

    A little longer length is okay. The hatch door opens higher and even tall guys could walk under it. But in my opinion, 150 pounds of lift strength is enough — unless you want an upper body work out each time you close your hatch. Oh well, I’ll live with it.

    Installation

    I love McMaster-Carr — I had the struts in 2 days so time to install:

    1. Open the hatch and prop it up with a ladder and something on top to pad it.
    2. When removing the original lifts make a note of which end goes up and which one goes down. Mine were different.
    3. Unclip the stock lifts by putting a flat head screwdriver under the metal ring that holds them and gently prying it off. Be gentle since you need to use them again. I’d recommend wearing safety glasses since these are strong clips and could pop off and put an eye out.
    4. Unscrew the ends from the original lifts. I had to put the lifts in my vice and use a channel lock to get the ends loose.
    5. Screw the ends onto the new lifts.
    6. Snap the new lifts onto hatch ball tips making sure to install in the correct direction.
    7. Replace the retaining clips. These are strong little buggers and I had a heck of a time getting them back on. It helped that the upper ones could be slid down into place.
    8. Once all four clips are installed remove the ladder and open and close the hatch several times to loosen the new lifts.

    Conclusion

    I tried using a pair of pliers to open those tough little clips a little and had one go flying off, hit the house and sailed off into the groundcover (the car was out on the driveway). I figured that clip was a goner and I would have to go to the dealer to get a new one. Believe it or not, I found it. Let this serve as a warning as to how strong and springy these clips are and protect your eyes and be careful to not lose one while you’re doing the install

    I couldn’t get one of the clips back on and finally asked a friend to do it when he stopped by. They really are tough little buggers.

    All in all, this is basically an easy repair and there’s no need to pay the price for OEM struts from the dealer. If I can do it (with a little assistance), anyone can.

    Note 8/12/2013: As far as going with the stronger struts as recommended on the forums. There was one guy who said his wife and kids could close the hatch with no problem. Well, they must be big burly people because I have to manhandle my hatch down now. No more one handed closing — it takes both hands to pull it down. I’d stick with the normal pressure strut if I had to do it again.

  • Replacing refrigerator condenser fan

    Replacing refrigerator condenser fan

    This was mentioned in a previous post about my home warranty company failure. I ended up purchasing and installing the fan myself.

    What to do

    If you hear a loud whirring sound from your refrigerator, pull it out from the wall, remove the cover from the lower part of the refrigerator back and verify the noise coming from the fan. This is a part that commonly fails. When I got down there it was blaringly clear the sound was coming from. My guess was the bearing had gone bad in it.

    While I wanted to replace the fan ASAP to prevent complete failure and loss of food, I was price shopping as well. I called around the area where I live and was shocked they wanted $120 for a fan I could find on Ebay or Amazon for under $60. I preferred the under $60, but I was also worried about accidentally getting the wrong fan.

    Where to order

    Home Appliance Parts suggests you contact them with your model number to make sure you’re ordering the correct part. I had already figured out I probably needed a Whirlpool/Kenmore W10124096, but it was really nice having it confirmed before I clicked the order button. I had the fan the next day.

    How to replace

    whirlpool-fan-lgThe only hard part about this repair is the awkward positioning. I pulled the plug on the refrigerator to make sure I wouldn’t get an electrical shock and made sure to keep my body parts away from the condenser — they get incredibly hot.

    The package contained everything I would need — even new mounting screws. A little assembly is required to attach the fan to the motor and the electrical connection, but you have the old fan to assure you how everything goes. Getting the old fan out and installing the new one took all of fifteen minutes. I used a socket and ratchet to remove and replace the mounting screws.

    I plugged in the refrigerator, it kicked on, and a soft, barely perceptible whirring came from the refrigerator. And I got it done before the fan completely failed and allowed the condenser to overheat and bread down.

    I think I heard from the warranty repair company a week later. I laughed and said it was all taken care of.

    Oh, by the way — while you’ve got the back off why not clean the coils of their accumulated dust and hair. That will extend the life of the refrigerator.


  • Great source for appliance parts

    Great source for appliance parts

    When the fan on my refrigerator started sounding like an airplane propeller and my home warranty company completely failed me I started looking for the part on my own and found a company that sells on both Amazon and Ebay. They are awesome.

    homeappliancepartThey suggest in their ad that you call and verify it’s the correct part before ordering. I emailed the model number of my refrigerator and they promptly responded that I had the right replacement fan.

    I asked for an ETA and after supplying my zip code they told me they had the part in a warehouse in Fort Worth and could have it to my Dallas area home the next day without paying for next day shipping.

    I ordered the part at 2 in the afternoon and had it at 1:00 PM the next afternoon.

    The fan cost less than the service call from my warranty company. I called a Dallas parts place and they had the same fan for twice the cost.

    If I need parts in the future HomeAppliancePart will be the first place I check. These are really great guys who know what customer service is about.

    Amazon HomeAppliancePart

    Ebay HomeAppliancePart

  • Replacing pull chain for whole house attic fan

    Replacing pull chain for whole house attic fan

    One evening I pulled the chain on my whole house attic fan to turn it off and thought at the time it sounded a little funny. The next morning I went to turn the fan back on and found out why — the switch for the pull chain had broken. I am not a big fan of getting up in my attic since I live alone, so I got a ladder and checked to see if the switch was accessible from the house instead of the attic. It was. I had to reach through the grate and it required some dismantling, but I got the switch out and headed for the computer to find one here in town. I love my attic fan so much and wanted it working again immediately. I called everywhere; hardware stores, lighting stores, electrical supply stores, Radio Shack. I went to the big box home improvement stores hoping they would carry it despite the fact it wasn’t listed on their web sites. No one carried the switch I needed locally. I gave up and couldn’t believe the best price I could find on ordering it was once again on Amazon for $7.99 and no shipping. The switch came with wiring instructions and was easy to put in. I reassembled the box it was housed in and everything worked perfectly. The switch came with a pull string so I added the chain from the old switch and it was good to go. Whole house fans start at $200 so I was thrilled mine could be easily repaired for $8.

  • Lawnmower maintenance

    Lawnmower maintenance

    My history with mowers

    Lawnmower maintenance - TheDIYGirl.comI have fears regarding lawnmowers. My dad, who had me work with him on almost everything, wouldn’t let me near a lawnmower after a little girl in our neighborhood ran up to her dad while he was mowing and lost the part of her foot. This left a deep impression and fear of lawnmowers in me.

    My mom and dad were out-of-town when I was 18 years old and dad’s beloved yard was looking really scruffy and I didn’t want him to come home to a mess so I pulled out his mower, figured out how to start it, and had the yard looking beautiful when they returned. But I was afraid of the thing and really respectful of the damage it could do.

    After years of mowing my own yard the whole situation was exacerbated a few years ago when I was trying to lift a non-functioning mower into my SUV to return it and things went all wrong. I lost hold of it, slipped and fell, and the mower came down on the end of my right ring finger and completely removed the fingernail. A trip to the ER and referral to a plastic surgeon to have the tip of the finger and nail bed stitched back together did nothing to improve my relationship with mowers.

    CAUTION: Remove the wire from the spark plug and secure it so it can’t accidentally reconnect every time you work on your mower.

    The reality

    My mishap didn’t alter the fact that I’m a homeowner who prefers to mow her own grass so lawnmower maintenance is a natural by-product. Enter the fear. I’m okay running it and walking behind it, but accessing the underneath to drain the oil and remove the blade is another story. The oil would get changed, but the blade was ignored.

    This spring when I dragged out my 15-year-old mower I knew it should have some serious TLC if I wanted it to Lawnmower maintenance - TheDIYGirl.comcontinue running. I bought a new air filter, spark plug, fresh oil and fuel. While under the mower to change the oil I had the wire removed from the spark plug and a 2×4 bracing the blade so it couldn’t move.I decided it was time to screw up the nerve to take the blade off to be sharpened.

    My trip to the local lawnmower repair shop confirmed my belief in patronizing small businesses. Not a peep out of them about how bad the blade was (never sharpened in 14 years) and $8 and 15 minutes later I walked out with a nicely sharpened blade.

    Back home I put the blade back on, poured in a little Seafoam, started the mower to make sure it was running and put it away since the grass didn’t need to be mowed yet.

    First mowing

    Three weeks later I pulled the mower out to mow the grass and no matter how much I yanked the cord, that engine wasn’t showing any sign of even trying to start. Groan.

    I pulled the spark plug and it seemed to be bone dry so back in the house to research on the internet.

    Back outside I removed the piece behind the air filter so I could get to the fuel line to check for clogs. I disconnected the line and gas flowed freely. In the process of removing the filter piece a gasket had torn so I headed off to the lawnmower repair shop for a replacement. $2.45 for the part and lots of advice. They suggested I spray carb cleaner in the carb and see if it would start. It did and promptly died.

    Me rebuild a carburetor??

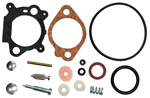
    So that meant the carburetor was probably gummed up in some way, but I had never worked on a carburetor in my life. Back in the house for youtube videos and back out to remove the carb. Once off the mower and the bowl removed I found gummy deposits that I cleaned up, but didn’t know if it would solve the problem. The o-ring around the bowl was completely shot so I headed back to the repair shop with the carburetor in hand.

    The rebuild kit for the carburetor was $9.95. Do you believe it? Less than $10. The man behind the counter cheerfully offered to put the rebuild kit on for me. I had to resist the urge to leap across the counter to hug him. Fifteen minutes later I walked out with a freshly rebuilt carburetor and once home I re-installed all the removed parts and the mower started on the first try.

    Lessons learned

    1. When I had added fresh fuel I had dumped in Seafoam, run the mower for all of 60 seconds and then put it away. I wonder if the Seafoam liquified crud and since I didn’t run the mower long it made it possible for it goo the carb up. I love Seafoam and use it in my car and motorcycle, but I think I will be cautious to add it only when I will run an engine for a decent period immediately following.

    2. The internet makes it possible to successfully repair things I never would have attempted before. There are kind folks who take the time to video step-by-step how to diagnose and repair. Bless them.

    3. Local lawnmower repair shops are wonderful. I think my experience with my motorcycle has made me cynical. Motorcycle shops don’t want to offer advice because they want you to bring your motorcycle in for repairs. So I was pleasantly surprised by the help and advice I received despite only buying items for a few dollars. Even other customers were making suggestions that helped. I called the shop the next day and thanked them for their help after I mowed my lawn with the newly repaired mower 🙂

    4. With a little love and care even a cheap lawnmower like mine can give years and years of service.

    5. While I always add fuel stabilizer to the gas can where I store fuel for mower I think I will change that fuel to premium grade. All the guys at the shop seemed to think it would hold up better over time.

    6. Do not forget to remove the wire from the spark plug and secure it so it can’t accidentally reconnect every time you work on your mower. I know — I’m nagging, but mowers scare me.

    The only tools this required were a couple screwdrivers,  a wrench, and some carburetor cleaner. If I can keep a mower running for 15 years anybody can.

  • Nikon D70 camera fix

    Nikon D70 camera fix

    This post isn’t really about my camera – it’s about working on something I’m afraid of.

    I bought a used Nikon D70 camera from a professional photographer friend in January 2009. Since then that poor camera has been bounced, vibrated, and jiggled over thousands of miles on my motorcycle. For two months it was in ocean coast conditions so humid the lens fogged and had to be sent back to Nikon for repair – but that was under warranty. All to say the camera has not led an easy life in the 3 years I’ve had it.

    A year and a half ago I started getting CHR and FOR errors when trying to take pictures and when I downloaded the images to my computer some would be corrupted with unexpected end of file errors. It was occasional at first and over the last year and a half has deteriorated until recently I took pictures and three quarters of them were corrupt.

    Anything that’s under warranty I let the pros handle — that’s part of what you pay for. But this camera is way, way out of warranty so I would have to pay for repairs myself.

    Internet research

    I researched and found posts that suggested several solutions: 1) clean the compact flash pins on the camera 2) take the camera apart and connect the cable for the compact flash that may have become partially disconnected 3) check for bent pins and replace the compact flash connection 4) buy Nikon batteries since the off brand batteries can cause errors.

    Being a coward with my newly acquired first ever dSLR camera I took the least invasive solution and tracked down a pin cleaner for the compact flash pins. It helped a little for a while. I was skeptical about the battery idea, and afraid of opening the camera to check the compact flash or replace it.

    Cleaning the pins wasn’t a fix so I reread the posts and tracked down a D70 repair manual online and downloaded it. There were great illustrations of the screws to remove and where the actual cable for the compact flash was located and what direction it was connected in.

    Nikon D70 camera fix - TheDIYGirl.com

    Then I research how much it would cost to have someone take a look at the camera — $200 just to open it. I wasn’t sure if I should pay that much, just replace the camera ($800 I can’t really afford), or try the repair myself. In the end I decided the only logical thing was to see if I could open the camera myself.

    Getting over the fear

    The most difficult task was finding a tiny screwdriver for the screws. I made a diagram of the bottom of the camera and marked it with the various sizes of screws I removed so I would make sure I got them back in the right place – there were 3 sizes.

    Nikon D70 camera fix - TheDIYGirl.com

    I got the bottom off the  camera and with the help of the diagrams located the cable. I took a small screwdriver and

    pushed on the plastic cap of the ribbon cable and was pretty sure it moved. It’s really small, so I wasn’t entirely sure. I pushed on both sides of the cable cap a couple times to make sure it was firmly attached and put the camera back together again.

    I took pictures with no CHR or FOR errors. I downloaded the images to my computer and they were all good with no corruption errors.

    I will continue to monitor how the camera does and if it behaves itself will probably replace my off brand batteries with ones I found on Ebay that are compatible.

    My point to this post is that I am totally intimidated by my dSLR and was afraid to open it up. Home repairs – no problem. dSLR cameras very scary. The first time I cleaned dust off the sensor I was scared to death I’d screw up the camera.

    When I did the work I made sure I had a clean work area and carefully tracked what I did as I disassembled. I was very, very, very gentle with the cable for the compact flash.

    But in the end – it was no big deal. I did what was needed and got the camera back together with no problem. And I’m very hopeful it will resolve all the errors I’ve been having. It took me all of 20 minutes, didn’t cost a dime, and bolstered my confidence that I can deal with a complicated camera.

    So far, so good with the camera – no errors or corrupt images. Maybe dSLR cameras aren’t quite so scary after all. Maybe some other repairs I’m hesitant to try wouldn’t be too scary either.