Category: Home Projects

Home Projects to Repair or Improve

  • $40 Kitchen Backsplash with Decals

    $40 Kitchen Backsplash with Decals

    $40 decal backsplash completed - TheDIYGirl.com

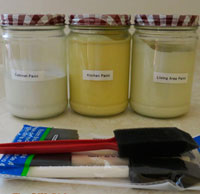
    I was looking for a low-cost solution for the kitchen backsplash. I had painted the walls a gold that matches the color in my countertops using Benjamin Moore chalkboard paint, but wasn’t sure where I wanted to go from there. Maybe do some artwork with chalk or just settle for being able to jot down shopping items?

    I had been thinking about the large decal mural my niece-in-law Brandy had done and was browsing decals for ideas.

    Shopping and decision-making

    Dali Decal website - TheDIYGirl.com
    Dali Decal website

    Then I found Dali Decals. These folks have some great decals and the mini poppies that I loved were only $10 a set. I ordered two sets. When I clicked on the page they have an image of the decals as a backsplash and even allowed you to change the cabinet color, sink color (I had to pretend it was my countertops I had just painted with Giani paint), wall color, and then the poppy color to test your ideas. Different decals have different options.

    This was a life saver for me — I had thought about trying to pick up the copper I put in the countertops, but all combinations I tried looked awful. I kept changing things until I found I like picking up the gold in the counters as the wall color and then black flowers to tie with the black cabinet hardware and pull out the black in my counters.

    The decals and set up

    It takes a while to get the decals. I suspect they wait until there are orders and then cut them so it was about a week and a half before they arrived. The shipping date was several days after the order date.

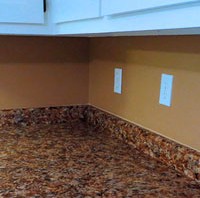
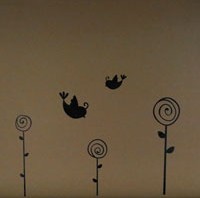
    The decals came on 4 sheets, so I cut the individual flowers out and used painters tape to tape them on the wall and decide where I wanted them. I wanted them somewhat randomly spaced so it wouldn’t look too regimented. Once that was done, I used a level to make a chalk line for each flower so they’d be straight and I spaced them about 3/8″ from the top of backsplash and stove top so I could wipe down the counter backsplash and even re-caulk and not have a problem with the flowers. I don’t know if chalk was a bad idea since it could interfere with adhesion, but they all seem to be firmly stuck to the wall.

    Cut decal, provided squeegee, painters tape, chalk for applying the decals
    Working on decal application – flowers taped up and Nikki supervising

     You first remove a stiff paper backing from each decal, smooth the decals on the wall where you want them, use the squeegee to firmly attach each decal to the wall, and then carefully remove the transfer paper from the top of the decal. I had to be really careful to not pull the little petals and stems away from the wall. If anything seemed to be pulling up I stopped and used the squeegee more. It’s pretty easy.

    Working on decal application – flowers taped up and Nikki supervising
    Working on decal application – flowers taped up and Nikki supervising

    Standing back and admiring

    decals-stove
    After 2 sets of decals I think it’s too sparse so I ordered 2 more sets

    I put my tools away, put appliances back in place, stood back at the doorway to the kitchen to admire my handiwork and had two thoughts. 1. I really liked the flowers for an economical, cute backsplash and black was the right choice. 2. They were too sparse. There simply wasn’t enough of them for the space.

    I got online to order another two sets in the hopes that going from 20 to 40 flowers would be enough.


    Two more sets applied

    I added the two additional sets and I’m satisfied with the look. Keep in mind this is a house that I purchased as a foreclosure and my goal here is to fix it up and sell it for a profit. I don’t want to put and arm and a leg into unless I absolutely have to.
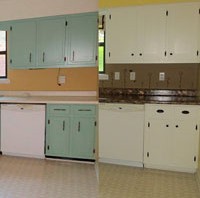
    The final results

    backsplash-right

    backsplash-sink-final

    I’m really happy with the look and the price.

  • Caulking sink after Giani Granite Paint

    Caulking sink after Giani Granite Paint

    Caulking sink after Giani Granite Paint - The DIY Girl
    Finished caulk job — nearly perfect

    I didn’t think I’d like the appearance of clear acrylic (recommended by Giani) around my sink so I ended up ordering color matched caulk (see my post Matching caulk after Giani Granite Paint) so it was way, way past 12 hours by the time I caulked my sink. To be honest — I was putting it off because I dreaded doing it. I thought this would need to be “freehand” caulking with no wipe down and I didn’t see myself doing a good job at that, especially in the nearly impossible-to-get-to back edge of the sink. And I didn’t want to look at a lousy caulk job around my sink that would detract from the gorgeous countertops. I checked with Giani Just to make sure I didn’t steer anyone in the wrong direction I called Giani to ask about their directions on caulking the sink after using their products to paint the surrounding countertops.

    Their directions say:

    Roll on your final Topcoat., then wait . . . – 1 hour and carefully remove tape – be sure to score the tape’s edge while pulling it up – 12 hours and apply clear acrylic caulk around sink’s rim to seal out water – one day before using your countertops and dishwasher – three days before setting small appliances back on your countertops

    When I spoke to Giani they said the 12 hours was an absolute minimum, but your could do it any time after that. Personally — I wouldn’t mess with it until it had dried longer. If the top coat wasn’t completely set up you could make a real mess. Method for caulking As I said — I had a low level of confidence for doing it freehand so I used painters tape. Painters tape is great for straight lines but what about rounded corners. I drew up a template using a bottle (ended up being a vitamin bottle) that was the same roundness as the corner. I used the template to cut pieces of wide painters tape that would span the corners.

    Once the tape was marked with a Sharpie I found scissors didn’t work for cutting because the tape stuck to them. I went to using my rotary cutter and carefully making the turn on the corner and that worked great.Caulking sink after Giani Granite Paint - The DIY Girl Here’s what the taped sink looked like when I was done.

    Caulking sink after Giani Granite Paint - The DIY Girl
    taped and ready to caulk

    I left a little over an 1/8th inch gap. This wasn’t precise because I don’t think there’s a way to be precise, but it was close enough. Next I applied caulk all the way around — I took no care to do it perfectly because I was going to flatten it out anyway. I used the tip a spoon (experiment with the right curvature) and ran it all around the sink to push the caulk firmly into the gap and smooth it.

    Caulking sink after Giani Granite Paint - The DIY Girl
    caulk applied with no precision at all

    I allowed the caulk to dry for just a few minutes so it wouldn’t be too runny and make a mess when the tape was pulled. I got a grocery bag ready by hanging from an upper cupboard handle so I could dispose of the tape easily. I then very carefully pulled the tape straight up and away from the sink. Remember the order you tape the sink and reverse it for the tape removal. The tape is really messy, so be careful to not get it all over — you might want to wear gloves. I ended up being really glad I planned in advance and had a bag handy for disposal. The good thing about waiting quite a while after doing the countertops was the Giani top coat was so hard that nothing pulled up with the tape. I have no idea how long you have to wait so this won’t be a problem. It’s been about 4 weeks since I did the top coat. The results Here are the final pics of how the caulk turned out. Yes, it was a lot of work for a little caulk job, but it would be a shame to ruin the appearance of the countertops. The caulk looks perfect — even on the back edge. Doesn’t the countertop look great too :-)?

    Caulking sink after Giani Granite Paint - The DIY Girl
    Caulking sink after Giani Granite Paint – The DIY Girl
    Caulking sink after Giani Granite Paint - The DIY Girl
    Caulking sink after Giani Granite Paint – The DIY Girl
    Caulking sink after Giani Granite Paint - The DIY Girl
    Caulking sink after Giani Granite Paint – The DIY Girl
  • Matching caulk after Giani Granite Paint

    Matching caulk after Giani Granite Paint

    The Giani instructions for painting the countertops were very clear they expected you to caulk around the sink and along the backsplash when the paint completely dry. Duh. I didn’t dawn on me that my custom paint job wasn’t going to match any of the limited selection of colors at the big box stores — they carry white, almond and clear caulk, none of which would look good or cover the gap between the backsplash and wall that didn’t have a perfect paint edge. I needed an opaque caulk that would cover the paint edge and it needed to be a waterproof caulk to work in the kitchen where it would be getting wet.

    I had matched the Inca gold color from Giani and painted the backsplash area that color, so my caulk needed to be Inca gold. I found a mix yourself caulk online, but when reading the details, I found out it was not waterproof. That wouldn’t work.

    Color Rite

    Matching caulk after Giani Granite Paint - TheDIYGirl.comI researched more and found Color Rite adhesives. Their caulk is waterproof and available in a huge palette of colors. I sent them a paint chip of the color so they could match it for me. No custom color was required since they had a stock color that would match my paint and the Inca Gold Giani paint.

    I spoke several times to the people at Color Rite and they were great to deal with on every call. The cost of the caulk isn’t jaw dropping, but you better be sitting down when they tell you the price of shipping. They were apologetic, but said the residential rates they got with UPS were high and they simply passed them on to the customer with no mark up. Around $13 for the caulk and $15 for shipping. For someone who refuses to order much of anything unless the shipping is free, this was a heart stopper, but I wanted their matching caulk.

    And the color is absolutely perfect, the gold in my countertops, the gold on the walls, and the caulk all match beautifully (the caulk was still wet in the pictures so it looks lighter). But I felt like I was applying gold – the metal, not the color.

    Matching caulk after Giani Granite Paint - TheDIYGirl.com

    Matching caulk after Giani Granite Paint - TheDIYGirl.comThis leaves only one more step to go on the kitchen makeover – the backsplash.

  • $70 Countertop Fix – Giani Granite Paint Part 2

    $70 Countertop Fix – Giani Granite Paint Part 2

    $70 Countertop Fix - Giani Granite Paint Part 2 - TheDIYGirl.com
    Finished paint

    Link to Part 1 of $70 Countertop Fix – Giani Granite Paint


    As promised by Giani the replacement paints arrived Monday morning.

    In the meantime I had figured out how to get the appearance I wanted. If you use a large section of sponge (like half of one) you get a blotchy circles look. If you use the edge of a thinner piece of sponge and use it repeatedly you get a speckled, not blotchy look. This is a case where less really is more.

    After you cover the area with the big splotches using a large piece of sponge, switch to a small sliver of sponge to break it up into a finer, speckled look.

    I was amazed how little it took to break up big, blotchy patches into a small speckled look. I ended up using this technique to add back some black primer, to add the brown from the new can of paint, to cut down on the Inca Gold that I felt was way too white for the appearance I wanted, and to put back the metallic copper highlights I wanted. I had purchased a Martha Stewart jar of metalic copper that I wanted in my countertops.

    OCD warning: Man, where do you stop? Once I started getting the look I wanted I kept dabbing here and dabbing there with all the colors and finally had to mentally grab hold of myself and say “enough is enough!” I had a nice blend of the matte black background, a little Inca Gold, a decent amount of the Feldspar brown to lighten the overall appearance, and speckles of chocolate.

    Initial process

    I didn’t like the idea of trying to do all colors at one time. I did the primer, then I did 2A, the metallic copper paint, 2B, and finally 2C. I loved the appearance up until 2C — that’s when I should have started using a sliver of sponge edge. I don’t think Giani makes this painfully clear in their videos. In my opinion if you use a big section of sponge there’s no getting around a big and blotchy look.

    My error

    I think I made a mistake when I called Giani because the new chocolate paint was just as watery when covering the other lighter colors as the original can. No matter how much I stirred and shook the can it seemed to separate when dabbed on the lighter colors and and the edges had a watery almost like the paint was separating. I have no idea if it’s a function of the dark brown pigment — the black certainly was a solid cover — but it separated and didn’t give a solid coverage of the light colors in a lot of places.

    That complaint aside, the bottom line is despite the watery brown, I was able to get exactly the look I wanted that’s all the really matters. Well, that’s not all that matters — Giani customer service was awesome. I like a company that stands behind their products.

    Top coat

    I watched the Giani video on how to apply the top coat and don’t think there’s much that can be added to what they said. It’s humid here so I really didn’t have any problems applying the top coat since fast drying wasn’t an issue. My big fear was dog hair — I wanted to get the top coat on and dried before hair floated in it from one of my yellow labs. They were exiled to other rooms while the paint and top coat was wet.

    Due to the high humidity I kept everything off the counters for a few days and was very careful with them for the first 3 weeks. I may have gone way too far with this, but I preferred that to trashing all the work I’d put into doing the countertops.

    Result

    You can see more pictures of the counters on my posts for the backsplash and final kitchen update. I’m a little disappointed with the pictures since they don’t really show the shiny copper accents that area beautiful. The top coat give the counters a gorgeous depth.

    $70 Countertop Fix - Giani Granite Paint Part 2 - TheDIYGirl.com

    $70 Countertop Fix - Giani Granite Paint Part 2 - TheDIYGirl.com

    I am so happy with the look of my counters that I find myself smiling every time I walk into my kitchen. Of course who wouldn’t? I’ve gone from washed out ugly to rich color and depth added by the topcoat. It’s a huge improvement.

    Be sure to read my post about finding a caulk that matches.

    Follow Up Notes:

    Follow up note on Top Coat: I ended up with brush stokes in the top coat on the left edge of the sink. It was really bugging me so I used  600 grit sandpaper to smooth out the brush strokes and then carefully applied two coats of top coat to the sanded area. As it dried it all leveled out and there is no lap line where the new coats met the old coats. It’s nice to know you can do repairs if needed.

    Also, after this touch up I set a condensating glass on it before it was completely dry and the condensation raised blisters in the top coat. Talk about panic. I thought I’d really messed up the top coat. I left it alone and came back a couple hours later to find the blisters had all settled back into the surface and you couldn’t see where the glass had been. What a relief. 

    Process: if part way through the process you think your counters look awful — don’t panic! If you looked at the pictures of the watery brown paint you can see things looked pretty bad and I was scared I had made a huge mistake or would have to start all over. I’m still not happy with the watery brown paint, but I love the countertops.

    Results 2 months later: The countertops still look awesome. I am careful with them — I don’t let water stand on them and don’t put things on them that I think could scratch. I suspect I’m being paranoid and will post how they are doing a few months from now.

  • $70 Countertop Fix – Giani Granite Paint Part 1

    $70 Countertop Fix – Giani Granite Paint Part 1

    $70 Countertop Fix - Giani Granite Paint Part 1 - TheDIYGirl.comWhile I am thrilled with how my Shaker cabinet update looks, ease of cleaning, and durability so far, I had yet to solve the problems of ugly countertops and back splash. As you can see in the image on the right the white cabinets need some color contrast instead of the washed out looking counters.

    Since this is a house I don’t plan to stay in, I am doing all the improvements at the most frugal cost possible and still look good. After researching I decided to try the Giani Granite paint rather than replace the counters. $70 and a lot of work instead of hundreds of dollars for new counters sounded like a deal.

    The steps involved:

    1. Clean with SOS or Brillo pads: The picture above shows the counters after I had cleaned them with SOS pads and rinsed them multiple times to make sure the soap residue was removed.

    2. Tape off the walls and cabinets: The next prep step is to tape off the counters before painting. The wall edges were a no brainer, but taping the sink was trickier. After trying to tape off the edges by lining the tape up (with unsatisfactory results) I decided to firmly tape the edges with tape extending over the formica and then use a skill knife to carefully cut the tape away from the sink. I was very pleased with the precision this process allowed. FYI — when Giani suggests 2 rows of tape above the back splash they know what they’re talking about. I accidentally dabbed paint above my one row of tape. Fortunately I hadn’t finished the back splash yet so I wasn’t heart-broken about the paint that went above the tape. 

    $70 Countertop Fix - Giani Granite Paint Part 1 - TheDIYGirl.com
    taping sink and then cutting edge away gave a very clean edge that didn’t allow paint to bleed under
    $70 Countertop Fix - Giani Granite Paint Part 1 - TheDIYGirl.com
    Completely taped and ready to paint primer

    3. Apply the primer: I found the black primer a little intimidating simply because it’s so black. I have an important suggestion before doing this step. PREPARE WHERE YOU WILL CLEAN UP THE BLACK PAINT. After applying the primer the kitchen sink was out of the question so I decided the tub in my bathroom was the safest option. The soap I needed was under the sink (behind my very white cabinets) and I had to push the shower curtain aside (with its snow-white liner) while I had black paint on me. I was able to get set up without getting black paint on anything, but I was stressed. Every little splash as I was washing things scared me too. The primer is very, very black. Better still — take the Giani advice and line your paint tray with foil. I wish I would have.

    As far as the primed surface — the primer dries to a matte black finish.

    $70 Countertop Fix - Giani Granite Paint Part 1 - TheDIYGirl.com

    4. The first coat of Giani minerals: Since I purchased the chocolate-brown kit my first coat was a gold. I cut the round sponge that came with the kit in half after looking at all sides of the ball and picking the side the had the most open cells instead of a side that had exposed tubes of the cells so it would provide good speckling. I attached a small piece to a pencil to get into the corners and tight areas. I ended up cutting another that provided a fairly straight edge to get the top of the back splash and along the wall. After I got the technique down I found the process fun. Except for behind the sink and faucet. That area was a bugger to do.

    $70 Countertop Fix - Giani Granite Paint Part 1 - TheDIYGirl.com
    Working on the first coat
    $70 Countertop Fix - Giani Granite Paint Part 1 - TheDIYGirl.com
    First coat complete – the paint is a matte finish

    5. The second coat: My second was a cream color. I was much happier with the look of the counter when it was darker and figured I would want to darken it up some, but I had to wait for the final coat which is a chocolate-brown to see what I wanted to do.

    $70 Countertop Fix - Giani Granite Paint Part 1 - TheDIYGirl.com
    Counters with 2nd coat of cream-colored Giani minerals

    6. Final coat of paint: the last coat is a layer of chocolate-brown. This is where the problems started. I shook the can, I stirred the can, but when I poured out the paint it was far more watery than the other two coats. I shook it more, stirred it more and it was still watery. I probably made a bad decision and went ahead and applied the watery paint.

    It was a completely different experience from the other coats. It blotched, it ran, it ran out. There was plenty of paint, but I think the sponge absorbed a lot more due to the watery consistency and I was barely able to finish all the counters even with putting less on the last 2/3’s of the surface.

    Where the previous layers had been a nice speckle, this layer looked blotchy and didn’t want to cover. I was concerned.

    $70 Countertop Fix - Giani Granite Paint Part 1 - TheDIYGirl.com
    Watery looking brown paint
    $70 Countertop Fix - Giani Granite Paint Part 1 - TheDIYGirl.com
    Close up of the watery appearance

    Giani customer support

    As soon as I washed up my tools and took a good look at my counters I got online and found the number for Giani. I called and told them about the watery paint and blotchy appearance and asked what I could do. They were very concerned about my problems and offered whatever paints I wanted to correct the problem and make me happy with the counters. They offered to FedEx more of the chocolate and gold paint as well as another sponge. Where customer service seems to be dying a terrible death in the US, these folks know the true meaning of the concept.

    Unfortunately it was Friday so the earliest I ccould get the paints would be Monday which means I have to live with a torn up kitchen for a few days. I just don’t see what other choice I have since the counters are so important.

    Continue to part 2.

  • Basement flooding – surprises inside surprises

    Basement flooding – surprises inside surprises


    Our are had what I would call almost monsoonal rains yesterday. I watched from the window in dismay as the gutters on both the front and the back of the house overflowed and were washing out maple seeds. I was aware the gutters would need to be cleaned in the fall. I didn’t think about cleaning them recently, especially since the roofers had cleaned them out when they did the roof in March.

    Not sure a pictures shows how much water was on the floor
    Not sure a pictures shows how much water was on the floor

    First surprise

    The basement floor of this house is half finished out and half garage. Late in the morning there was a lull in the storms so I thought I’d better get the dogs outside for a pit stop. I opened the door to garage and was greeted by a swimming pool effect — there was water all over the floor. I ran around to make sure it wasn’t damaging anything. The water appeared to be coming in the front of the wall and while there were boxes stored there I had put them on 2 x 4’s to be safe. I needed to pick up one box and everything else looked okay.

    I started to get upset about the flood of water and then thought “Hey, it’s the garage. It could be worse and be in the house. The house!”

    Second surprise

    I ran back inside and found I had squishy carpet. along the wall bordering the garage. Oh joy.

    I quickly moved furniture so I could pull back the carpet and padding. I pulled them up and flopped them over a folding chair so they could dry.

    Third surprise

    I stepped onto what I expected to be concrete and found water standing on (and in) foam.

    Carpet and padding are already pulled and I'm working on scraping foam off the concrete
    Carpet and padding are already pulled and I’m working on scraping foam off the concrete

    Apparently there had been foam backed carpet glued to the floor at one point of the house’s life and someone had pulled the carpet out leaving about 1/4″ of sopping wet foam firmly glued to the floor. How was I ever going to get things dried out with the foam there? It would have to come off.

    I got a putty knife and started scraping. My test knife was the narrow 1 1/2″ size and while it worked, it was going to take forever. I went out and got a couple wider putty knives. Try as I might, the wider knives flexed and didn’t get under the foam and truly scrape it clean. I was going to have to do the entire area with the narrow

    The little putty knife is the only one that would get down and get the foam cleanly off the concrete :-(
    The little putty knife is the only one that would get down and get the foam cleanly off the concrete 🙁

    knife. Groan.

    Several hours later I had the wet foam removed from the floor a couple of feet into bone dry areas. I removed the carpet strips that were completely wet and soft. I threw out a section of the padding because I had no idea how I’d get the water out of it and I figured it wouldn’t be too expensive to get some at Lowe’s. The floor inside was mopped up. I used a broom to push most of the water out of the garage and mopped up what remained. I sprayed bleach water along the baseboards in an effort to deter mold. Fans were set up and things appeared to be drying nicely.

    Another heavy storm started around 7:00 PM. Again I watched the gutters overflow. I ran downstairs and there was more water than there had been before. I had to pull the carpet back further and scrape more soggy foam off the floor. The garage was a swimming pool again.

    Goody — I get to do the same clean up twice in one day.

    Concerns

    I don’t know if the flooding was caused by the sheer volume of water or the plugged up gutters dumping an enormous amount of water right along the house. When I moved here in January we pretty much had 3 solid months of rain with no flooding in the basement.

    As luck would have it the guys showed up to finish the rails on the stairs to the deck in back the next morning. They offered to clean the gutters for me. I got up on a ladder and saw there were little maple trees growing in the gutters — there were a lot of maple seeds mattered into stinky masses. Yuck.

    I will be vigilant about gutter cleaning and keep my fingers crossed that the flooding doesn’t happen again. At least I won’t have to scrape the foam again.

  • Installing electric dog fence

    Installing electric dog fence

    Installing electric dog fence - TheDIYGirl.comMy dogs are trained for an electric fence. When they were puppies I purchased an Innotek Contain and Train SD-3000. Innotek has come out with much fancier systems now, but I’m still happy with what I have.

    I like Innotek — they stand behind their products. The collars are the most expensive part and if one fails (and they have) you can do a trade-in at a much lower cost than buying a new collar.

    This system also comes with an adjustable transmitter. The dog collars beep well before the dogs gets a shock. The width of that area where it gives the warning beep can be adjusted. I love this feature. My dogs hear the beep and high tail it back into safe territory.

    Previous install

    The house in Texas was an easier install for several reasons. It was a smaller yard. There were large ground cover areas that I could just run the wire through instead of burying it. But most importantly it had a concrete driveway with seams. I designed the layout for the fence incorporating one of these seams to run the wire through.

    I put all the flags out, and did a lot of training, but my girls were so good they’d never cross the line to see what happens. I hated doing it, but I had to take them across the line so they’d get zapped. One zap was all it took. Neither of them will continue when either of their collars beeps. 

    The bad part — forget taking your dog down the drive to go to the street for a walk. They would look at me with an expression that said “Uh, uh. We KNOW what happens if we walk up that way. No way we’re going.” They won’t risk getting zapped again. So I have to load them in the SUV and go to a park. Not a bad thing. Safer on paved trails anyway.

    Next install

    I brought the transmitter and collars, purchased more wire, and faced a much more difficult install. I had a lot more yard to cover and no ground cover to cheat with. I also had an asphalt drive way to cross.

    I would advise sitting down and drawing out where you want the fence to go, where you’ll access the electricity, and what obstacles you have to get around or through. The wire has to be a continuous loop for it to work.

    The transmitter is not water proof so I put it in the detached garage and drilled a hole through the wall to run it outside.

    Installing electric dog fence - TheDIYGirl.com
    Transmitter in detached garage
    Installing electric dog fence - TheDIYGirl.com
    Wires coming out of garage

    Where ever you put the transmitter you have to start there, go around the yard in a circle and return to the transmitter.

    The man who is mowing my grass (in lieu of buying a riding mower) graciously offered to loan me a gas edger, so I used it to dig a little trench all the way around the perimeter. It did a good, but not perfect job, so while burying the wire I had to do some digging in places. But all together so much better than doing it all with a shovel.

    My big dilemma was still the asphalt driveway. I figured I wasn’t the only person to face this so I started researching on the internet and found there were ways to protect the wire running over the drive. I ordered the product on the left from Amazon and it’s perfect. It’s black so it looks good on the drive and it sits over the wire and protects it from car tires. And it doesn’t slip

    Installing electric dog fence - TheDIYGirl.com
    strip across asphalt drive

    around. I’ve had it out for a few weeks and it’s staying put.

    It was a full two-day exhausting project, but it’s in and working. Most of that time was scooting along the ground cramming the wire down into the crevasse. I figured out some tools that made it a little bit easier.

    Not to worry about cutting the wire in the future. I regularly check to make sure the red light on the transmitter is lit. If it’s not it could very well mean the wire has been cut. If did anywhere near the wire, I always check to make sure I have cut the line. I’ve had line cut before and fortunately there’s a way to find the break and repair it.

    I’ve now made the same mistake on two installations. At the old house if the walked to close to the front door their collars would beep. I think it was 2 years before my younger dog would retrieve a ball from that particular corner. I apparently didn’t get the wire far enough from living room corner of the house here and if I forget to remove their collars they will get a beep in the living room. Not a good situation, so make sure you get the wire far enough from all points of the house.

    We’re all glad the fence is in

    This house is on a busy road and there’s no way I would let my dogs loose so they’d been on a leash to do their business since we moved here. I could tell they were really tired of it. They’re happy to be back on their collars and have time to leisurely sniff around the yard. I’m happy knowing they can’t end up on the road to get squished. I just have to check the batteries in their collars to make sure they’re still signalling the dogs when they’ve walked too far.

    Training

    When I first installed the fence my dogs were so good about not crossing the line that they never got zapped. I ended up dragging them each across the line so they could see what happened. One time was all it took for my Labs — they never wanted that to happen again.

    There’s an inconvenience to this type of fence. Because I had the line across the driveway, there was no way to exit the yard to go for a walk. Walks entail loading them up in the vehicle and taking them someplace to walk. Not an awful problem if there are walking paths nearby.

    An inconvenience for the dogs – squirrels figure out the dogs can only go so far and will stand just outside their perimeter and chatter at the dogs, really taunting them. I never would have guess that would happen.

  • Touch up paint

    Touch up paint

    I’ve recently seen some name brand touch up paint containers. They leave me wondering how tightly they seal and how long the paint lasts. I believe in handy to use touch up paint for the rooms you’ve painted in your house. No more trucking out to the garage, maybe having to let the paint warm up. No stirring cans, dealing with possible rusted cans. Just reach under the sink and dab a little paint where you just scraped the wall.

    Touch up paint - TheDIYGirl.comI started doing this when my son was little so when he hit the wall with one of his toys it was no big deal. I had the paint if I owned the home and I asked for the paint when I rented. People I rented from were thrilled to death when they did the final walk through because the walls always looked so good. An added bonus — it makes it easy to touch up the paint when you take pictures down and patch the holes.

    I’ve talked about this in other posts. It was a life saver when I was preparing to move in January and I left them for the new owner.

    If I empty a jar that has a rubber seal around the lid like peanut butter or pickle jars, I wash them thoroughly and save the jars for paint. Pictured above, I have a jar for touching up my newly painted kitchen cabinets, the kitchen walls, and the living area walls.

    I tried hand written paper labels in the past, but over time the paint name gets wiped off and if you have close colors you’re not quite sure which one to use. If you use the wrong one, it evident as soon as it dries.

    I keep the jars stashed under the kitchen sink in the back where they’re out of the way and I keep a handful of small foam brushes with them. When I need to touch up a spot I shake them really well, do the painting, wipe off the tip rim of the jar and put the lid back on. The rubber seals keep the paint fresh for a long, long time, are basically free, and beat the heck out of wrestling with rusty paint cans.

  • Repairing torn window screens

    Repairing torn window screens

    The house I’m in had a couple of screens with serious holes in them. It looked like vines had grown up and sent anchoring tendrils into the screen and someone had attempted to rip the vine off. The vine was gone and so were patches of screen.

    Repairing torn window screens - TheDIYGirl.comRepairing torn window screens - TheDIYGirl.comI have replaced screening before. It’s any easy job anyone can do. You need a spline (the rubber stuff that holds the screen in the frame), a spline roller, and screen. The spline and the roller will cost you about $3 or $4 and a roll of 36″ by 25′ fiberglass screen should be around $15.

    Family Handyman has a great how-to at http://www.familyhandyman.com/DIY-Projects/Doors—Windows/Window-Repair/how-to-fix-a-window-screen/View-All. I can’t do a better job than they did so I will refer you to that for instructions. They had the great suggestion of putting a brick in the center of the screen so you don’t get it too tight and warp the frame. I used heavy books instead.

    Just be careful when you’re cutting the excess screen off and don’t slice your finger like I did…

    This is one of my almost completed screen — I have one side left to cut the excess screen off. You can see the books I used as a weight over to the right and the left over spline to the left.

    Repairing torn window screens - TheDIYGirl.com
    Spline in 2 side of the screen

    The screens look great and I can open the windows now 🙂

  • Shaker Kitchen Cabinet Update – before and after

    Shaker Kitchen Cabinet Update – before and after

    Shaker Kitchen Cabinet Update - before and after - The DIY Girl
    Before and After

    From the Lettered CottageThe inspiration came from the Lettered Cottage and the pictures to the left. They started with cabinets almost identical to mine so I figured I could do the same thing since I love the look of Shaker cabinets.

    I knew the kitchen had to be greatly improved if I was going to sell this house for a decent amount so the cabinets had to look better. They were well-built, solid cabinets, but ugly. I wanted to keep the cabinets, but lose the ugly while not spending much money.

    Many, many hours of work that required a lot of patience. This kind of project just isn’t going to be done in a day — not when you’re using a paint with a minimum 16 hour drying time and applying multiple coats.

    I was able to go cheap on hardware — Overstock.com sold knobs in packs of 25 and pulls in packs of 10 at great prices. Since it needed 20 knobs and 8 pulls this worked perfectly for me. I used one of the extra knobs on a bi-fold pantry door. Some people spend hundreds on hardware. I spent $85. I wanted much improved — not exorbitantly expensive. I did have to go out and buy longer screws to put the hardware on since I had added 1/4″ to already 3/4″ doors. That was an extra six bucks.

    I spent a lot more for the MDF than others on the net, especially when you factor in I had to rent a truck to get the sheets from the specialty wood store to Lowe’s where an employee cut the 4′ x 8′ sheets into strips for me. If you live in a larger city you would be able to get it much more easily and cheaper, especially if you have a pickup or van.

    The primer and paint from Benjamin Moore wasn’t cheap, but when you go to this much trouble you want to end up with a surface that will last while being bumped and cleaned. What I found surprising at Benjamin Moore was how reasonably priced their supplies were — their paint trays were of much higher quality (awesome paint trays) and were cheaper than the big box improvement stores.

    Item  Cost
    knobs for doors and pulls for cabinet drawers from Overstock.com       50.93
    Hinges for cabinets       34.27
    paint supplies for kitchen cabinets, primer, deglosser – Benjamin Moore       46.91
    sandpaper for cabinets         6.78
    Paint for cabinets, tray, tack cloth –  – Benjamin Moore       52.73
    trim for above cabinets, sanding block       15.35
    sanding block, misc       25.13
    2×4′s for saw horses (work surface for painting cabinet doors)       17.97
    rent truck to pick up MDF       21.33
    2 sheets 1/4″ MDF       36.96
    sawhorse brackets       18.09
    liquid nails         6.75
    liquid nails and white caulk         4.48
    sanding block         4.89
    1 1/4″ screws for knobs on cabinet doors         6.10
    TOTAL FOR PROJECT     348.67

    I had someone give me one of the rollers at the left and I liked it better than the wool rollers Benjamin Moore recommended because it left a smoother surface to the paint when it was rolled and then dried with a smoother finish.

    Hardware and hanging

    I was PAINFULLY careful while drilling the holes for the knobs and pulls. After all the work I’d put into them I did not want to screw up one of them with a hole in the wrong place. I bought a template that was useless and ended up meticulous measuring and double checking before drilling. Somebody must have been looking out for me because I got them done with no boo-boo’s.

    I hate doing hinges. Five screws for each and every one and two hinges per door. I was worried about getting the doors level and even and was again meticulous in measuring before drilling for the hinges. The doors had been crooked when I took them done, so I had filled all the holes and had to start all over again when doing the hinges.

    It about broke my heart but I put a couple small scratches in a couple of doors while I was hanging them. Happy to report I touched them up and you can’t tell. So far the paint is holding up really well and food stains wipe right off.

    Posts of what I did

    Here are links to all the posts I did along the way that provide all the gory details of each step:

    Shaker Kitchen Cabinet Update Plans
    Shaker Kitchen Cabinet Update – painting prep
    Shaker Kitchen Cabinet Update – adding trim
    Shaker Kitchen Cabinet Update – painting boxes
    Shaker Kitchen Cabinet Update – painting tips
    Shaker Kitchen Cabinet Update – the materials odyssey
    Shaker Kitchen Cabinet Update – applying the MDF strips
    Shaker Kitchen Cabinet Update – Painting the doors and drawers

    The cabinets look awesome so my $350 cabinet update really paid off. I almost can’t believe I did this all by myself.

    Shaker Kitchen Cabinet Update - before and after - The DIY Girl
    Large image of after
    Shaker Kitchen Cabinet Update - before and after - The DIY Girl
    Close up of cabinet detail
    Shaker Kitchen Cabinet Update - before and after - The DIY Girl
    Trim I added to hide gap between cabinets and soffit
    Shaker Kitchen Cabinet Update - before and after - The DIY Girl
    I painted the inside of the doors and the face trim on the shelves so they look great when the doors are open