When I moved into this house I found out the blind on the living room window had all three of it’s pull strings that raise and lower it were broken. I wasn’t surprised because the six foot wide blind is a beast to pull up.
After finding out a new blind would cost a minimum of $100 I went to Joann and bought blind cord for $7 and re-threaded the pull cords. Easy fix. That was 8 months ago.
Last week I had to blinds open and went to tilt them up when it got dark out. The piece that goes up into whatever turns the blinds snapped off and the wand clattered to the floor. Peachy.
I went online and first had to figure out what the little buggers were called — that’s where I found the term tilt mechanism. Several places carry the parts for various blind sizes. I took the blind down and removed the broken piece so I would know what to purchase. It was a matter of popping out the plastic end cap and pulling the broken tilt mechanism out. It was easy.
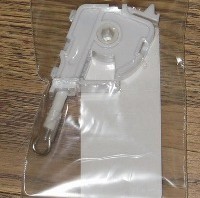
Broken tilt mechanism still on metal bar with end cap removedBroken tilt mechanism removed. The part that connects to the wand is missing (I broke that off) and you can see six-sided hole that fits over six-sided metal bar.
The most important thing with this type of repair is determining if the blind is even worth it. Spending $10 for this part and shipping was worthwhile since a new blind would cost 10 times that. Not sure I would do it for a $35 blind, but since I hate throwing stuff out if it can be repaired there’s a good chance I would.
If you’re doing this repair make sure you get the correct size tilt mechanism with the correct hole. That metal bar that spans the width of your blind has to fit into the hole so it will tilt your blinds up and down. My bar is 6 sided and the height of my header is 1 1/2″. They sell the tilt mechanisms with the plastic parts like what broke in mine and more expensive ones that have metal parts.
I ordered from Fixmyblinds.com. They shipped it on Monday and it was in my mailbox on Wednesday.
The repair consisted of angling in the piece that sticks out to attach to the wand through the hole in the head rail, sliding the tilt mechanism over the metal bar and then snapping it into the head rail. It was much harder getting that 6′ blind down and back up again than actually doing the fix.
new partNew part installed on bar, snapped into place, and end cap replaced
Now I hope nothing else breaks on the blind before I sell the house.
I’ve been living in an area that has made me more security conscious — didn’t know when I moved here that it’s a high crime area and can’t wait to move again. Anyway — I’ve discovered some low-cost interesting ideas.
I watched the video at Super Grip Lock where they mentioned bump keys. Bump keys? A quick search led me all too quickly to YouTube where an assjerk young man explained in-depth how easy bump keys are to make and use and how most home owners are too stupid to know about them. Just peachy. Glad to know we’re educating our criminals.
Now I really want to further secure my deadbolts
First step to secure deadbolts
The first thing you should do is check the screws and strike plates for your deadbolts. Most locks come with screws that are too short and flimsy strike plates. Replace screws with at least 3″ screws that will go through the door frame and well into the studs that frame the door. Screws are cheap.
I prefer a strike plate with a metal pocket. It will need a hole chiseled out of the door frame for the pocket to fit in. That’s a little bit of work to that, but in my opinion it’s more than worth it. The strike plate should also be secured with screws that are long enough to go through the door frame and into the studs.
Both the long screws and the better strike plate will slow down or stop kicking a door in, but we all know if someone really wants in they find a way. These ideas are to make another, easier house more appealing so maybe they’ll leave mine alone.
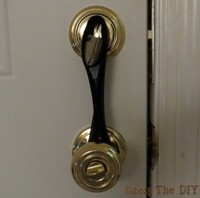
Deadbolts with screws on inside
I stumbled across Simlock and it took me about 2 seconds to decide to order one. Right now they have a 2 for 1 sale so I got 2 for $9.98. They describe it as “SIMLock installs as a secondary lock on a current deadbolt”.
Takes more time to get the screwdriver than to install the device. When it’s in position your key, a bump key, or whatever is not going to be able to turn the lock and unlock the door. What a great, simple idea. The deadbolt is a little harder to unlock since it now drags across the top of the screw, but I can live with that.
Simlock in lock positionSimlock released
Deadbolts without screws on inside
As I have 3 deadbolts. One has screws on the inside. Two do not. So how to secure those without screws?
As mentioned above I ran across an article about Super Grip Lock. I like this idea not just for my doors at home, but what a great thing to carry as a woman traveling alone.
There were a couple negative comments on Amazon about it not being long enough if your deadbolt and handle aren’t close together. Mine are close, but since I have a ton of Velcro on hand I decided to make my own. After watching the video on the Super Grip Lock website it didn’t look too hard to do so I made two for the doors that couldn’t use the SimLock since no screws on the inside.
At my previous house I had French doors that both opened in from the middle. One side had slide locks that went into the top and bottom of the door frame and no knob since it was supposed to be fixed most of the time. The other just locked with a double keyed deadbolt. I knew if some just pushed fairly hard the door would probably open. The local police did vacation watches and they didn’t like those doors for the same reason.
It didn’t concern me too much when I was at home because there was a motion detector alarm that would go off. After paying an alarm company for years I had disconnected from their service, so the alarm would scare people, but not call the police. The one time I had the alarm go off at 4:00 AM (for absolutely no reason) I hit speed dial for 911 and the police were there in minutes.
What worried me was when I was gone for extended periods (I’ve done a couple two month trips) and people could empty my house through those doors that faced the backyard. I came up with a solution, but it wasn’t pretty. I didn’t care because it was only there when I was out-of-town for long periods.
I went to one of the big box stores where they sell stainless steel cable. I had them cut a length that would reach from the door frame next to the fixed door to the door knob on the door that opened with extra for wrapping around the knob. They helped me bend loops on each end and secure with crimps.
I had what I regard as a huge eye bolt – 4″ long with an 1″ eye. I sank that bolt all the way up to the eye into the studs along the door frame. When I was going to leave I hooked one end of the cable on the eye bolt, pulled it tight across to the door knob, wrapped it around the knob until I just had enough cable to barely get back to the eye bolt. Then I put a pad lock through both loops of the cable and the eye bolt. Here’s a sketch of the general idea.
When the cable was installed the door would open, but just barely. The opening wasn’t big enough for a person to fit through. Again — if someone really wanted in they could just break the glass out of the french doors. This was to make trying to get in unappealing.
A couple of people asked what the eye bolt was for. No big deal. Before I put the house up for sale I removed the eye bolt, filled the hole, touched up the paint and no one knew it had ever been there.
Avoiding paranoia
Life only makes you as miserable as you let it. I do what I think keeps me reasonably safe and then let it go hoping for the best from life. But I have never been broken into and felt the violation that comes with that experience and sympathize with those who have. These ideas just make me go back to sleep a little bit more easily when things go bump in the night.
Since one of the complaints about the Super Grip Lock was that it was too small I will preface these instructions with the fact my deadbolt and doorknob are not far apart. It’s about 5 1/2″ center to center. If your deadbolt is much farther, just cut longer pieces of Velcro to fit your door.
The last time I checked Joann sells 1 yard packets 3/4″ Velcro for $.99. Wherever you get it, a yard is more than enough.
Constructing the security strap
My deadbolt turn knobs are like an arrow — a flat end and a pointed ended. The flat end is bigger than the pointed end. I measured and a pocket inch high would be perfect for the flat end. Check your deadbolt knobs to see how big a pocket you need.
All sewing should be double stitch or tight zigzag to make sure it’s strong.
I cut 2 2″ strips of 3/4″ Velcro hook (the stiff side) and sewed them together so it was approximately 2″ by 1 1/4″. This is the pocket.
Sew a 24″ strip of 3/4″ Velcro hook centered on one end of the pocket with the hook on the pocket and the 24″ strip facing the same way.
Fold the pocket lengthwise in half with the hook facing out. Stitch both sides of pocket.
On then end of the 24″ strip opposite the pocket fold 8″ back with the hook side facing out and stitch together.
Cut a 16″ strip of 3/4″ Velcro loop (the softer side) and sew it to the end of the hook strip opposite the pocket that you just sewed double. The loop should face the same way as the open pocket.
Using
1. Attach the pocket on the deadbolt knob to the end that applies pressure (pull the knob toward) to the locked position.2. Wrap the strap around the turn knob again.3. Go down and around the doorknob. Wrap back up and around the deadbolt turn knob and down the other side toward the door knob.4. Pinch the strips running between the doorknob and the deadbolt together to hook the Velcro.
Testing
After I did one of these I had the door open with the deadbolt thrown and tried my key. I would have bent the key before the deadbolt would turn. I was happy 🙂
I’m going to make a third one, probably longer, to throw in my bag when I travel that will hopefully work on hotel door deadbolts as well as these do at home.
This isn’t so much about the project, but the product that I used and was very pleased with.
I have a lamp base made by my grandfather. It’s oak that he had turned on a lathe and then finished with lacquer. I didn’t like the way the lacquer yellowed so I regrettably sprayed it with a textured granite paint years ago. Researching on the internet told me that type of paint is extremely difficult to remove. I haven’t used paint stripper or remover for quite a few years so I had no idea what to try. I really wanted the texture of the granite paint off the lamp base so I would be down to wood grain again. I dreaded the job. I wasn’t sure I would be able to get the granite paint off and I had no expectation of getting the thick layer of old lacquer off.
After perusing the options at Lowe’s I decided on a can of spray since this was a fairly small job – Crown Tuff-Strip. It’s described as a heavy duty stripper that clings well to vertical surfaces.
How it worked
I took the lamp base and the spray stripper outside so I wouldn’t breathe the fumes. I had purchased chemical resistant gloves to protect my hands. I put the lamp on a piece of cardboard and sprayed one side of the lamp.
The directions said to use a putty knife to scrape the melted paint off. Because of the curves I was going to end up gouging the wood more than removing the paint. I had a bag of steel wool and switched to using it to wipe the melted paint off. The can said to wait 5-10 minutes after applying the stripper. Closer to five worked best — at 10 the paint was starting to re-solidify. It also worked better doing small areas.
The paint wiped off amazingly easily, but the process is tedious. Spray the stripper, find something to do for a few minutes, wipe off the section, repeat, and repeat. It took a while but when the paint was off I realized only a couple small patches of lacquer remained, so I worked on them and got them off. The entire lamp is down to bare wood and looks gorgeous.
I didn’t breathe any bad fumes, didn’t hurt my hands, and with a little over and hour of working I had a clean lamp base. I will definitely use Tuff-Strip again — the product really did perform as the can promised.
(note: I have no sponsors so this is an objective review.)
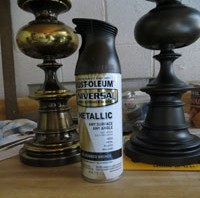
This post isn’t so much about my lamps as it is about the paint. I love Rustoleum Oiled Bronze Spray Paint! The can said it was good on wood, metal, plastic, and masonry. So far I’ve tried it on metal lamps, plastic coasters and a switch plate and ceramic knobs
I have two good quality brass lamps that were in desperate need of an update. I toyed with the idea of using brushed nickel spray paint since that turned out so well on the ceiling fan, but decided it would be too light a color. Then it hit me an oiled bronze finish would be perfect.
How to
I wrapped up the cord in a sandwich bag and put painters tap around what still stuck out. Another sandwich bag protected the socket from paint. I sanded them a little — there were a couple of spots I wanted to smooth out and I also wanted the paint to stick. Since these take no abuse I didn’t use primer. We’ll see if that was a good decision.
That’s all the prep. Don’t forget the little finials that hold the shade in place. I forgot all about them until I was putting the lamps back in the living room and had to go drag everything back out to paint those two little pieces so they would match.
I did one lamp at a time so I have a good before and after. What doesn’t show in the picture is the oiled bronze paint has a little bit of gold fleck in it that it beautifully reflective. I think that’s what makes this finish really gorgeous.
I want to get new shades but this is one of the lamps and the plastic coaster I had that were gold and were now oiled bronze.
I’m in the process of painting my living room tables. The one above is the last one I have yet to do. I painted the ceramic knobs I had on the 3 tables with this paint and I will have to see if it sticks. I sanded the knobs before painting, but didn’t feel like I put much of a dent in the ceramic surface.
I have decided to try it on a switch plate to see how that holds up. It’s the switch by the door to the garage and gets finger prints so maybe this will hide the marks.
The spray can that sprays in all directs, even upside down, was great for getting all the nooks and crannies on the lamps. Huge improvement in the lamps and all it cost was a $5.77 can of paint from Walmart.
I recently read a post explaining the chemistry behind this process — how the tannin of the tea would combine with the oxidation of vinegar/steel wool mixture and provide an aging stain for new wood. I was doubtful. Since the ingredients were all on hand and economical I decided to run a test to see if it would do anything.
Brewing the mixtures
I made a small amount of tea with 4 tea bags and let them steep for a couple of hours. I got a small chunk of 0000 steel wool and dropped it in about 1/2 of apple cider vinegar. Both apple cider and white vinegar can be used — I just decided to try apple cider first. I left the lid off the jar, but the vinegar was evaporating so I sealed the jar and set both jars aside for a week or so — hence the mold you see in the tea jar. I just avoided those lumps and didn’t think they’d affect the staining or lack of. Notice the color of the popsicle stick? It’s from stirring the vinegar solution.
A few days before I had slopped both mixtures on a small piece of 2×4 expecting nothing. I walked by a couple hours later and stopped dead in my tracks saying “No way!” The smooth sides were dark brown and the rough ends were almost black. I decided it was time for a more serious test. That first test piece is in the top right corner of the rest of the pictures.
Wood before staining – 2 x 4 and pine board
Very light coat of tea applied with foam brush – can’t even see the tea
Vinegar solution applied very lightly with a foam brush (immediately after application)
After drying a couple hours
I can’t believe how much it stains. Both the tea and vinegar were barely wiped on, but the 2 x 4 in the upper left is almost black. I wanted to see if there would be a difference between just vinegar and vinegar applied over tea and there is a big difference. The tea does act with the vinegar to make it darken a lot more.
I want to make another toolbox so I may use this stuff as a test on that. Be warned about this vinegar/steel wool solution. It may just be vinegar but it’s a serious stain. I got it on a Formica clad board and it won’t come off, so if you use it show the same care you would with any stain.
chair rail around room (sorry — I don’t like it in a kitchen…) – removed and wall patched
gap above and sides of dishwasher – dishwasher raised and wood time added to side
black painted kick plate below cabinets – painted with several coats of white
vinyl flooring – when I had the dishwasher out to clean it I saw carpet under the vinyl. Someone else can deal with ripping all that out. I pass.
Everything got done but #1 and #16 — popcorn ceiling and vinyl floor with indoor/outdoor carpet under it were more than I chose to tackle. I would have liked to replace the railing along the opening for the stair with a solid wall, but decided to forgo the expense. There are posts galore for everything I did.
Here’s what it cost me. I am amazed what I could accomplish for under a thousand dollars.
Before
I moved the white refrigerator to the garage and it will sell with the house when the time comes. In the meantime I wanted to use my own refrigerator.
After
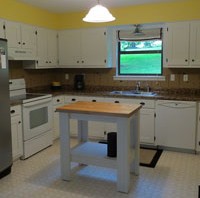
Here’s a picture with all the furniture out of the room so it shows the cabinets well.
Here’s the kitchen with the island and rugs I added. I got the set of three rugs from Walmart for $33. The dogs like rugs, or rather they hate hard floors, so I wanted plenty of rugs for them.
Picture taken from the sliding glass door so you can see the chalkboard and plaques I made.
This shows the painted ceiling fan and the curtain I made for the slider. The curtain rod is 1″ conduit pipe since I wanted something strong enough it would not need a center bracket. The rod cost $10.
Picture that shows the backsplash behind the stove.
Odds and Ends
Nikki was grossly offended she was banished from the kitchen while I took pictures.
While painting I ran across a couple wall anchors that were still in the wall. I kept painting and was wondering what they had been for when it hit me. Holy crap! I don’t have a smoke detector! I ordered a smoke detector and a new doorbell from Amazon — the old, big, brown, ugly doorbell had to go.
The wall over the microwave looked barren. I didn’t want to spend any money so I used scrap lumber, printed vintage labels off the internet and mod podged them on the wood.
I made this on the computer and had it printed. I like what it says 🙂
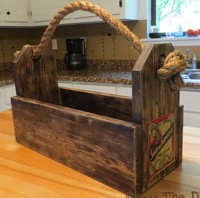
I wanted something made out of wood for the shelf on my new kitchen island so I found a box I liked on Houzz in their ideabooks — simple plan and materials.
I purchased a 1″ x 6″ x 8′ board and a dowel. Cutting the end corners provided nice little scraps for propping up things when I’m painting them. I had a 1″ paddle bit for the holes. I also bought 3′ of heavy sisal rope thinking that might make a cool handle if I could knot it.
Assembled box and testing rope — I love how the rope looks!
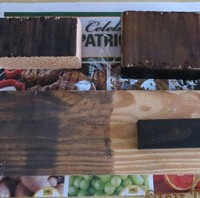
I wanted the wood to end up looking like barn siding and wasn’t quite sure how to get there. I wanted to see what burning would do, so I tried that first.
Burned with propane torch
Next, I beat the crap out of it with a hammer and assorted metal pieces like bolts, screw, etc. Seems a little weird to lovingly and carefully build something and then burn and beat it up.
I thinned white primer with water and white-washed the box so the white would be in the distressing I had added. When it dried it not only was lighter than I wanted, but it had a pinkish tint to it that had to go. I ended up getting some very dark stain called Kona by Rustoleum since I figured the white wash would make stain slow to penetrate. I finally got a look I was happy with so I added the rope to see how it would look.
I got some vintage labels I found on the internet and glued them to the ends. I used a paste wax to finish the entire box. Here’s the final pics of the toolbox. Burning the wood made the sap boil out of the knots and they didn’t take stain — I like the golden brown the sap added to the textures.
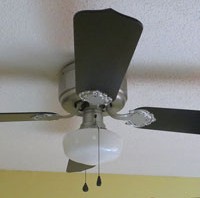
In all my picture taking of what I’ve done to the kitchen, I have carefully avoided one thing — the ceiling fan. You can see why. It was like an ugly albatross hanging there.
I was dead set against spending money on a new one and when I’d look at it I’d mentally mumble something along the lines of “The next people who own the house can do something about that…” But it bugged me that it had absolutely nothing to do with anything I’d done to the rest of the kitchen.
So I looked online to see if anyone had painted a fan and there were a few who had. My concern was about spraying paint into the motor and what effect that would have, but no one seemed to address that.
I picked up a $5 can of Valspar Brushed Nickel Spray Paint, a new set of fan and light pulls in black and thought for $8 I’d see if I could make the fan look a little better and at least go with the brushed nickel light fixtures over the sink and island.
Disassembling and cleaning
I removed the fan blades and the light fixture. I lucked out and the housing came off and I could leave the heavy fan motor hanging. Everything was filthy so they had to be cleaned first. I thoroughly dusted the motor to remove cobwebs and thick dust. The metal parts cleaned up easily. I started washing the blades and black stuff started rolling off the side that had been on top. I realized there was a layer of black, greasy dust on the tops and edges of the blades — it was gross and paint would never stick to it. I had to use a scrubby and scrub hard to get it off.
Partially removed black grease on edge of fan blad
I was completely undecided what color to paint the blades, black or white, and set them aside to dry and worked on the metal parts.
Painting
I took the metal parts outside and sprayed the blade brackets, light fixture, and motor cover. I liked the brush nickel paint so much I decided I would probably paint a couple of living room lamp with it when I paint my end tables. If you added a clear top coat to give it some shine I think it would look exactly like the other brushed nickel fixtures I had. I decided to skip that step for the fan though.
In an effort to not have to take the motor down I sprayed some of the paint in a plastic cup and ran in the house and painted the exposed metal on the motor housing that led to the light. There were so many wires crammed inside I didn’t want to remove it. I had to move fast before the paint dried in the cup. It didn’t look perfect, but it looked good enough for up on the ceiling where no one would see it closely.
Two coats of paint and the metal parts were ready to go.
Fan Blades
After looking at images of brushed nickel fans on the internet I decided black was the only good color for the blades. Since there’s black hardware in the kitchen it would go well too. I sprayed the plain side of the blades and edges and left the decorative side as is. I had leftover black paint from the chalkboard I had made for the kitchen.
Putting it back together
I attached the motor cover and the light fixture and didn’t think my hand painted part looked too bad.
The CFL bulb was for testing that I had wired the light fixture correctly. I hated that CFL and replaced it.
Here’s the finished fan. Granted it’s still a really ugly fan, but at least it goes with the kitchen now. I couldn’t believe what a cheap, easy, and quick project this was. If you have a ceiling fan that doesn’t match – Paint it!
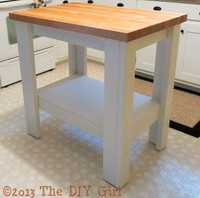
When I completed all the work on the kitchen I felt it looked empty and was screaming for an island. The big issue for me is that I didn’t want to invest a whole lot of money in it. I shopped around and figured out it would cost between a minimum of $200-300 to get a size that would compliment the kitchen. I checked thrift shops and flea markets and couldn’t find anything that would work, so back to the drawing board — literally.
The design
Since this would be my first building project ever, I based my island design on a workbench I had found at FamilyHandyman.com. Since I’d never put anything like this together before I figured simple and rustic were appropriate for my skill level and my lack of tool as in no nailer and no table saw.
The whole island would be driven by the top I chose. I did a search and found a Grizzly workbench top for $89 plus $14 shipping that was 24 in. x 36 in. It looked great online and had excellent reviews so I decided when I had the base completed that would be the top I’d get.
I did my own plan so I could figure sizes depending on how much overhang I wanted the top to have. I went with 1 in. on the corners.
Once I knew how big it was going to be I figured out how much the lumber would cost.
Building the base
I didn’t want to invest in a lot of tools, but I clearly needed decent clamps to hold the corners together. After checking at the big box stores and being appalled by how much they wanted for a 12 in. clamp I went to Harbor Freight and got 4 clamps for less than they wanted for one since I had a coupon for $1.99 each. What a deal and I like the clamps — I’ve even reversed them and used them as a spreader on one project, so they’re pretty versatile.
I wanted to screw the base together since I don’t have a nailer. I have always thought I sucked at using a drill to power in screws — perhaps I was using crappy screws.
I got the lumber at Lowe’s and purchased the screws shown on the left. The come with their own square driver bit. I loved the screws.
I cut the legs pieces with my compound miter saw. After cutting I measured and marked each leg so I put the screws in the exact same place on each leg in case they showed when the base was complete. I clamped and glued the legs before adding 3 screws in each leg. The screw side of each leg would be on the side so the front facing part of the leg would look good. Then I assembled the base.
Once the frame was complete, I measured what I needed for the shelf on the bottom, bought a board at Lowe’s and had them cut it to the exact size I needed. My way of getting around not having a table saw.
I primed and painted the base the same color as I had painted the kitchen cabinets and while it was drying I ordered the butcher block top to finish it off.
Grizzly Butcher Block Top
The experience of getting the top started reminding me of the materials odyssey for the doing the Shaker update on my kitchen cabinets.
I was so excited when the top arrived. I opened the box and the butcher block was absolutely gorgeous. I removed the broken pieces of the corner protector and found that UPS had dropped the top so hard on one end that even with Grizzly’s great packaging one corner was chipped off.
I called Grizzly, not Amazon even though that’s where I ordered it, because I simply didn’t know what to do. There was no way I could re-package it to send back after cutting the plastic strapping.
The people at Grizzly were wonderful. I emailed pics of the damage and they said they’d send out a replacement and let UPS know to pick up the damaged one.
The second top arrived and had been dropped so hard on one end both corners were mashed in. I was very frustrated. I had a finished base sitting in my kitchen with no top and I was 100% confident that UPS would damage another one if Grizzly was even willing to ship it.
I spoke to the folks at Grizzly and they were willing to send another, but would add additional packaging. The third top arrived and the outside box was torn and trashed in places, but the extra layers of bubble wrap and the second box took all the punishment and the third butcher block top was in perfect condition. Thank you kind people at Grizzly! Shame on you careless people at UPS.
While waiting for the butcher block top I had added nylon feet to the base so it would slide easily on the floor. That maple butcher block weighs a ton so it was a good workout hefting the top onto the base. I used L brackets to secure the top to the base and it was all done. Finally. And I think it looks perfect in the kitchen — of course I’m a little prejudiced…