I was approached by a reader to assist in coming up with measurements for a smaller dog cot for her dogs. Donna was kind enough to send pics of her puppies and the cots so I could post them. Aren’t they cute?
Donna built the PVC frame using 1″ pipe: the long sides of the PVC were cut 24″, the short side of the PVC were cut 18″.
Donna told me that when assembled there was 22″ and 16″ of the PVC exposed between the corners so that had to be the width of the finished slings
Donna told me the circumference of the 1″ pipe is approximately 4 1/4″ so that’s what had to be added to wrap around the pipes.
I came up with cutting the fabric pieces 18″ x 35.5″ and 24″ x 28.5″ and Donna told me that working out perfectly once the 1″ side hems and the loops to go around the pipes were sewn. That means you only need 1 yard of fabric to make each set of the small dog slings.
Follow the step by step for the large dogs PVC cots subbing in the smaller PVC and fabric measurements.
These are the cots Donna made — she did a beautiful job!
Email me if you have questions, but I may have to defer to Donna’s expertise since I haven’t actually made the smaller size cots.
My end goal with my house is to covert over to a beach themed cottage decor so I would love to have some pieces with a gray weathered wood finish. Most of the stuff I will be staining to look like weathered wood will be pine so I have been testing various solutions.
Helpful videos
For those of us considering a solution of vinegar and steel wool to stain wood there are a couple of videos I would recommend to learn about the process. Rundown – Ebonizing Wood Follow Up explains what iron acetate — the result of steeping steel wool in vinegar — does and how it looks on different woods. He also explains how to enhance it with a tea solution.
The other video I suspect is by the folks at DIY Driftwood although they don’t fess up to that during the video. It goes through trying to get a weather wood finish using 5 different techniques on different woods.
My testing
The last time I tried vinegar and steel wool I let it steep for a week and it turned pine almost black. I want a GRAY weathered wood finish so I wanted to see what would happen if I let it steep for a much shorter length of time. I tried it after 2 hours, 4 hours, 6 hours and it gave me brown, darker brown, reddish-brown. I added a whole lot of white vinegar and it was still brown. I diluted it more and got brown.
I let the solution site 1 weeks, 2 weeks, 3 weeks. No matter what solution I used of steel wool and vinegar I get anything from brown to reddish-brown on pine. This solution doesn’t give an aged look on pine in my opinion. May work great on oak, but I’m not building things in oak.
That’s why I found the videos above — I wanted to understand what steel wool and vinegar do chemically and that the tannins in tea increase the effect for ebonizing or turning wood black.
Some tips on steel wool and vinegar
make sure you have real steel wool — apparently there is fake stuff
wash steel wool to remove oil that protects from rust
do test on the same wood you will be staining using a scrap piece
Weathered gray finish
Back to the drawing board to figure out how to get gray. I was hoping to go directly to gray and not have to stain it dark and then use white wash or liming wax to lighten it.
I wouldn’t mind trying the driftwood finish at DIYDriftwood.com, but $5.80 shipping for 2 little packets that cost $14.99??? I tried emailing and asking if they could send the packets in a USPS first class envelope but they said the packets couldn’t be sent air. They were so resistant to the idea I didn’t tell them that USPS first class goes by truck. Guess they want their shipping fees.
I tried a couple small cans of gray stain and I felt they went on like paint.
Courtesy of the Minwax website
I finally tracked down a can of Minwax Wood Finish Classic Gray 271. The lady at Home Depot said it’s a relatively new color for Minwax and they didn’t have it in the little cans yet so I ended up with a quart. I did a test on a piece of pine and loved how it looked.
I used it as a test on an ottoman tray I made and I’m so happy with how it looks. It is a weathered gray with some of the lighter grain showing through the stain – not solid coverage at all. I love the grays and browns — that’s exactly what I was aiming for. This is an oil stain — be sure to thoroughly stir it before applying.
This is how the tray looked after applying 2 coats of stain.
Having just installed 5, count them 5 (house came with no fans) ceiling fans since moving in, I have some pointers for newbies that will make the process a little easier. Ceiling fan installation isn’t bad, even when doing it alone. Some of this information comes by way of learning from my past mistakes…
Know the support you’re installing into: If your outlet isn’t a braced outlet do not trust it. My builder said all ceiling lights were braced to hold fans, even the light on the outside covered patio. I’m not thrilled that I have to go on trust and would like to see it — just not bad enough to climb into an attic in summer in Florida.
If in doubt, remove the existing box and install one of the supports pictured right — they’re available at all big box home improvement stores. It’s easy and a whole lot better than having a fan crash down unexpectedly. I once had a fan I had not installed spontaneously crash down on the bed in a spare bedroom as I watched. The fan wasn’t running and I hadn’t touched it. Fortunately no one was injured, but the event left a lasting impression.
Always, always turn the power off at the circuit breaker: Never work on electricity with just the wall switch off — be safe and turn the breaker for the circuit off until installation is complete.
Unpack all the parts: more than once I have had missing parts or a broken globe for the light. It is really annoying when you are part way through the install and are stopped dead with this kind of problem. FYI – Before I got smart enough to check all parts in advance I refused to take the fan back but instead returned with my receipt and made the store open a box and replace my missing/broken parts.
Really read the directions: All fans seem to go together a little differently. Read the instructions that come with them. It will avoid a lot of headaches.
Strip the wires on the floor: Before hefting the fan motor into place strip a little additional insulation off the wires. They come with maybe 3/8″ exposed and I like more exposed wire to guarantee a good connection with the wires coming out of the fixture box. Just make sure it’s not so much you have exposed wire showing above the wire nuts when connected. It is so much easier to do with the motor sitting on the floor than when it’s hanging from the ceiling.
Use the correct size wire nuts for your connections and make sure they are tight. Here’s a video if you’re new to it.
Assemble fan blades per instructions: This is important since you want a balanced fan that doesn’t wobble. Another thing that seems to vary a little between fans.
Make sure all assemblies are tight: Unless you like rattling noises from your fan be sure to get everything installed with appropriately tight connections.
Test sooner, rather than later: As soon as the motor is up and the light kit installed I stick the bulb in temporarily, turn the power on for a moment, and test to make sure the motor turns and the light bulb comes on. Turn the power back off until you’re completely done. I believe somewhere in my sordid past I have completely finished and put everything away only to discover something didn’t work properly…
I moved into a home with a decent size pantry, but it only had three 12” deep wire shelves. While I find them tolerable in clothes closets, I don’t like the way everything falls over on wire shelves in a pantry. It was really a pitiful use of space that wasn’t going to work for me and I wanted to improve the pantry shelving BEFORE I started unloading boxes.
My sad looking 3 wire shelves in the pantry
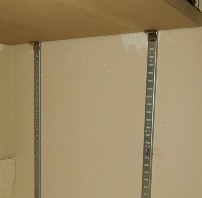
I went to Home Depot and purchased four tracks and shelf clips which are technically called pilaster standards and supports. I also bought a 4’ x 8’ sheet ¾” MDF. I had the nice guys in the lumber department cut the board into 16” strips and then 5 shelves cut to 35 1/2” to maximize the use of the space. Be sure to have your boards cut at least 1/8″ shorter than the space between the tracks to allow for angling the boards into place.
Support for shelfStandard
The only tricky part about installing the standards is the need to get all four of them level so your shelves will be level. I secured each track with 5 hollow wall anchors.
Once the tracks are installed you insert the clips that hold the shelves and drop your shelves in place and load the shelves.
I needed space at the bottom for the dog food and dog biscuit containers so I could only fit in 5 shelves. You can see on the floor I also had room for a container for recyclables. Between the added depth of the pantry shelving (going from 12″ to 16″) and the additional shelves (going from 3 shelves to 5 shelves) the pantry now holds an enormous amount. And if I buy some now appliance or something else that is tall, I can easily adjust a shelf up or down to accommodate it.
At some point when I have more time I want to touch up the wall paint from removing the wire shelves, paint the MDF shelves white, and do a better job with the shelf liner, but that is farther down the priority list.
I went from 1296 square inches of shelf space to 2880 square inches. The sheet of MDF was around $38 and I have boards left over to use on other projects. The standards and supports ran about $20. HUGE improvement over 3 wire pantry shelving and all for less than $60.
I re-purposed the 3 wire shelves in the pantry and they are now in the master closet so nothing went to waste.
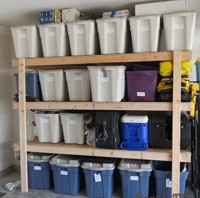
After moving I was desperately in need of storage space in the garage (I basically went from a 4 car garage to a small 2 car garage – talk about downsizing) and after researching I decided to design something similar to the shelves on DIY Design Fanatic with some minor modifications. Another site suggested moving the legs in at least 5” from ends to prevent sagging in the middle of the shelves, at the last-minute I decided to add center supports under each shelf. Other than that, DIY Design Fanatic had a perfect plan. Below is my finished DIY garage storage shelves.
Screws vs. Nails
Using a nail gun would have been quicker, but it would have been a forever kind of assembly. I opted for screws so shelves could be adjusted up and down or the entire shelf disassembled if needed.
I secured the shelf frames with 3” screws and attached the OBX to the frame with 1 ¼” screws. The shelves were also attached to the legs with 3” screws. I am not good with a drill and screws and opted for the more expensive self-tapping screws that went into the wood beautifully and I was able to complete the entire shelf unit without stripping one screw and with very little cussing and swearing.
My advice: spend the extra money and get the good screws. They are #9 star flat-head deck screws available at both Lowe’s and Home Depot and each box includes the bit for driving the screws.
Design
I drew up the design and according to my measurements the shelf unit (one row of containers on the floor and 3 shelves for containers) should hold 22-23 plastic containers. I wanted the bottom shelf to leave 23 ½” for larger containers on the floor. The other 2 shelves would leave 20 ½” and the top shelf would sit at 75”. The garage ceiling is about 102” so that shelf would have about 27” of space.
My only dilemma was how to assemble. Not one site detailed the assembly process.
Materials
I purchased everything at Home Depot and it cost me less than $80. I had them cut the sheets of OBX for me. I don’t have a table saw and have a small SUV — that way I could haul all the materials home.
Qty
Description
12
2 x 4’s
2
sheets of 7/16th OBX ripped in half lengthwise
1
box 1 ¼” self-tapping star deck screws
1
box 3” self-tapping star deck screws
Assemble the shelves
As I cut 4 24” pieces of 2 x 4 for the ends of each shelf I ran into a surprise. I had purchased the cheapest 2 x 4’s and wasn’t aware they are not a full 8’ long – they are a nominal 93″ compared to 96″ . The width of the end pieces was 3” and my shorter 2 x 4’s left me a little short for the OBX. It was less than a ½” so I decided to live with it instead of loading up 11 boards and returning them to the store. The OBX is just a little longer than the frames and it doesn’t bother me one little bit. If I would have purchased 8′ 2 x 4’s I would have needed to cut each to fit under the OBX.
As mentioned above, I was a little worried about the weight on the shelves so I added center supports to prevent the OBX from sagging. Easier to do it now than wish I would have done it later.
Adding the legs
I cut the leg pieces to 75”, the height of the tallest shelf. I then turned one of the shelves upside down on the floor to attach the 4 legs. I used a square and a level to make sure they were straight before screwing them in.
Now the tricky part – how to assemble it the rest of the way by myself. The only way I could think was on its side. I rolled it over with the top shelf away from the wall I wanted the shelving unit to be against since it seemed like that would be the easiest way to lift it into place when it was done.
Adding shelves 2 and 3
I put shelves 2 and 3 on their sides and slid them in between the legs. I measured the living daylights out of it to make sure the top of the shelf second from the top was at 51” on the legs and 5” in from the ends of the shelf. Note: I realized I had the shelf turned the wrong way and removed the shelves, put the top away from the wall, and then repositioned the shelves.
Same for the last shelf. I measured to make sure all 4 legs were attached with the top of the shelf at 27” and 5″ in on each end.
I basically had it lying on its front side. I put the screws in the back legs and screwing into the frame. For the front of the shelf the screws went into the shelf frame and then through the legs. I used 3 screws to attach all 3 shelves to all 4 legs. It was a lot of screws, but the shelf was going to hold a lot of weight.
Erecting
Now the funny part. It dawned on my that I had built really great garage shelves all by myself and had absolutely no chance of setting it up and positioning it on my own. I had mentally started referring to the project as “the beast” because it was.
The weight of each individual shelf was heavy. All three shelves assembled with legs was really, really heavy. I tried to lift the top edge. There was no way that was happening so I called a friend and had to wait for assistance. It was even heavy for the two of us to heave up into place.
I’m still in shock how much the thing holds. I have ladders against the one end and screwed in coat hooks on the other to hang shoes on to keep them off the floor.
And yes, my containers are labeled. I’ve already had people laugh about that, but at least I know what’s in each and every container.
This whole project cost under $80 and took an afternoon. It’s a total bargain when you consider how much storage it provides. And if I move I can take my DIY garage storage shelves apart and take them with me.
I moved to northeast Florida to a new construction home. Big change from the foreclosure fixer upper I came from, but not any less work. I went into this knowing it’s not a perfect house. It’s seriously lacking in storage – of any kind. I’m going to be on a mission to utilize every square inch of useable space since I’m downsizing big time.
The house is also builders grade, builders grade, builders grade. I’m not knocking it – it provided me a home in the price range I could afford – but sometimes builders grade isn’t great quality and it tends to be kind of boring and lacking in pizzazz. The house is pretty plain and badly in need of some personality.
I spent 9 hours driving here and immediately hit the house with my camera to catalog what it looked like starting out without furniture, without anything — well my dog Ellie and a backpack.
So this is my starting point gallery. Not really of any use to anyone other than myself. I want to see where I started so I can compare to where I end up.
[pile_gallery id=’2787′]
Hitting the ground running
The morning after I arrived, and before the moving truck was to arrive I got up and painted the garage. One of the cost cutting measures for my home apparently was not painting the garage. I wanted it painted. I would never have the opportunity again to paint an empty garage. I took it.
As soon as the garage was painted I went to Home Depot, the closest big box store, and purchased a 4’ x 8’ sheet ¾” MDF and had them cut shelves for the kitchen pantry. Three wire shelves were pitiful.
Next up was doing something with the master closet since it had wire shelves that were so high I couldn’t touch them. Apparently they were installed for an NBA player.
I have an “antique” washing machine — it was made in 1995 and has served me well for almost 20 years. At one point I had a home warranty and it broke down and was $7 short of being replaced, but instead the bearings were replaced.
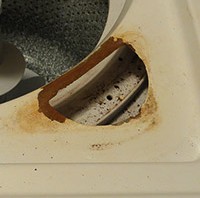
I have always been good about leaving the door up on my top loading machine after using it so it could dry out. But I started noticing rust spots on some of my clothes and realized it was rusting around the plastic insert for the bleach dispenser. I finally pulled the dispenser out and was appalled by the amount of rust.
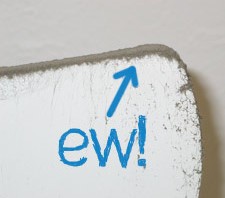
This photo is after I had scraped the peeling paint so it really looks bad. I found a video online that showed how easy it was to remove the cabinet so I removed the control panel and popped the cabinet off. It’s in a small room so I couldn’t pull it all the way off, so I leaned it forward against the wall.
When I looked underneath I found the entire front rim of the cabinet had rust, but the rust around the bleach dispenser was by far the worst.
I scraped the paint and loose rust off and used Ospho. I had used it on 14 steel posts that held up second and third floor decks at my old house and love this stuff. You can see that post at Refinishing Rusty Metal – Ospho
Ospho turns the actively oxidizing rust into an inert substance. I applied Ospho to all the washing machine rust areas and let it sit overnight. The next day it had turned all black.
Since I couldn’t get the washing machine cabinet outside (and it was too cold anyway) to use spray enamel I purchased a 1/2 pint can of Rustoleum Oil Based Protective Enamel in Gloss White that I got at Wal-Mart for $3.97. I figured it didn’t matter how it looked, since it was a 20-year-old machine — I was most concerned with covering the rusty areas.
I applied 2 coats allowing the first coat to dry overnight. I painted the underside of the rim, the area around the bleach dispenser, and the underside of that area.
I’m amazed how well the paint matches. Now only time will tell how well it will extend the life of my washing machine. I realize I’m on borrowed time, but appreciate any extension I can get. And now I shouldn’t be getting rust spots on clothes due to rust flakes falling into the machine.
I have a Moen kitchen faucet that suddenly started dripping right after I put my house on the market to sell. Not exactly the look I wanted for showing – a spattered sink and dripping faucet.
A failing faucet cartridge is almost always the reason for a dripping faucet and is usually not a difficult fix.
Figuring out what cartridge you need
In the past I have taken bathroom faucet cartridges to the hardware store and they have matched it up to the correct replacement. This time I couldn’t even get the handle off and needed directions on how to accomplish that. There was a hole on the back of the handle and using a mirror I could tell there was a set screw in the hold that most likely needed an allen wrench. I tried and tried and could get a wrench to seat and couldn’t get the handle off. While most faucets are really easy to disassemble, this particular faucet was not a friendly design for repairs.
I searched the Moen site. Since I purchased this house as a foreclosure I had no idea what the model of the faucet was. I took pictures of the faucet and emailed them to Moen customer service and they emailed me back with the model number so I could order the replacement cartridge – this process took about 48 hours so be patient. (Note: if you are the original owner of the faucet, Moen guarantees their faucets for like and will probably send you a new cartridge for free.)
Unfortunately this Moen cartridge wasn’t available locally so I had to order it from Moen at over $20. Yikes.
Replacing the cartridge
When the cartridge arrived I called customer service to ask how to remove the handle. It required a 3/32 allen wrench – you have to be kidding me. They don’t etch sizes into little allen wrenches and I didn’t have a fold out tool that had sizes that small. Since it faced away from me I asked specifically whether I needed to turn the wrench clockwise or counter-clockwise and was told counter-clockwise while facing the faucet. That seemed counter intuitive to the lefty loosey/righty tighty idea, but okay. I assumed they knew their faucets. Note the instruction below do NOT show a faucet with a set screw in the back.
Cartridge and instructions
Before replacing a faucet cartridge TURN THE WATER OFF going to the faucet.
Working blind I tried allen after allen and finally felt one seat into the screw. I turned the wrench to the left or counter-clockwise and the handle wouldn’t let go. I didn’t want to ruin the set screw, so back on the phone to Moen to confirm which way would loosen. I had been told incorrectly — I needed to turn it to the right or clockwise to loosen the set screw.
Faucet with allen wrench finally in placeView from the top with allen wrench in placeHandle off, ring removed, and nut removedIt was easy to pull out the cartridge — not all cartridges remove this easilyNew cartridge inserted
After figuring out the set screw the repair was a breeze. The handle came off, a top cover ring slid off, a nut easily came off and I was able to pull the old cartridge out by hand. I popped in the new cartridge, put all the parts back together, turned the water on and no drip!
Don’t ever let a faucet drip. Avoid the annoyance and the wasted water and do this easy fix as soon as it’s needed.
Maybe some things you might not think of in the flurry of activity to get your house on the market…
Clean Windows — clean them and keep them that way checking before each showing to make sure dogs or kids haven’t left smears behind. If bright and sparkling sells houses, letting the light in through clean glass is the first step.
Clean fans blades — you don’t want everything else to be sparkling clean and have a prospective seller look up and find caked on dust layered fan blades. Get up there with a ladder and give the entire fan a thorough dusting.
Clean bugs out of all light fixtures — while you have the ladder in to clean fan blades clean you ceiling fixtures. Dirty globes block light and you don’t want a prospective buyer looking up and seeing a collection of dead bugs. You don’t want a prospective buyer to even think the word bug while in your house.
Baseboards — it won’t do a lot of good to clean the carpet and floors if the baseboards are grimy. Get down and wash the base boards — especially if they’re white. If they run along carpet use a crevasse tool to vacuum all the crud that can accumulate between the baseboard and the carpeting. I find that crevasse to be an amazing dog hair catcher.
Refrigerators – a lot of refrigerators are the family show place. Kid’s art is hung there, family pictures, magnets from past vacations. All that stuff screams “This is somebody else’s house!” when prospective buyers walk into the kitchen. You want them thinking “Hmmm. Nice kitchen. I could see our family in here.” Take the stuff down and pack it safely away for your new house. The kids will understand why it has to disappear for a short while.
Pictures and showings – I got this from a professional photographer who has a very successful business taking pictures for house listings on the internet. He said houses look best with all curtains and blinds open and every single light turned on. He was right — the pictures he took of my house were spectacular.
He told me the follow-up was to do the same thing for every showing of the house. The worst thing you can do is have your house look great in pictures and then disappointing in person because you haven’t opened every blind and turned on every light so the house looks the same as it did in the pictures. Last thing you should do before walking out is turning every single light on for your prospective buyers.
Create a checklist – create a list of the finishing touches you leave until the last minute and put it on your smart phone. I have mine in Evernote and I consult it before every showing. Little things like doing a toilet check to make sure they’re flushed…
Having recently moved to an extremely humid area I was not happy with how mildewy the dishwasher was getting between uses earlier this summer. I live alone, don’t go through the many dishes most of the time and they were sitting in that damp environment too long. Wash my dishes in a moldy, mildewy environment? It just wasn’t very appetizing so I decided to quit using the dishwasher and hand wash for the remainder of the summer.
Now it’s October and I’m getting ready to sell the house so I thought it was time to go back to using the dishwasher — make sure it clean and working properly. I opened it up and sure enough — mold and mildew despite the fact I had cleaned and dried it after I stopped using it. A little online research and I decided to throw in some bleach and run a heavy-duty cycle to sanitize it.
I was about to walk out the door to take the dogs to the park when I thought I hadn’t used the dishwasher in a while so maybe I should check it before leaving. OMG! There was water all over the kitchen floor. Talk about a panic. The kitchen is over a finished basement and I did NOT want to ruin the drywall down there.
Three layers of flooring
While redoing the kitchen I had discovered there were 3 layers of flooring in. The bottom layer is a lovely orange indoor/outdoor carpet, the middle a rigid tile, the top the current vinyl flooring. I knew the carpet would be soaking up a ton of water so I had to hurry.
I turned if off, but the water kept pouring out. I got a bucket and started bailing the water out of it. It was still leaking while I did this.
Warning: Always assume someone before you has done something totally stupid to what you’re currently working on.
I’m working on dragging the dishwasher out from the wall. I am well aware that water and electricity are not a safe mix so I wanted to get the thing out so I could unplug. As I pull it out there is electrical sparking under the dishwasher. What the heck?
I then make 10 trips back and forth to the electrical box until I finally figure out which breaker turns off the dishwasher. Note to self: thoroughly label the electrical box.
I finally get the dishwasher completely out from the cabinets and guess what I discover? Someone somewhere along the way had pulled the electrical connectors that I assume go to the heating element. Did they cap them off? No. Did they wrap them in electrical tape? No. They left them dangling with current running through them so they’d drag through the water and cause an electrical short sending sparks everywhere.
I repeat: Always assume someone before you has done something totally stupid to what you’re currently working on. Find the circuit breaker first and then move the dishwasher if water is present.
Dishwasher float mechanism stuck
The dishwasher had been fine the last time I used it so I couldn’t image what happened to cause the leak. I got online to research what could have caused the leak after I set up a fan and space heater to start drying out the carpet. I found a stuck float mechanism in the right front corner tends to be a common ailment. Some have washers that fail, my Maytag didn’t have a washer since the tube the float sits in is molded into the bottom of the dishwasher.
My understanding is the float is what tells the dishwasher to stop filling. It rises with the water and releases the switch that turns off the fill. Either the switch or the float had failed on mine.
Float inside the dishwasher
As suggested in some posts I removed the float and found a lot of solidified gunk in the very top of it. I used a Q-tip to dig it out and get it completely clean.
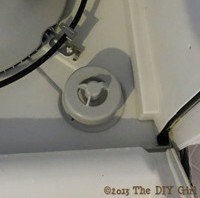
Float switch on bottom of dishwasher – you can see the gray stem of the float resting on the switch mechanism
I removed the switch, cleaned all the years of accumulated gunk off of it and replaced it.
Test run
I had to do a test run to see if I’d solved the problem and I wanted it out on the vinyl floor so I could contain it. If you ever do this, be prepared for the noise. I about had a heat attack when I turned it on, thinking something was terribly wrong, but a dishwasher is just really loud when not encased in cabinets. And my dishwasher model is a “Quiet 300”. No leaking after a 9 minute rinse cycle.
Maybe the gunk inside the float hardened while not being used and froze the float. Who knows? Just glad it’s working properly once again.
Dishwashers are designed to not leak when level
So how do you level a dishwasher once it’s inside the cabinet? I could level it while it was out in the middle of the kitchen, but with all the flooring thicknesses in the cabinet I had no way of knowing if the front to back level would change. I had opted to put 2 strips of 1/4 MDF down to raise the floor in the cabinet to the same level as the rest of the kitchen floor — that way I wouldn’t have to worry where each of the 4 feet were sitting.
MDF strips to level dishwasher — I can’t get over how hideous that carpeting is…
Once again — If your dishwasher leaks control the panic over water flowing everywhere long enough to kill the power first. Then start containing the flood. I’m lucky I didn’t zap myself.