I have 2 dog cot slings for the large dog cots with PVC pipe sides that measure 32″ and 26″. One sling is khaki and the other in nutmeg. Both are made of 100% duck cloth and washable.
I had someone contact me asking me to sew the slings for her – even nagged me over Memorial Day weekend about getting them done – and then refused to ever send payment. Sigh. Does this fall under “no good deed goes unpunished”? Due to this I am rescinding my offer to sew slings for people in the future.
Each sling is $35. $10 for fabric, $20 for labor (they each take 2-3 hours to measure, cut, iron, and sew), $5 dollars for shipping.
If you’re interested either leave a comment or send me a message from the contact page. They need a good home with a dog who will appreciate them 🙂
Update October 19, 2014
The nutmeg sling went to Crystal in Ontario, Canada who is starting a dog kennel and will be using one as a template to make a lot more. I am really tickled about this since I’ve always thought the dog cots would be perfect for kennels.
I have people emailing me about the remaining khaki sling so I suspect it will be gone soon. I will consider sewing more, but due to the time it takes and the increase in the cost of fabric I would charge $40 a set. I checked duck cloth at Joann yesterday and there are a lot of colors in stock so if you’re interested I will check if they have a color that will work with your dog and decor. So if you don’t own a sewing machine and would like to buy the standard size slings for large dogs send me an email through comments or from the contact page.
Update November 24, 2014 – the khaki sling sold also.
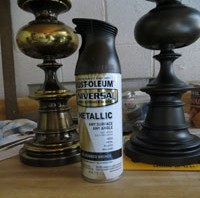
This post isn’t so much about my lamps as it is about the paint. I love Rustoleum Oiled Bronze Spray Paint! The can said it was good on wood, metal, plastic, and masonry. So far I’ve tried it on metal lamps, plastic coasters and a switch plate and ceramic knobs
I have two good quality brass lamps that were in desperate need of an update. I toyed with the idea of using brushed nickel spray paint since that turned out so well on the ceiling fan, but decided it would be too light a color. Then it hit me an oiled bronze finish would be perfect.
How to
I wrapped up the cord in a sandwich bag and put painters tap around what still stuck out. Another sandwich bag protected the socket from paint. I sanded them a little — there were a couple of spots I wanted to smooth out and I also wanted the paint to stick. Since these take no abuse I didn’t use primer. We’ll see if that was a good decision.
That’s all the prep. Don’t forget the little finials that hold the shade in place. I forgot all about them until I was putting the lamps back in the living room and had to go drag everything back out to paint those two little pieces so they would match.
I did one lamp at a time so I have a good before and after. What doesn’t show in the picture is the oiled bronze paint has a little bit of gold fleck in it that it beautifully reflective. I think that’s what makes this finish really gorgeous.
I want to get new shades but this is one of the lamps and the plastic coaster I had that were gold and were now oiled bronze.
I’m in the process of painting my living room tables. The one above is the last one I have yet to do. I painted the ceramic knobs I had on the 3 tables with this paint and I will have to see if it sticks. I sanded the knobs before painting, but didn’t feel like I put much of a dent in the ceramic surface.
I have decided to try it on a switch plate to see how that holds up. It’s the switch by the door to the garage and gets finger prints so maybe this will hide the marks.
The spray can that sprays in all directs, even upside down, was great for getting all the nooks and crannies on the lamps. Huge improvement in the lamps and all it cost was a $5.77 can of paint from Walmart.
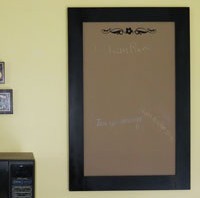
I had a bare wall that needed something and also had a bug to have a chalkboard for jotting grocery lists and to do ideas. Combine those two wishes with left over materials.
I figured the chalkboard framing that worked so well for my Shaker kitchen cabinet update would work for this — I had left over 3″ strips and two larger pieces of MDF. I took one of the pieces to Lowe’s and asked if they would cut it for me — they reluctantly did. I need to get a table saw as soon as a move to a more permanent location…
I painted the large piece with the leftover chalkboard paint from the backsplash, cut MDF strips to fit the sides and then join them on the top and bottom. I decided to get at least one coat of paint on the black border strips, so I did have to buy a can of black spray paint.
I glued the MDF strips to the back using Liquid Nails.
Spray paints sides glue with liquid nailsTop and bottom pieces gluedFramed glued and sanded and ready for last coat of paint
I very carefully taped the chalkboard and covered with newspaper so I could spray the frame again — making sure to cover the exposed edge of the bottom board.
I hung the chalkboard and it needed a little something — it was too plain. So I printed an enlarged border, transferred it to the chalkboard by using a crayon on the back of the my printout and then tracing. I am not a detail painter at all — then I painted in the border accent with black acrylic paint. I can’t believe how much I like having a chalkboard in the kitchen to jot things down and it was free since I used all leftover materials.
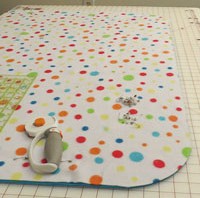
This is just a short post. If you crochet fleece blankets and have only done 90 degree corners, you should try rounded corners. Also, if you crochet fleece blankets you should look into joining or contributing to Project Linus since there are chapters all over the US.
I learned this from a woman in the Dallas chapter of Project Linus — round the corners so you just cruise around them when crocheting the border on a fleece blanket. She was so good at it she could do it free hand — I’m not so good, so I made a template using a dinner plate since it’s a good curve for the corner. Anything smaller makes the corners too tight.
Cutting and pinning 2 layer fleece blanket with rounded corners
The border isn’t finished, but it gives you and idea of how it looks when crocheted. On this blanket I added 4 stitches in each corner when I jumped to the larger crochet stitch so the border wouldn’t be tight and cup at the corners.
Once I tried the rounded corners I never want to go back to 90 degree corners again.
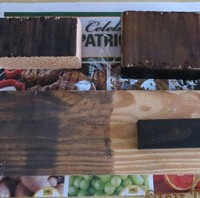
I recently read a post explaining the chemistry behind this process — how the tannin of the tea would combine with the oxidation of vinegar/steel wool mixture and provide an aging stain for new wood. I was doubtful. Since the ingredients were all on hand and economical I decided to run a test to see if it would do anything.
Brewing the mixtures
I made a small amount of tea with 4 tea bags and let them steep for a couple of hours. I got a small chunk of 0000 steel wool and dropped it in about 1/2 of apple cider vinegar. Both apple cider and white vinegar can be used — I just decided to try apple cider first. I left the lid off the jar, but the vinegar was evaporating so I sealed the jar and set both jars aside for a week or so — hence the mold you see in the tea jar. I just avoided those lumps and didn’t think they’d affect the staining or lack of. Notice the color of the popsicle stick? It’s from stirring the vinegar solution.
A few days before I had slopped both mixtures on a small piece of 2×4 expecting nothing. I walked by a couple hours later and stopped dead in my tracks saying “No way!” The smooth sides were dark brown and the rough ends were almost black. I decided it was time for a more serious test. That first test piece is in the top right corner of the rest of the pictures.
Wood before staining – 2 x 4 and pine board
Very light coat of tea applied with foam brush – can’t even see the tea
Vinegar solution applied very lightly with a foam brush (immediately after application)
After drying a couple hours
I can’t believe how much it stains. Both the tea and vinegar were barely wiped on, but the 2 x 4 in the upper left is almost black. I wanted to see if there would be a difference between just vinegar and vinegar applied over tea and there is a big difference. The tea does act with the vinegar to make it darken a lot more.
I want to make another toolbox so I may use this stuff as a test on that. Be warned about this vinegar/steel wool solution. It may just be vinegar but it’s a serious stain. I got it on a Formica clad board and it won’t come off, so if you use it show the same care you would with any stain.
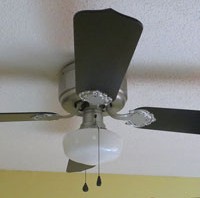
In all my picture taking of what I’ve done to the kitchen, I have carefully avoided one thing — the ceiling fan. You can see why. It was like an ugly albatross hanging there.
I was dead set against spending money on a new one and when I’d look at it I’d mentally mumble something along the lines of “The next people who own the house can do something about that…” But it bugged me that it had absolutely nothing to do with anything I’d done to the rest of the kitchen.
So I looked online to see if anyone had painted a fan and there were a few who had. My concern was about spraying paint into the motor and what effect that would have, but no one seemed to address that.
I picked up a $5 can of Valspar Brushed Nickel Spray Paint, a new set of fan and light pulls in black and thought for $8 I’d see if I could make the fan look a little better and at least go with the brushed nickel light fixtures over the sink and island.
Disassembling and cleaning
I removed the fan blades and the light fixture. I lucked out and the housing came off and I could leave the heavy fan motor hanging. Everything was filthy so they had to be cleaned first. I thoroughly dusted the motor to remove cobwebs and thick dust. The metal parts cleaned up easily. I started washing the blades and black stuff started rolling off the side that had been on top. I realized there was a layer of black, greasy dust on the tops and edges of the blades — it was gross and paint would never stick to it. I had to use a scrubby and scrub hard to get it off.
Partially removed black grease on edge of fan blad
I was completely undecided what color to paint the blades, black or white, and set them aside to dry and worked on the metal parts.
Painting
I took the metal parts outside and sprayed the blade brackets, light fixture, and motor cover. I liked the brush nickel paint so much I decided I would probably paint a couple of living room lamp with it when I paint my end tables. If you added a clear top coat to give it some shine I think it would look exactly like the other brushed nickel fixtures I had. I decided to skip that step for the fan though.
In an effort to not have to take the motor down I sprayed some of the paint in a plastic cup and ran in the house and painted the exposed metal on the motor housing that led to the light. There were so many wires crammed inside I didn’t want to remove it. I had to move fast before the paint dried in the cup. It didn’t look perfect, but it looked good enough for up on the ceiling where no one would see it closely.
Two coats of paint and the metal parts were ready to go.
Fan Blades
After looking at images of brushed nickel fans on the internet I decided black was the only good color for the blades. Since there’s black hardware in the kitchen it would go well too. I sprayed the plain side of the blades and edges and left the decorative side as is. I had leftover black paint from the chalkboard I had made for the kitchen.
Putting it back together
I attached the motor cover and the light fixture and didn’t think my hand painted part looked too bad.
The CFL bulb was for testing that I had wired the light fixture correctly. I hated that CFL and replaced it.
Here’s the finished fan. Granted it’s still a really ugly fan, but at least it goes with the kitchen now. I couldn’t believe what a cheap, easy, and quick project this was. If you have a ceiling fan that doesn’t match – Paint it!
Making stuff from PVC is a fun project. You cut it, sand it, glue it, and paint it. All you need is ideas.
I purchased a couple lengths of PVC, 2″ and 3″, and several caps to make a free form pen holder for my office and individual tool/pen holders for my sewing table. I had PVC cement at home.
I used my compound miter saw to cut the pipe since I wanted smooth edges. I sanded the bottom and top edges and glued the caps in place. This is the first time I’ve tried angle cuts for one of the tool holder so it would lean forward.
Caps glued in
I bought plastic spray paint in a Khaki color and sprayed the PVC inside and out.
Here’s what they look like after I filled them up. I may need to make another low one. The second one in the picture ended up in the kitchen to hold chalk for my new chalkboard.
This is the one I had already made for my office. I glued the individual sections together so it’s one piece. I love being able to have separate holders for different things. Makes it easier to grab stuff.
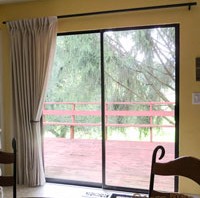
This isn’t a DIY post, but suggestions of how to put curtains on a large window without spending a fortune. Not even close to a fortune.
I had some left over canvas and had already made a roman shade for the kitchen window over the sink so I wanted to stick with the canvas theme for the sliding door in the kitchen. I shopped curtains and rods and they were a lot more money than I was interested in spending on a house that I plan to sell in the not too distant future so I started researching how to do it for as little money as possible and still have it look great.
Curtain
I checked around and ended up getting a 9′ x 12′ canvas painters drop cloth at Harbor Freight for $14.99. Lowe’s and Home Depot sell them for around $20.
I wanted one solid curtain that would slide to one side of the sliding glass door. The only problem with the drop cloth was it’s size made it a beast to wash, iron, and run through the sewing machine.
I opted for a tab top curtain so that I wouldn’t have to purchase rings or any other hardware to hang it. I put the tabs on the back of the header so they don’t show when the curtain is hanging. $15 dollars for a curtain that covers a large window — what a deal.
There are a ton of great DIY blogs entries about using canvas drop clothes and making tab top curtains so you can bone up on ideas before starting your project.
Curtain Rod
Another blog supplied me with the idea to use metal conduit for the rod. I went to Lowe’s and purchased a 10 foot section of 1″ conduit for $6.77. I had already measured and determined what length I wanted the rod to be and was lucky enough to find a nice man at Lowe’s who cut it to size before I left the store.
I would have preferred a matte black to paint it with, but I already had a nearly full can of a hammered glossy black Rustoleum so I used that. Otherwise it would have been another $4 for paint.
You can spend some money on finding something fun to use as finials. I dug around the garage and found some wooden knobs that I sprayed with the same black paint and glued them in the ends of the conduit. Since one end was against the wall and the other end not far from the upper cabinets I didn’t feel they were a focal point.
Curtain Rod Brackets
1″ conduit is fairly heavy so I wanted strong supporting brackets for it. I ruled out the type of bracket on the left because it seemed like I could end up bending it down with repeatedly pulling the curtain back and forth.
I found the brackets on the right at Ebay for $5 each (I thought that was a somewhat ridiculous price).The design seemed like it would do a better job of supporting the heavy conduit. They were a matte black so I sprayed them with the Rustoleum so the rod and brackets would match. I mounted them with a good hollow wall anchor to make sure I wouldn’t be pulling them out of the wall.
The Result
I spent some time pleating the curtain after it was hung and for a grand total of $32 I have a great window covering on my sliding glass door that matches the curtain over the sink. I’m very happy with the result and that I will enjoy having and will be an asset when selling the house.
I was looking for a low-cost solution for the kitchen backsplash. I had painted the walls a gold that matches the color in my countertops using Benjamin Moore chalkboard paint, but wasn’t sure where I wanted to go from there. Maybe do some artwork with chalk or just settle for being able to jot down shopping items?
I had been thinking about the large decal mural my niece-in-law Brandy had done and was browsing decals for ideas.
Shopping and decision-making
Dali Decal website
Then I found Dali Decals.These folks have some great decals and the mini poppies that I loved were only $10 a set. I ordered two sets. When I clicked on the page they have an image of the decals as a backsplash and even allowed you to change the cabinet color, sink color (I had to pretend it was my countertops I had just painted with Giani paint), wall color, and then the poppy color to test your ideas. Different decals have different options.
This was a life saver for me — I had thought about trying to pick up the copper I put in the countertops, but all combinations I tried looked awful. I kept changing things until I found I like picking up the gold in the counters as the wall color and then black flowers to tie with the black cabinet hardware and pull out the black in my counters.
The decals and set up
It takes a while to get the decals. I suspect they wait until there are orders and then cut them so it was about a week and a half before they arrived. The shipping date was several days after the order date.
The decals came on 4 sheets, so I cut the individual flowers out and used painters tape to tape them on the wall and decide where I wanted them. I wanted them somewhat randomly spaced so it wouldn’t look too regimented. Once that was done, I used a level to make a chalk line for each flower so they’d be straight and I spaced them about 3/8″ from the top of backsplash and stove top so I could wipe down the counter backsplash and even re-caulk and not have a problem with the flowers. I don’t know if chalk was a bad idea since it could interfere with adhesion, but they all seem to be firmly stuck to the wall.
Cut decal, provided squeegee, painters tape, chalk for applying the decals
Working on decal application – flowers taped up and Nikki supervising
You first remove a stiff paper backing from each decal, smooth the decals on the wall where you want them, use the squeegee to firmly attach each decal to the wall, and then carefully remove the transfer paper from the top of the decal. I had to be really careful to not pull the little petals and stems away from the wall. If anything seemed to be pulling up I stopped and used the squeegee more. It’s pretty easy.
Working on decal application – flowers taped up and Nikki supervising
Standing back and admiring
After 2 sets of decals I think it’s too sparse so I ordered 2 more sets
I put my tools away, put appliances back in place, stood back at the doorway to the kitchen to admire my handiwork and had two thoughts. 1. I really liked the flowers for an economical, cute backsplash and black was the right choice. 2. They were too sparse. There simply wasn’t enough of them for the space.
I got online to order another two sets in the hopes that going from 20 to 40 flowers would be enough.
Two more sets applied
I added the two additional sets and I’m satisfied with the look. Keep in mind this is a house that I purchased as a foreclosure and my goal here is to fix it up and sell it for a profit. I don’t want to put and arm and a leg into unless I absolutely have to.
As promised by Giani the replacement paints arrived Monday morning.
In the meantime I had figured out how to get the appearance I wanted. If you use a large section of sponge (like half of one) you get a blotchy circles look. If you use the edge of a thinner piece of sponge and use it repeatedly you get a speckled, not blotchy look. This is a case where less really is more.
After you cover the area with the big splotches using a large piece of sponge, switch to a small sliver of sponge to break it up into a finer, speckled look.
I was amazed how little it took to break up big, blotchy patches into a small speckled look. I ended up using this technique to add back some black primer, to add the brown from the new can of paint, to cut down on the Inca Gold that I felt was way too white for the appearance I wanted, and to put back the metallic copper highlights I wanted. I had purchased a Martha Stewart jar of metalic copper that I wanted in my countertops.
OCD warning: Man, where do you stop? Once I started getting the look I wanted I kept dabbing here and dabbing there with all the colors and finally had to mentally grab hold of myself and say “enough is enough!” I had a nice blend of the matte black background, a little Inca Gold, a decent amount of the Feldspar brown to lighten the overall appearance, and speckles of chocolate.
Initial process
I didn’t like the idea of trying to do all colors at one time. I did the primer, then I did 2A, the metallic copper paint, 2B, and finally 2C. I loved the appearance up until 2C — that’s when I should have started using a sliver of sponge edge. I don’t think Giani makes this painfully clear in their videos. In my opinion if you use a big section of sponge there’s no getting around a big and blotchy look.
My error
I think I made a mistake when I called Giani because the new chocolate paint was just as watery when covering the other lighter colors as the original can. No matter how much I stirred and shook the can it seemed to separate when dabbed on the lighter colors and and the edges had a watery almost like the paint was separating. I have no idea if it’s a function of the dark brown pigment — the black certainly was a solid cover — but it separated and didn’t give a solid coverage of the light colors in a lot of places.
That complaint aside, the bottom line is despite the watery brown, I was able to get exactly the look I wanted that’s all the really matters. Well, that’s not all that matters — Giani customer service was awesome. I like a company that stands behind their products.
Top coat
I watched the Giani video on how to apply the top coat and don’t think there’s much that can be added to what they said. It’s humid here so I really didn’t have any problems applying the top coat since fast drying wasn’t an issue. My big fear was dog hair — I wanted to get the top coat on and dried before hair floated in it from one of my yellow labs. They were exiled to other rooms while the paint and top coat was wet.
Due to the high humidity I kept everything off the counters for a few days and was very careful with them for the first 3 weeks. I may have gone way too far with this, but I preferred that to trashing all the work I’d put into doing the countertops.
Result
You can see more pictures of the counters on my posts for the backsplash and final kitchen update. I’m a little disappointed with the pictures since they don’t really show the shiny copper accents that area beautiful. The top coat give the counters a gorgeous depth.
I am so happy with the look of my counters that I find myself smiling every time I walk into my kitchen. Of course who wouldn’t? I’ve gone from washed out ugly to rich color and depth added by the topcoat. It’s a huge improvement.
Follow up note on Top Coat: I ended up with brush stokes in the top coat on the left edge of the sink. It was really bugging me so I used 600 grit sandpaper to smooth out the brush strokes and then carefully applied two coats of top coat to the sanded area. As it dried it all leveled out and there is no lap line where the new coats met the old coats. It’s nice to know you can do repairs if needed.
Also, after this touch up I set a condensating glass on it before it was completely dry and the condensation raised blisters in the top coat. Talk about panic. I thought I’d really messed up the top coat. I left it alone and came back a couple hours later to find the blisters had all settled back into the surface and you couldn’t see where the glass had been. What a relief.
Process: if part way through the process you think your counters look awful — don’t panic! If you looked at the pictures of the watery brown paint you can see things looked pretty bad and I was scared I had made a huge mistake or would have to start all over. I’m still not happy with the watery brown paint, but I love the countertops.
Results 2 months later: The countertops still look awesome. I am careful with them — I don’t let water stand on them and don’t put things on them that I think could scratch. I suspect I’m being paranoid and will post how they are doing a few months from now.