I’m not going to do a tutorial on how to build a DIY miter saw cart since Ana White provides some of the best plans and instructions on the internet. I ran across the miter saw cart evidently done by Lady Goats on her site and loved the idea. The one by Lady Goats is pictured below.

Materials to make it
Since the cart is constructed from one sheet of plywood I thought this was going to be a totally cheap way to have a cart. Then I was told rubber won’t last long in the Florida heat and I should get polyurethane wheels so they will last. The poly casters at Home Depot are $8 or $9 a piece. Yikes.
I tracked down the cool locking brackets at Home Depot for $12.99 although I had to order them since my local store didn’t have them in stock. The online ad referenced “pair” so I ordered 2 pair. Think again. It’s $12.99 per bracket, not $12.99 per pair, so it would be $52 for brackets alone. Scratch that idea.
I decided to use strap hinges that ran $4 each and leftover lumber to prop up the side tables. That got the roughly $130 project cost down below $100.

Warning about height of plans
Since I don’t have a table saw a friend offered to cut the plywood for me. He was kind enough to go with me in his pickup so he could even carry the 4′ x 8′ sheet for me. He’s an extremely experienced woodworker and has been very generous with his time and advice.
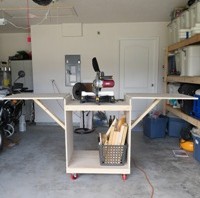
So when I voiced repeated concern about the 36″ height of the side pieces and the 5″ wheels I felt obligated to defer to his opinion that the height would be fine. I kept pointing out countertops are 36″. Add the caster and the height of the saw and I was worried I was going to end up with a miter saw tower and I’m 5’3″. He insisted we follow the plan and cut the sides 36″.

Whoa — is this baby tall. I’m dealing with it, but I don’t think it will be long before I build a little platform for me to stand on so I’m at a better working height. I can’t change the cart since I glued it together.
So think it through before you cut the side pieces and make sure you make the cart a height that will work for your height.
Propping up the side tables without locking brackets
There are lots of pictures on the Ana White site that show options to the expensive brackets. I angle cut 2 x 4 scraps and attached 1 x 2 to the outside of the sides and the underside of the table extensions. This will work fine for me for now. Who knows? Maybe someday I’ll spring for the nice locking brackets.
In retrospect I should have staggered the strips on the cart and the underside of the table so they don’t hit each other when the sides are down. It would make the sides store more closely and save me a little space. When it cools off I will probably move them (I didn’t glue them) and cut new pieces of 2 x 4.


Even though it’s tall for me, I really like the cart. It rolls out so easily and I’m working in no time. When I’m done it’s easy to tuck away.


