Tag: woodworking

  • Aging wood with tea, vinegar and steel wool

    Aging wood with tea, vinegar and steel wool

    I recently read a post explaining the chemistry behind this process — how the tannin of the tea would combine with the oxidation of vinegar/steel wool mixture and provide an aging stain for new wood. I was doubtful. Since the ingredients were all on hand and economical I decided to run a test to see if it would do anything.

    Brewing the mixtures

    I made a small amount of tea with 4 tea bags and let them steep for a couple of hours. I got a small chunk of 0000 steel wool and dropped it in about 1/2 of apple cider vinegar. Both apple cider and white vinegar can be used — I just decided to try apple cider first. I left the lid off the jar, but the vinegar was evaporating so I sealed the jar and set both jars aside for a week or so — hence the mold you see in the tea jar. I just avoided those lumps and didn’t think they’d affect the staining or lack of. Notice the color of the popsicle stick? It’s from stirring the vinegar solution.

    Aging wood with tea, vinegar and steel wool - The DIY Girl

     A few days before I had slopped both mixtures on a small piece of 2×4 expecting nothing. I walked by a couple hours later and stopped dead in my tracks saying “No way!” The smooth sides were dark brown and the rough ends were almost black. I decided it was time for a more serious test. That first test piece is in the top right corner of the rest of the pictures.

    Wood before staining – 2 x 4 and pine board

    Aging wood with tea, vinegar and steel wool - The DIY Girl

     Very light coat of tea applied with foam brush – can’t even see the tea

    Aging wood with tea, vinegar and steel wool - The DIY Girl

     Vinegar solution applied very lightly with a foam brush (immediately after application)

    Aging wood with tea, vinegar and steel wool - The DIY Girl

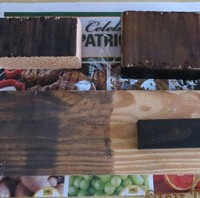
     After drying a couple hours

    Aging wood with tea, vinegar and steel wool - The DIY Girl

    I can’t believe how much it stains. Both the tea and vinegar were barely wiped on, but the 2 x 4 in the upper left is almost black. I wanted to see if there would be a difference between just vinegar and vinegar applied over tea and there is a big difference. The tea does act with the vinegar to make it darken a lot more.

    I want to make another toolbox so I may use this stuff as a test on that. Be warned about this vinegar/steel wool solution. It may just be vinegar but it’s a serious stain. I got it on a Formica clad board and it won’t come off, so if you use it show the same care you would with any stain.

  • Building a toolbox

    Building a toolbox

    I wanted something made out of wood for the shelf on my new kitchen island so I found a box I liked on Houzz in their ideabooks — simple plan and materials.

    I purchased a 1″ x 6″ x 8′ board and a dowel. Cutting the end corners provided nice little scraps for propping up things when I’m painting them. I had a 1″ paddle bit for the holes. I also bought 3′ of heavy sisal rope thinking that might make a cool handle if I could knot it.
    Building a toolbox - The DIY Girl
    Assembled box and testing rope — I love how the rope looks!

    I wanted the wood to end up looking like barn siding and wasn’t quite sure how to get there. I wanted to see what burning would do, so I tried that first.

    Building a toolbox - The DIY Girl
    Burned with propane torch

    Next, I beat the crap out of it with a hammer and assorted metal pieces like bolts, screw, etc. Seems a little weird to lovingly and carefully build something and then burn and beat it up.

    I thinned white primer with water and white-washed the box so the white would be in the distressing I had added.
    Building a toolbox - The DIY GirlWhen it dried it not only was lighter than I wanted, but it had a pinkish tint to it that had to go. I ended up getting some very dark stain called Kona by Rustoleum since I figured the white wash would make stain slow to penetrate. I finally got a look I was happy with so I added the rope to see how it would look.

    Building a toolbox - The DIY GirlI got some vintage labels I found on the internet and glued them to the ends. I used a paste wax to finish the entire box. Here’s the final pics of the toolbox. Burning the wood made the sap boil out of the knots and they didn’t take stain — I like the golden brown the sap added to the textures.

    Building a toolbox - The DIY Girl Building a toolbox - The DIY Girl Building a toolbox - The DIY Girl