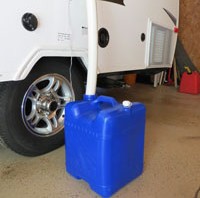
I’ve been trying to figure out a decent way to get my gray water from the kitchen sink in my Rockwood A128S to the Aqua-Tainer I purchased from Amazon.
I did a lot of online research and looked at pictures posted by a lot of different picture. I didn’t want to go with a hose attached to the gray water outlet because it would cause the sink to drain so slow, but I also didn’t want it to be complicated or expensive. With the help of a very nice employee at Lowe’s today I think I came up with a great solution at a great price.
Three pieces: an adapter, an elbow, and flexible pvc spa pipe. They fit so snugly together I’m going to try the assembly without gluing to see if it works fine that way. All for a total of $7.16
1-1/2-in Dia 90-Degree PVC Elbow Fitting
0.80
1-1/2-in Dia PVC Cleanout Adapter Fitting
1.20
1-1/2-in PVC Spa Flex Hose
5.16
Total
7.16
And I think it looks great. I like the white PVC with the camper as opposed to black like many have used. It takes all of a minute to assemble and light weight to store. I would have to check on how to seal the hose into the Aqua-tainer if I’d like to chain a couple containers together.
I just bought a Rockwood A128S – one of the little A frame, hard side, pop up campers. Mine has a small screen in the door, but I wanted more air flow when the heat or air wasn’t needed. An open door isn’t an option for me because I’m a mosquito magnet. I kid you not — if there’s a mosquito within a hundred miles it will find me and bite me. I feel like when I walk outside they all communicate to each other gleefully “Dinner is served!”
I had some left over solar screen material that I like. It’s sturdier than fiberglass so it will hold up to handling a lot better. I might even block some heat.
Materials for project:
Screening (I chose solar screen)
Webbing strap 12-15″
Buckle or Velcro for strap
Black loop Velcro for screen
White adhesive back Velcro for door frame
The decorative board over the door is easy to remove. The buttons are snaps and pop off. Then you remove the screw and other part of the snap.
After measuring the frame around the door I cut the screen to 20 ¾” wide by 70” long and took it out to the camper to mark the locations for the black loop Velcro with a chalk marker. I didn’t want to accidentally place Velcro with the walls fold. I sewed the 2” pieces of black loop Velcro on the marked locations. I didn’t put Velcro on the top corners because the corner screws of the door board would hold them.
Before going back out to the camper I brought the board that tops the door in and placed it on the top edge of the screen, rolled the screen up and then figured out how I wanted the strap mounted. I wanted the buckle on top on a short length to it wouldn’t fall down past the board trim. I rolled up the screen to see how long the strap needed to be. I wanted a ladder buckle instead of Velcro so I could snug the screen down.
Back out to the camper and I started applying the white adhesive back Velcro at the bottom of the door frame. The metal on the bottom was narrow so I cut the Velcro strips in half to fit.
I worked up from the bottom, holding the screen up and marking the door frame where the black hook Velcro fell with a china marker. I could then let the screen lay down while I applied the white adhesive back Velcro to the door frame.
When the screen was attached to all the Velcro spots I cut a small hole in the strap so the center screw could go through. It was a little tricky holding the board with the screw partially through, centering it on the screen and forcing the screw through the strap. Holding all this while getting the board screwed back onto the wall would have been a whole lot easier with another set of hands but I managed.
Once the center screw was in it was a matter of making sure the corners were trimmed enough, getting the screws in the right place through the screen so it was taut and straight and then getting them screwed back into the wall.
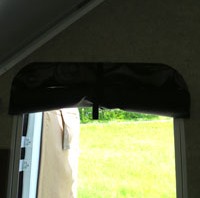
I was pleased how unobtrusive the white Velcro appeared on the door frame when the screen was rolled up (didn’t get a picture of it yet). I figured black would have stuck out like a sore thumb. I also tested to make sure the camper closed up with the rolled up screen. No problems there.
Screen in placeScreen stored
I haven’t been camping with it yet so see how it does keeping insects out and dogs in. I post a note when I get back on how it performed.