Tag: Purdy

  • Shaker Kitchen Cabinet Update – painting tips

    Shaker Kitchen Cabinet Update – painting tips

    I won’t go into detail — after everything else I’ve written about painting kitchen cabinets it would be about interesting as, well, watching paint dry. So just some observations.

    Read the label

    Shaker Kitchen Cabinet Update - painting tipsAs mentioned I am using Benjamin Moore’s ADVANCE Waterborne Interior Alkyd Paint – Satin Finish (792). I got curious about Alkyd — their site says Water Reducible Alkyd.  Apparently the major components of an alkyd coating are fatty acids and triglyceride oils and are not petroleum products, but slow the drying time so you end up with a harder finish. On kitchen cabinets this is a good thing.

    If you try the paint be sure to read the label. It is water clean up, but because of the alkyd oil they recommend a final rinse in mineral spirits for your tools. This is how my tools looked yesterday after soaking in paint for the 3 hours it took me to do the second coat.

    Shaker Kitchen Cabinet Update - painting tips
    Cleaned and ready for next coat

    The other important difference is the drying time. They say a minimum of 16 hours before sanding and applying another coat. I let it dry longer since the house is only around 65 degrees.

    Technique

    I feel the second coat went better, but that was because it got down to a routine that I knew worked. The upper cabinets take the longest, partly because I’m painting the shelf fronts, partly because the bottoms of the upper cabinets need to be painted, and partly because there are more of them. The base cabinets probably only took 45 minutes, including painting the toe kick area.

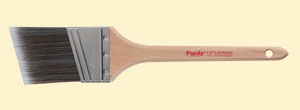
    I did treat myself to a new short handled brush to make easier working inside the cabinets edges — I purchased a Purdy XL Cub. The stubby handle is great for working in small spaces.

    I suggest a very, very light touch with the roller to prevent runs. There are so many edges and corners when painting cabinets that any pressure could unknowingly leave a load of paint that will run after you have moved on to the next section.

    With great sadness I gave up on using a foam brush and went back to my old stand by — quality bristle brushes. I may have had to spend time cleaning, but the application was so superior I was glad I made the switch. The XL Cub did a such a nice job.

    Cleaning

    The mohair roller and brush clean up first with soap and warm water. I always use Dawn dish detergent because it contains grease and oil cutters. After getting as much moisture out as possible with a towel, I then dunked both in mineral spirits and squeezed that out. They look virtually unused after cleaning.

    If you use a painter’s tool with the crescent shape to get water out of the little rollers be very gentle. I was too rough after the primer and started loosening tufts and felt the smart thing was to discard that roller or the loose tufts would end up in the paint. I quit using the painter’s tool and used my hands only to remove water and it worked a lot better. The painter’s tool is a new thing for me and I’m not good with it yet.

    The plastic rolling tray, brush, and roller are all in perfectly good condition to be used again.

  • Quality paint brushes vs. foam paint brushes

    Quality paint brushes vs. foam paint brushes

    I recently read a post by another blogger who stated she only uses disposable rollers and foam brushes. She admitted it wasn’t “green”, but it was easy.

    While I agree (and love) the ease, there are overriding issues with these two brush types.

    Why I hate bristle brushes

    When I was a little girl my skills were not deemed good enough to paint, but they were deemed good enough for clean up. So while the big people painted, the pans, rollers, and brushes were handed to me to clean. And the big people were picky. Needless to say I got really good at cleaning.

    The funny thing is how the nasty tasks you’re stuck with as a child become the tasks you absolutely abhor as an adult. I can get through the biggest painting project without batting an eye, but I totally blanch at the clean up that inevitably follows. If I felt okay with it, throwing it all away would be absolute bliss for me. Unfortunately I still have those brushes of incredible quality that my dad used to paint with so I am forced to care for them.

    Forced isn’t really an accurate term — I lovingly care for those brushes because in doing so I remember the man who used them and taught me how to use them with skill. Still hate the whole brush cleaning process. Sorry daddy.

    Why I love (quality) bristle brushes

    There’s more to foam brushes vs. brushes you clean and keep than “easy” or “green”  — there’s quality of application.

    I’m not buying that anyone can cut in along the ceiling with a foam brush. I also don’t believe anyone can get paint up into tight corners with a foam brush. Top this off with the fact that they quickly break down and don’t last long enough to complete a big project.

    Case in point: I’ve been painting kitchen cabinets for the first time in my life. I bought high quality mohair rollers (which I would want to clean) and tried to get by with foam brushes for all the corners, etc.

    There were several problems with the foam brush. It didn’t apply a nice coat of paint to the cabinets where I used it. When I was working on the bottom of the cabinets (the most dreaded part of this operation) I could not, for the life of me, force paint up into the corners. Wouldn’t you think foam would do a better job than bristle? Wrong. No matter how much I tried, I couldn’t get paint up there.

    On the second coat of paint for the cabinets I switched to a quality bristly brush. Where I had been totally unable to fill paint into the corners, it flowed in with no problem. Where the foam brush provided smeared coverage of boards that couldn’t be rolled, the brush flowed paint on with smooth coverage.

    One the baseboards (where I was trying to cover black with snow white) the brush flowed paint on with thorough coverage.

    It was a thing of beauty.

    Final analysis

    While I absolutely detest cleaning brushes after a paint job, I have such good results when cutting in around ceilings, windows, doors, and baseboards, filling paint into corners that I will suffer the pain of cleaning brushes for the outstanding application.

    Where do I think foam brushes are perfect? I always keep a stash of touch up paint (in old peanut butter jars that have rubber seals) and a good quantity of foam brushes for touching up spots on the walls to keep them looking perfect. That way me and the dogs don’t have to be perfect. Accidentally slam a chair into the wall? Throw a dog toy that marks the wall? No worries — take a few minutes every once in a while to touch up the marks.

    Big project? Use a high quality brush that’s appropriate for the type of paint you’re going to use. Personally, I love Purdy brushes, but I suspect Wooster and others are also good.

    And be patient with yourself. Learning to cut in is a skill that includes knowing what side of the brush to load the paint on, how much paint to load, and how to angle the brush. It takes practice, but once learned provides beautiful results. And painting can become fun. I’m not sure the clean up can ever be fun…