Tag: Giani Granite Paint

  • Caulking sink after Giani Granite Paint

    Caulking sink after Giani Granite Paint

    Caulking sink after Giani Granite Paint - The DIY Girl
    Finished caulk job — nearly perfect

    I didn’t think I’d like the appearance of clear acrylic (recommended by Giani) around my sink so I ended up ordering color matched caulk (see my post Matching caulk after Giani Granite Paint) so it was way, way past 12 hours by the time I caulked my sink. To be honest — I was putting it off because I dreaded doing it. I thought this would need to be “freehand” caulking with no wipe down and I didn’t see myself doing a good job at that, especially in the nearly impossible-to-get-to back edge of the sink. And I didn’t want to look at a lousy caulk job around my sink that would detract from the gorgeous countertops. I checked with Giani Just to make sure I didn’t steer anyone in the wrong direction I called Giani to ask about their directions on caulking the sink after using their products to paint the surrounding countertops.

    Their directions say:

    Roll on your final Topcoat., then wait . . . – 1 hour and carefully remove tape – be sure to score the tape’s edge while pulling it up – 12 hours and apply clear acrylic caulk around sink’s rim to seal out water – one day before using your countertops and dishwasher – three days before setting small appliances back on your countertops

    When I spoke to Giani they said the 12 hours was an absolute minimum, but your could do it any time after that. Personally — I wouldn’t mess with it until it had dried longer. If the top coat wasn’t completely set up you could make a real mess. Method for caulking As I said — I had a low level of confidence for doing it freehand so I used painters tape. Painters tape is great for straight lines but what about rounded corners. I drew up a template using a bottle (ended up being a vitamin bottle) that was the same roundness as the corner. I used the template to cut pieces of wide painters tape that would span the corners.

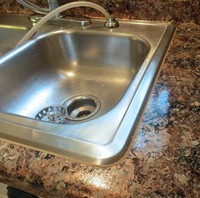
    Once the tape was marked with a Sharpie I found scissors didn’t work for cutting because the tape stuck to them. I went to using my rotary cutter and carefully making the turn on the corner and that worked great.Caulking sink after Giani Granite Paint - The DIY Girl Here’s what the taped sink looked like when I was done.

    Caulking sink after Giani Granite Paint - The DIY Girl
    taped and ready to caulk

    I left a little over an 1/8th inch gap. This wasn’t precise because I don’t think there’s a way to be precise, but it was close enough. Next I applied caulk all the way around — I took no care to do it perfectly because I was going to flatten it out anyway. I used the tip a spoon (experiment with the right curvature) and ran it all around the sink to push the caulk firmly into the gap and smooth it.

    Caulking sink after Giani Granite Paint - The DIY Girl
    caulk applied with no precision at all

    I allowed the caulk to dry for just a few minutes so it wouldn’t be too runny and make a mess when the tape was pulled. I got a grocery bag ready by hanging from an upper cupboard handle so I could dispose of the tape easily. I then very carefully pulled the tape straight up and away from the sink. Remember the order you tape the sink and reverse it for the tape removal. The tape is really messy, so be careful to not get it all over — you might want to wear gloves. I ended up being really glad I planned in advance and had a bag handy for disposal. The good thing about waiting quite a while after doing the countertops was the Giani top coat was so hard that nothing pulled up with the tape. I have no idea how long you have to wait so this won’t be a problem. It’s been about 4 weeks since I did the top coat. The results Here are the final pics of how the caulk turned out. Yes, it was a lot of work for a little caulk job, but it would be a shame to ruin the appearance of the countertops. The caulk looks perfect — even on the back edge. Doesn’t the countertop look great too :-)?

    Caulking sink after Giani Granite Paint - The DIY Girl
    Caulking sink after Giani Granite Paint – The DIY Girl
    Caulking sink after Giani Granite Paint - The DIY Girl
    Caulking sink after Giani Granite Paint – The DIY Girl
    Caulking sink after Giani Granite Paint - The DIY Girl
    Caulking sink after Giani Granite Paint – The DIY Girl
  • $70 Countertop Fix – Giani Granite Paint Part 2

    $70 Countertop Fix – Giani Granite Paint Part 2

    $70 Countertop Fix - Giani Granite Paint Part 2 - TheDIYGirl.com
    Finished paint

    Link to Part 1 of $70 Countertop Fix – Giani Granite Paint


    As promised by Giani the replacement paints arrived Monday morning.

    In the meantime I had figured out how to get the appearance I wanted. If you use a large section of sponge (like half of one) you get a blotchy circles look. If you use the edge of a thinner piece of sponge and use it repeatedly you get a speckled, not blotchy look. This is a case where less really is more.

    After you cover the area with the big splotches using a large piece of sponge, switch to a small sliver of sponge to break it up into a finer, speckled look.

    I was amazed how little it took to break up big, blotchy patches into a small speckled look. I ended up using this technique to add back some black primer, to add the brown from the new can of paint, to cut down on the Inca Gold that I felt was way too white for the appearance I wanted, and to put back the metallic copper highlights I wanted. I had purchased a Martha Stewart jar of metalic copper that I wanted in my countertops.

    OCD warning: Man, where do you stop? Once I started getting the look I wanted I kept dabbing here and dabbing there with all the colors and finally had to mentally grab hold of myself and say “enough is enough!” I had a nice blend of the matte black background, a little Inca Gold, a decent amount of the Feldspar brown to lighten the overall appearance, and speckles of chocolate.

    Initial process

    I didn’t like the idea of trying to do all colors at one time. I did the primer, then I did 2A, the metallic copper paint, 2B, and finally 2C. I loved the appearance up until 2C — that’s when I should have started using a sliver of sponge edge. I don’t think Giani makes this painfully clear in their videos. In my opinion if you use a big section of sponge there’s no getting around a big and blotchy look.

    My error

    I think I made a mistake when I called Giani because the new chocolate paint was just as watery when covering the other lighter colors as the original can. No matter how much I stirred and shook the can it seemed to separate when dabbed on the lighter colors and and the edges had a watery almost like the paint was separating. I have no idea if it’s a function of the dark brown pigment — the black certainly was a solid cover — but it separated and didn’t give a solid coverage of the light colors in a lot of places.

    That complaint aside, the bottom line is despite the watery brown, I was able to get exactly the look I wanted that’s all the really matters. Well, that’s not all that matters — Giani customer service was awesome. I like a company that stands behind their products.

    Top coat

    I watched the Giani video on how to apply the top coat and don’t think there’s much that can be added to what they said. It’s humid here so I really didn’t have any problems applying the top coat since fast drying wasn’t an issue. My big fear was dog hair — I wanted to get the top coat on and dried before hair floated in it from one of my yellow labs. They were exiled to other rooms while the paint and top coat was wet.

    Due to the high humidity I kept everything off the counters for a few days and was very careful with them for the first 3 weeks. I may have gone way too far with this, but I preferred that to trashing all the work I’d put into doing the countertops.

    Result

    You can see more pictures of the counters on my posts for the backsplash and final kitchen update. I’m a little disappointed with the pictures since they don’t really show the shiny copper accents that area beautiful. The top coat give the counters a gorgeous depth.

    $70 Countertop Fix - Giani Granite Paint Part 2 - TheDIYGirl.com

    $70 Countertop Fix - Giani Granite Paint Part 2 - TheDIYGirl.com

    I am so happy with the look of my counters that I find myself smiling every time I walk into my kitchen. Of course who wouldn’t? I’ve gone from washed out ugly to rich color and depth added by the topcoat. It’s a huge improvement.

    Be sure to read my post about finding a caulk that matches.

    Follow Up Notes:

    Follow up note on Top Coat: I ended up with brush stokes in the top coat on the left edge of the sink. It was really bugging me so I used  600 grit sandpaper to smooth out the brush strokes and then carefully applied two coats of top coat to the sanded area. As it dried it all leveled out and there is no lap line where the new coats met the old coats. It’s nice to know you can do repairs if needed.

    Also, after this touch up I set a condensating glass on it before it was completely dry and the condensation raised blisters in the top coat. Talk about panic. I thought I’d really messed up the top coat. I left it alone and came back a couple hours later to find the blisters had all settled back into the surface and you couldn’t see where the glass had been. What a relief. 

    Process: if part way through the process you think your counters look awful — don’t panic! If you looked at the pictures of the watery brown paint you can see things looked pretty bad and I was scared I had made a huge mistake or would have to start all over. I’m still not happy with the watery brown paint, but I love the countertops.

    Results 2 months later: The countertops still look awesome. I am careful with them — I don’t let water stand on them and don’t put things on them that I think could scratch. I suspect I’m being paranoid and will post how they are doing a few months from now.

  • $70 Countertop Fix – Giani Granite Paint Part 1

    $70 Countertop Fix – Giani Granite Paint Part 1

    $70 Countertop Fix - Giani Granite Paint Part 1 - TheDIYGirl.comWhile I am thrilled with how my Shaker cabinet update looks, ease of cleaning, and durability so far, I had yet to solve the problems of ugly countertops and back splash. As you can see in the image on the right the white cabinets need some color contrast instead of the washed out looking counters.

    Since this is a house I don’t plan to stay in, I am doing all the improvements at the most frugal cost possible and still look good. After researching I decided to try the Giani Granite paint rather than replace the counters. $70 and a lot of work instead of hundreds of dollars for new counters sounded like a deal.

    The steps involved:

    1. Clean with SOS or Brillo pads: The picture above shows the counters after I had cleaned them with SOS pads and rinsed them multiple times to make sure the soap residue was removed.

    2. Tape off the walls and cabinets: The next prep step is to tape off the counters before painting. The wall edges were a no brainer, but taping the sink was trickier. After trying to tape off the edges by lining the tape up (with unsatisfactory results) I decided to firmly tape the edges with tape extending over the formica and then use a skill knife to carefully cut the tape away from the sink. I was very pleased with the precision this process allowed. FYI — when Giani suggests 2 rows of tape above the back splash they know what they’re talking about. I accidentally dabbed paint above my one row of tape. Fortunately I hadn’t finished the back splash yet so I wasn’t heart-broken about the paint that went above the tape. 

    $70 Countertop Fix - Giani Granite Paint Part 1 - TheDIYGirl.com
    taping sink and then cutting edge away gave a very clean edge that didn’t allow paint to bleed under
    $70 Countertop Fix - Giani Granite Paint Part 1 - TheDIYGirl.com
    Completely taped and ready to paint primer

    3. Apply the primer: I found the black primer a little intimidating simply because it’s so black. I have an important suggestion before doing this step. PREPARE WHERE YOU WILL CLEAN UP THE BLACK PAINT. After applying the primer the kitchen sink was out of the question so I decided the tub in my bathroom was the safest option. The soap I needed was under the sink (behind my very white cabinets) and I had to push the shower curtain aside (with its snow-white liner) while I had black paint on me. I was able to get set up without getting black paint on anything, but I was stressed. Every little splash as I was washing things scared me too. The primer is very, very black. Better still — take the Giani advice and line your paint tray with foil. I wish I would have.

    As far as the primed surface — the primer dries to a matte black finish.

    $70 Countertop Fix - Giani Granite Paint Part 1 - TheDIYGirl.com

    4. The first coat of Giani minerals: Since I purchased the chocolate-brown kit my first coat was a gold. I cut the round sponge that came with the kit in half after looking at all sides of the ball and picking the side the had the most open cells instead of a side that had exposed tubes of the cells so it would provide good speckling. I attached a small piece to a pencil to get into the corners and tight areas. I ended up cutting another that provided a fairly straight edge to get the top of the back splash and along the wall. After I got the technique down I found the process fun. Except for behind the sink and faucet. That area was a bugger to do.

    $70 Countertop Fix - Giani Granite Paint Part 1 - TheDIYGirl.com
    Working on the first coat
    $70 Countertop Fix - Giani Granite Paint Part 1 - TheDIYGirl.com
    First coat complete – the paint is a matte finish

    5. The second coat: My second was a cream color. I was much happier with the look of the counter when it was darker and figured I would want to darken it up some, but I had to wait for the final coat which is a chocolate-brown to see what I wanted to do.

    $70 Countertop Fix - Giani Granite Paint Part 1 - TheDIYGirl.com
    Counters with 2nd coat of cream-colored Giani minerals

    6. Final coat of paint: the last coat is a layer of chocolate-brown. This is where the problems started. I shook the can, I stirred the can, but when I poured out the paint it was far more watery than the other two coats. I shook it more, stirred it more and it was still watery. I probably made a bad decision and went ahead and applied the watery paint.

    It was a completely different experience from the other coats. It blotched, it ran, it ran out. There was plenty of paint, but I think the sponge absorbed a lot more due to the watery consistency and I was barely able to finish all the counters even with putting less on the last 2/3’s of the surface.

    Where the previous layers had been a nice speckle, this layer looked blotchy and didn’t want to cover. I was concerned.

    $70 Countertop Fix - Giani Granite Paint Part 1 - TheDIYGirl.com
    Watery looking brown paint
    $70 Countertop Fix - Giani Granite Paint Part 1 - TheDIYGirl.com
    Close up of the watery appearance

    Giani customer support

    As soon as I washed up my tools and took a good look at my counters I got online and found the number for Giani. I called and told them about the watery paint and blotchy appearance and asked what I could do. They were very concerned about my problems and offered whatever paints I wanted to correct the problem and make me happy with the counters. They offered to FedEx more of the chocolate and gold paint as well as another sponge. Where customer service seems to be dying a terrible death in the US, these folks know the true meaning of the concept.

    Unfortunately it was Friday so the earliest I ccould get the paints would be Monday which means I have to live with a torn up kitchen for a few days. I just don’t see what other choice I have since the counters are so important.

    Continue to part 2.

  • Decisions on countertops and backsplash

    Decisions on countertops and backsplash

    I ran across a great article at The Family Handyman on comparing cost and materials of different countertop options: Buying Countertops: Plastic Laminates, Granite, and Solid Surfaces. At the end of the article is a link to a pdf that summarizes Wear and Maintenance Comparison Chart for each type. Great information when trying to decide what direction you want to go in for a kitchen remodel.

    They also have a good tutorial on installing laminate counter tops yourself.

    Decision 1: Countertops

    formica-samples

    Well I’ve made a decision about countertops. Or rather the decision was made itself for me.

    I made a trip to Lowe’s to price countertops for the kitchen. Since there’s a mitered corner with one side that runs almost 12 feet the stock counter tops were not an option. They took the measurements and checked with their fabricators on cost.

    The very basic waterfall edge Formica would be $370 for the counters. That didn’t seem too bad. Then they told me installation would be around $600 and tear out of the old counter would be another $200 for the installation. $370 for the material and $800 to make the change?

    I’m sorry, but this isn’t rocket science. I looked underneath the counters and it’s not hard to get them off but the sink would need to be removed. That’s not that big of a deal. all the attachments would unscrew. The install is the reverse except a hole needs to be cut for the sink. How hard can that be since they should have the right tools? Put the sink back in, caulk the edges and your done. So again, my question — $800??? I figure the longest it could take would be 4 hours and I’d be willing to bet they could get the old counters out and the new one installed in under 2. So at the high estimate they get $200 an hour? I don’t think so. The problem being it’s a project I can’t do solo.

    Just as a due diligence kind of thing I’m going to check with a salvage company that sells countertops, but I would imagine installation would once again kill the idea.

    Decisions on countertops and backsplash - TheDIYGirl.com
    Giani Chocolate Brown

    Another idea

    Totally ticked off at the absurdity of $1200 for cheap countertops when that’s what I already have in the kitchen I started beating the internet to death on economic countertop updates. In that search I ran across a lot of painting ideas, but wasn’t really hooked on the idea until I checked Giani Granite Paint for Countertops.

    I read the testimonials, but what really sold me was the long 15 minute instructional video. It was good enough I’m actually excited about painting the countertops because I think it has great possibilities. It would give them a granite look and the sealer coats would add shine.

    Decisions on countertops and backsplash - TheDIYGirl.com
    From Giani website

    I will be going with their chocolate-brown, but the color infinitely variable by how much color you do or don’t apply.

    Even if it only lasts a couple of years – and there were testimonials from people who had done the painting over a year ago and the counters still looked great – at $70 and a couple of days of work it’s a bargain.

    I looked at using Envirotex Lite to coat the counters and got scared off by comments that direct sunlight would cause it to yellow. With a south window over the sink and a sliding glass door in the kitchen the coating would get a lot of natural light. Beside it would be over $100 just for the top coat.

    I’m going to wait until it warms up to paint the counters since the Giani instructions say it needs to be above 70 degrees for the whole process and I don’t heat the house that warm in winter months. That’s okay – I can wait.

    Decision 2: Backsplash

    Decisions on countertops and backsplash - TheDIYGirl.com
    Benjamin Moore Chalkboard Paint

    After looking at a gazillion economical backsplash ideas on the internet I’ve decided to wait until the counters are painted and then go to Benjamin Moore and have their chalkboard paint tinted to a coordinating color.

    Not sure where I’ll go once the chalkboard paint is up, but I’ll figure that out then.

    These ideas are probably at least a month or so down the road since I want warmer weather for the counters and will be working to solve the cabinet door and drawer fronts in the meantime.

    Maybe by summer I will really have the kitchen finished…