Tag: Flagstaff 25BHS

  • Favorite Things – Travel Trailer Miscellaneous

    Favorite Things – Travel Trailer Miscellaneous

    There are few things I have gotten for the trailer that have worked out really well.

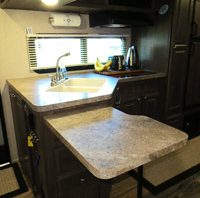
    I brought a wooden toolbox I had made that has a rope handle. I filled it with jars and a utensil holder to store all my silverware (4 place setting set from Ikea) and kitchen utensils. Since my trailer only has 2 smallish drawers in the kitchen using the toolbox freed those drawers for other things. 

    I then added the OXO rotating utensil holder for my longer cooking utensils. 

    travel trailer

    I obviously have to pack these when I’m moving the trailer, but have loved having everything within grabbing distance when I’m cooking. 

    Another kitchen addition is the Kamenstein Perfect Tear Wall Mount Paper Towel Holder in Stainless Steel. I had the counter top one in my house and like this one just as well. No paper towels spooling off the holder.

    I researched and decided on the Seville Classics UltraSlimline Tower Fan 40-inch Tower Fan. It helped so much on stiflingly hot days this summer. It helped keep my electric bill down since I was monthly and paying for power at that time.

     Since I am a little vertically challenged I needed a step stool. I got this little thing that folds flat for storing but is strong enough to feel safe.

    And I feel I should mention my felt heart garland. I have several garlands (fall leaves, old-fashioned Christmas bulbs, the hearts, and bunnies) that easily store in a plastic baggy when out of season and add next to no weight to the trailer. I must have my holiday decor :-).

  • RV Roof UV Protectant

    RV Roof UV Protectant

    Maintenance day: I spent a fun filled day scrubbing my travel trailer roof and then applying a roof UV protectant to it.

    Since slippery high surfaces make me nervous and I’m doing these projects solo I lean toward caution, so I scrubbed the entire roof on my hands and knees with a scrub brush and the recommended solution of Spic and Span for my rubber roof.

    Yesterday had been a bizarrely (and scary) windy day where the gusts were so strong I wasn’t sure my trailer was going to stay upright. It tore apart the sewer hose support, blew the sewer hose around, tried to rip off the tire covers, and dislodged every possible thing it could wrap it’s fingers around. Not a fun day at all. The wind came up so suddenly the slide had to come in for the day. The trailer isn’t too livable with the slide in.

    So today I was thrilled with a crystal clear, calm day. So was every bug in Padre Island National Seashore. They loved my wet roof. Spiders, butterflies, skippers, lady bugs — lots of insects were attracted to my wet, clean roof.

    RV Roof Protectant

    The view of the Gulf of Mexico was spectacular from the roof with particularly azure seas. My brilliant white roof was a pretty beautiful sight as well.

    RV Roof Protectant

    Once the roof was dry (and I had to get up there with a towel to mop up some puddles that were not drying) it was time to apply some UV protection to the rubber roof. I decided to try the Protect All brand in a quart bottle since it was available at a local RV supply store.

    I applied a decent layer to my 8′ x 21′ roof and the quart covered with a little left over in the bottle. Once again I was on my hands and knees. Braver souls couldn’t definitely save time and pain by applying with an applicator on a broom handle.

    I will see how it holds up over the next 3 to 6 months and report back. I was pleased with the condition of the roof — some shoe scuffs that would not come off, but otherwise in great shape.

    This is the stuff I used:

    RV Roof RV Portectant

  • Favorite Things – Instant Pot

    Favorite Things – Instant Pot

    When I was going through the decision process of what kitchen appliances to take in the travel trailer I decided an Instant Pot was one of the best things I could get. It has mutiple functions in one appliance: Pressure Cooker, Slow Cooker, Rice Cooker, Saute/Browning, Yogurt Maker, Steamer & Warmer.

    Here it is on my counter top extension and ready to make Thai pasta.

    Instant Pot

    I had never used a pressure cooker before so I bought it a few months before hitting the road so I could figure out how to use it. It’s become one of my favorite appliances. Some of the things I’ve made:

    • Hard boiled eggs in 5 minutes that almost peel themselves
    • The best shredded chicken ever (and you can use it SO many ways)
    • 5 minute Thai pasta
    • Chicken enchilada soup – pressure cooker infuses the flavor
    • Boiled white potatoes and sweet potatoes
    • Turkey breast for Thanksgiving
    • Homemade cranberry sauce for Thanksgiving (it was easy and awesome)

    I’ve been so busy learning the pressure cooker aspect that I haven’t tried it as a slow cooker yet. I will have to buy the slow cooker lid soon so I can try that out. 

    And no, no one paid me to write this post. I bought my Instant Pot (before the prices came down :-()and will purchase the lid myself. I just wanted anyone with a small cooking area to know what a great appliance this is. 

  • Favorite Things – Magnetic Spice tins

    Favorite Things – Magnetic Spice tins

    Since I cook almost all my own meals and rarely eat out, spices were going to be important to me when I started traveling full time in my trailer. But how to store them in an accessible way?

    My preference was to have magnetic spice containers so I purchased the Kamenstein 6-Piece Colored Magnetic Tin Set from Walmart since they had the best price. 

    Before selling the house I washed them, labeled them, and filled them with spices. 

    When I got settled in to the travel trailer the problem became what to stick them to. The only metal in the entire place is the vent hood over the cook top. I tried them there and really hated it. 

    I researched online and wasn’t really wild about any of the high price magnetic board options I found. So I prowled the aisles of the big box home improvement stores until I ran across 6″ and 18″ pieces of metal for around $6. I had to go through all of them to find the one in the best condition (still some defects on it), grabbed a roll of 3M heavy duty double sided mounting tape for around $4 and headed back to the trailer to decide where to put it.

    The area of wood on the side of the pantry that faced the microwave was the perfect size. After mounting the metal sheet all 18 spice tins would fit with a little room for some other magnets.  

    I have read reviews that the tins rust but that hasn’t happened and I’m at Padre Island National Seashore right next to the beach. I have also read some RVers leave these in place while traveling. Not me. I pack them into a grocery bag when I’m on the road. The mess that would be created if tins fell and spewed their contents all over just isn’t worth the risk to me. 

    Having these magnetic spice tins handy is definitely one of my favorite things cooking in my travel trailer. 

  • Favorite Things – Extend-a-Shower Shower Rod

    Favorite Things – Extend-a-Shower Shower Rod

    The showers in most RVs are little and mine is no exception at 40 inches wide and 24 inches deep. Fortunately, I’m short so the lack of shower head room is no issue for me. 

    The shower curtain that came with the travel trailer was awful — nasty, scimpy material on a poor ceiling sliding mechanism. I wanted a rod that would allow more room when showering, but not be sticking out in the way when not showering.

    I found the Stromberg Carlson Extend-A-Shower in satin nickel. The best price I could find at the time was the sale price at Camping World. This shows how it works:

    It was a pain to install because I was worried about mounting on the flimsy trailer wall at the back. I had the wood cabinet in the front. Needless to say, I am gentle with the rod when opening and closing the curtain and I don’t hang anything heavy on it. 

    Shower curtain in drying position
    Shower curtain in showering position
    Shower curtain when dry and not in use

    I wanted a decent polyester shower curtain that would dry quickly, not mold and mildew, and could be machine washed. I got a standard shower curtain and cut it down to the appropriate size for my little shower. 

    The rod is not metal, but painted plastic so I wouldn’t recommend metal shower curtain rings. I picked up a 99 cent bag of Ikea silicone shower rings – they work great and don’t damage the rod. 

    I absolutely love this shower rod. It makes my little shower feel roomy enough when showering, and everything gets out of the way of the toilet when not in use. Highly recommend the rod and it comes in two sizes: one for 35″ to 42″ openings and one for 54″ to 60″ openings.

  • Counter top extension for travel trailer

    Counter top extension for travel trailer

    When I ordered my trailer I ordered the counter top extension. When the dealer received the trailer there was no extension. Forest River mailed it to me at my campground in Texas, but it was unassembled with no instructions, not even screws. I called the dealer and the service guy mentioned something about shims, said he really didn’t know and suggested taking it to a dealer in Texas. To get into a dealer in summer takes weeks where I would be without my home. Forget it.

    I wasn’t sure how to install so I posted on the Forest River owner forum and asked if someone could post pictures of the bottom so I could see how the hardware should be attached. Two different owners posted pics within an hour! Bless you helpful RV owners out there.

    A trip to a hardware store for screws that wouldn’t go through the counter top and Formica top and bolts and bolts for the brackets on the kitchen cabinet.

    Whoever had slapped on the cabinet brackets at the factory hadn’t bothered to put them on straight. I wanted to start with them level so I removed them and centered them. Since the cabinet isn’t real wood and I was worried about the screws pulling out I decided to go with bolts, nuts, and large washers. Those brackets are very solid now.

    I stacked containers so I get the extension in place to mark the screw holes on the brackets making sure they lined up with the cabinet brackets. Then attached the leg making sure it was centered and would support the extension well. I put a little green paint so I would know what hole was the correct height for the leg.extension-installed-hardware-thediygirl

    I love my additional counter space! Now I can really start cooking in here.

    extension-installed-diy

    extension-installed-under-diy