Tag: dog bed

  • Large, medium, and small dog cot slings for sale

    Large, medium, and small dog cot slings for sale

    Please see update effective October 1, 2016

    I added small and medium dog slings on 2/10/2015 for people who don’t sew. Prices are for fabric slings only. The instructions on how to make the PVC frames can be found at PVC Dog Cot Tutorial.

    Large, medium, and small dog cot slings for sale - The DIY Girl

    Outside Dimensions Price
    Large 30 x 36 $58
    Medium 24 x 30 $54
    Small 18 x 24 $50

    I’ve been mentally wrestling with this idea since Christmas and need to make a decision. The mental wrestling has been a result of really wanting to help out the non-sewers who have asked me to make dog cot slings for them, but feeling guilty about the price I have to charge so I won’t be giving my time away.

    You probably should also be aware the first time I tried making slings for a reader who asked me she then refused to pay when they were ready to ship. Kind of left me with a “no good deed goes unpunished” feeling. It wouldn’t have been so bad if she simply told me she changed her mind, but instead she kept telling me over and over she would send the money. After weeks I got the point and gave up. When I finally sold the slings to others it was to really nice people who were fun to deal with and promptly paid. Thanks to them for the positive experience.

    Explanation of process: If someone orders one I have to go to Joann to buy the fabric and matching thread. Get an okay from the person ordering that the color will work for them. Then I have to lay it out, measure and mark the fabric, cut the fabric, iron the hems, sew the hems, measure, mark and sew the loops, iron both pieces, request payment, arrange for shipping. It all takes time if you want nicely done dog slings. I just want you to understand I didn’t arrive at the price lightly. Even at $56 it will most likely work out to me making less than $10 an hour, especially when you factor in gas. This is not a mass production shop, but me sewing one at a time in my home.

    Costs of fabric slings only for large dog cot frame only:

    Dog Cot Slings - The DIY Girl

    The picture shows the current price of duck cloth at Joann and the colors that were available the day of the picture (the black box in the upper right corner isn’t duck cloth so I blocked it out). I can’t promise every color will be available with at least 1 5/8 yard on the bolt. Some of those skinny bolts probably don’t have enough yardage on them. And it all depends on what’s in stock on any given day.


    • This is for the fabric slings only fitting the large dog cot frame. The corners and PVC are available locally so you would buy and assemble the frame and then add the slings when they arrive. The PVC pipe sides would be cut 32″ and 26″ for these slings.
    • I do have 8 corners if anyone can’t find them. They are $3 each and I would need to ship in a larger box so shipping would be higher.
    • The above cost is based on the current price of duck cloth and thread at Joann and subject to change. I know Joann has coupons, but I can’t count on that so I have to go with the list price.
    • I applied for a FL sales tax certificate, but only FL residents would be subject to that.
    • The shipping cost is based on my ability to cram the slings into a Priority Mail™ Padded Flat Rate Envelope and subject to change if I am not able. If anyone has cheaper shipping options I’m open to ideas.
    • It would be 10 days from time of order to request for payment. When payment is received I will immediately arrange for shipping. If I can get them done sooner, I would ship as soon as they are completed.
    • Color — always keep in mind your monitor may not be showing the same color as my picture, so color can be close, but not exact unless you go to Joann and see it in person.
    • The duck fabric is sturdy 100% cotton and can be washed and dried.
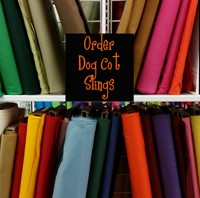
    How to order

    Please use the contact page to email me. Tell me which color in the picture below – I numbered the top and bottom row so tell me “top row 8 dark brown” or “bottom row 14 purple” as examples. Please send two colors in case your first choice isn’t in stock. Be descriptive since getting the right color will make me nervous. I will get back to you about availability once I go to the store.

    PVC Dog Cot Slings - The DIY Girl

    Payment

    I prefer QuickPay through online banking since there are no service fees involved and I’m trying to keep the price down. I will send a payment request to your email address. If you have other suggestions for payment, let me know.

    I would love to have payment in advance of sewing, but just don’t feel right about that. Once the order is placed I will start making the slings and have them ready to ship in a maximum of 10 days. I will send a request for payment and the slings will ship as soon as the payment is received.

    If anyone has questions or concerns don’t hesitate to contact me. Happy to answer questions and open to discussion.

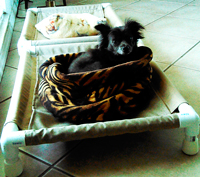
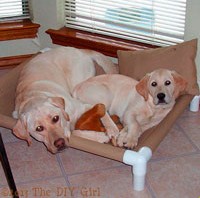
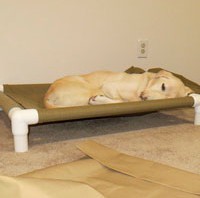
    Large, Medium, and Small sizes available

    Large, medium, and small dog cot slings for sale - The DIY Girl

    I went ahead and made frames for medium and small (as well as the original large) and will be selling the slings in all three sizes at the prices listed above.

    Still not sure?

    Here’s a link to a thank you post one of my reader’s (and purchaser of the dog cot slings) posted on her blog Keely and Ranger’s Dog Cots.

  • PVC dog cots – measurements for small dog cot

    PVC dog cots – measurements for small dog cot

    I was approached by a reader to assist in coming up with measurements for a smaller dog cot for her dogs. Donna was kind enough to send pics of her puppies and the cots so I could post them. Aren’t they cute?

    Donna built the PVC frame using 1″ pipe: the long sides of the PVC were cut 24″, the short side of the PVC were cut 18″.

    Donna told me that when assembled there was 22″ and 16″ of the PVC exposed between the corners so that had to be the width of the finished slings

    Donna told me the circumference of the 1″ pipe is approximately 4 1/4″ so that’s what had to be added to wrap around the pipes.
    I came up with cutting the fabric pieces 18″ x 35.5″ and 24″ x 28.5″ and Donna told me that working out perfectly once the 1″ side hems and the loops to go around the pipes were sewn. That means you only need 1 yard of fabric to make each set of the small dog slings.
    Follow the step by step for the large dogs PVC cots subbing in the smaller PVC and fabric measurements.
    small dog cots
    These are the cots Donna made — she did a beautiful job!
    Email me if you have questions, but I may have to defer to Donna’s expertise since I haven’t actually made the smaller size cots.
  • PVC Dog Cot Tutorial

    PVC Dog Cot Tutorial

    PVC Dog Cot Tutorial - TheDIYGirl.com
    Nikki and Ellie 4-24-2005 on the first cot I made

    Update February 10, 2015 – New sizes available

    I have added instructions below for materials and cutting for medium and small PVC dog cots as well as the original large PVC dog cots. The small size looks so cute when next to the large one.

    I went to buy smaller diameter PVC for the medium and small and didn’t like the amount of flex (bending) in 1″ PVC so all 3 sizes are designed using 1 1/2″ PVC. Make the legs shorter for the smaller sizes.

    All the general instructions remain the same — just use the correct set of measurements you need for your dog.

    If you don’t sew I will be selling the slings for all three sizes so see Large, medium, and small dog cot slings for sale for details.

    Update 2/15/2015 – let me know if you need a specific size

    Sarah contacted me yesterday asking if I could help her with measurements for a dog cot that would fit inside their dog crate. Since I had done my calculations for the new medium and small size cots in Excel I was able to come up with all the measurements fairly easily. If you need a specific size, let me know and I will help if I can. Just don’t go too small since the slings get harder to put on small frames.

    Tutorial

    I had a reader request I sew one set of slings for the PVC dog cots and send them to her so she could then sew two more for her 3 dogs. I figured a step by step tutorial on how to do it might be warranted.

    This is basic sewing so anyone can do this project. All that’s required are straight rows of straight or zigzag stitches so it would be a good beginner project.

    This tutorial is based on using 1 1/2″ PVC pipe and fittings only for a 30″ by 36″ bed for a large dog.  Before making, be sure you have the floor space to accommodate the bed. If you have a smaller dog and want a smaller bed you will have to calculate different measurements. If you need help doing this you can contact me.  

    What you need for the project:

    PVC Dog Cot Tutorial - The DIY Girl

    PVC Dog Cot Tutorial - The DIY GirlPVC Dog Cot Tutorial - The DIY Girl

    The first thing you will need to track down is the elbows that will be the corners of the bed. You can find the elbows on Amazon and they are also available at US Plastics and other places. Update: when I made my first cots these 3 way elbows were not available locally. Appears the big box stores carry them now, which makes this project even easier. Note added February 21, 2017: Bob let me know he ordered the 3-way elbows on-line at Home Depot, a pack of 4 for $10.26 with free shipping to the store: 1-1/2 in. Furniture Grade PVC 3-Way Elbow in White (4-Pack) Internet #: 205749500 UPC Code: 812039024359

    3-way-elbow

    You can go to your local big box home improvement store to find 1 1/2″ pvc in 8 ft. lengths. It’s reasonably priced.Look for 3 way elbow fittings and for this tutorial they must be 1 1/2 inch. Note added February 21, 2017: Bob also thought I should specify that expensive furniture grade PVC isn’t necessary, but schedule 40 pipe is important since it’s much stronger and thicker than schedule 30. So be sure to get schedule 40 PVC pipe. Take the measurements for each side and see if they will cut the pipe for you.

    Note added February 21, 2017: Last but not least Bob mentioned rubber caps that would prevent slipping on hard floors with part information Home Depot # Model # PQC-101 Internet # 100372302 Store SKU # 688053. They are $2.97 each. He suggested they be glued to the bottom of the legs so it doesn’t harm your dog. I ran into a sliding problem and bought rubber pads for furniture legs and glued them on the legs. Either idea works well and will also protect floors.

    Cutting the PVC

    They sell PVC cutters that work amazingly well. I didn’t have one for this size PVC Dog Cot Tutorial - TheDIYGirl.comPVC so I cut the pipe with my compound miter saw. Cut the pipe into 2 32″ and 26″ pieces. When fitted into the elbows this will create a frame with the outside dimensions of 30″ by 36″.

    You will also need 4 small pieces for the legs. I recently increased the legs on mine after finding out one of my dogs has arthritis in her spine and I want to make sure she’s suspended above the floor. 4″ or 5″ legs would work fine for smaller/younger dogs.

    Fabric

    I’ve tried 100% cotton, cotton/polyester blend, and Cordura. 100% cotton stretches a lot. Cordura is exceedingly tough, but I don’t like it because it’s noisy — every time the dogs move around on their beds it’s very noisy. I like cotton/polyester the best. The cotton makes it soft for the dogs and the polyester makes it durable.

    The important thing about the fabric is that it must be over 48″ in width (you will need to cut the selvages off). The last fabric I purchased was Crosstalk Target at Joann which is a 65/35 cotton/poly blend that is 53″ wide. If it’s not on sale make sure you have one of their 40% off coupons – the coupons can be loaded on your smart phone. If you buy another fabric make sure it’s machine washable and at least 48″ wide.

    How much fabric you’ll need

    PVC Dog Cot Tutorial - The DIY Girl

    PVC Dog Cot Tutorial - TheDIYGirl.com
    Fabric layout for 2 large dog cots

    Cutting out the fabric

    These instructions are written for someone with little sewing experience, so forgive me if you are an experienced seamstress.

    Note: Cut the edge selvages off before measuring and cutting the slings.No pattern needed. I use a T-square to square up the fabric and make straight lines for cutting, marking the lines with a chalk pencil and then cut. I always buy a little more fabric than required because fabric stores often don’t cut the fabric straight. Once you square it up you can lose a couple inches, so better to be safe than sorry.

    Sewing the slings

    I recommend Gutermann thread. Cheaper threads aren’t of consistent thickness and will jamb up in thehome_logo sewing machine. Gutermann is quality thread and a dream to sew with.

    That said — you don’t need an expensive sewing machine. My expensive machine died and no longer had replacement parts available and I wasn’t in the mood to spend $1,500 to $2,000 on a machine. I purchased a cheap machine and it does just fine for basic sewing. Cheap machine = okay. Cheap thread = not okay.

    The ironing board and iron are both your friends. If you want to turn out a decent sewing project they are almost more critical than the machine you sew on.

    Sew outside hems

    PVC Dog Cot Tutorial - TheDIYGirl.com
    inch hems ironed on side of each sling

    After the panels are cut use an iron to turn 1 inch hems on the sides of the panels. You can go the further step of then folding the seam under again for the 1/2 inch hem you want in the end, but I find ironing the 1″ fold makes it easy to tuck the 1/2 inch under for the finished seam while I’m sewing — but I’ve been sewing since I was 5 years old, so the extra step of folding under the hem may be easier for those of you new to sewing.

    Sew the 4 outside hems. A single line of stitching is fine

    PVC Dog Cot Tutorial - TheDIYGirl.comfor these hems since they won’t take a lot of abuse from the dogs using the beds. The narrow slings should have a finished width of 23″ and the wider slings should be 29″.

    Sew end pockets for PVC tubing

    Use the iron to turn under a 1/2″ hem on each end of the slings.

    Fold the ends under 4″ to form the pockets and pin. Double and triple check before sewing that the finished length of the wide sling is 31 1/2″ and the finished length of the narrow sling is 37 1/2″.

    The most important thing is the finished length of each sling. If they are too long they will droop on the floor and defeat the whole purpose of the bed. If they are too short you won’t be able to assemble the bed. 

    When you are sure you have the correct length, stitch the pockets. I do three rows of stitching since these are the seams that will take the most abuse from the dogs jumping on the beds. I have two 75 lb. dogs who at times both leap on the same bed — I haven’t had a seam fail yet. The zigzag stitch is very strong, so you can use that as well. Just make sure the pocket for the PVC pipe is 6 1/2″ total or 3 1/4″ folded since the circumference of the 1 1/2″ PVC is 6″.

    Assembly

    PVC Dog Cot Tutorial - TheDIYGirl.com
    My QA department making sure I do a good job on the cot
    PVC Dog Cot Tutorial - TheDIYGirl.com
    This is what the assembled frame looks like without the slings
    PVC Dog Cot Tutorial - TheDIYGirl.com
    Final corner ready for assembly
    PVC Dog Cot Tutorial - TheDIYGirl.com
    Fully assembled dog cot

    You have your finished slings and you’ve cut the PVC pipe to the required lengths. You also have you PVC elbow for the corners and the short pieces for the legs. You are ready for assembly.

    The first three corners will be easy. If you’ve sewn the slings to the correct length, the final corner should be a pain to assemble because everything will be tight. That’s a good thing, so don’t worry. Note: as the cots get smaller they are harder to get that last corner on so the medium and small are hard, but doable. You want the fabric to be tight, so don’t get upset if it a bear to do the last corner.

    I have assembled the beds in a multitude of ways. I prefer to put the slings over the appropriate length of pipe and then added the corners. The 4th corner should be difficult to do — you may have to tilt the opening of the corner and work the pipe into it.

    Maintenance

    The beds are easy to dismantle so the slings can be run through the washing machine. The PVC can easily be wiped down as well. After washing and drying the slings just reassemble.

    If you have any questions please contact me.

    Links

    A reader named Donna and I worked out the dimensions to make a smaller cot with 1″ PVC.

  • PVC cots for dogs

    PVC cots for dogs

    Nikki and Ellie aren’t the first Labrador Retrievers I’ve had so I am aware of the ongoing genetic issue of hip dysplasia in their breed. I wanted my girls up off the floor with their hips cushioned.

    Both were crate trained for the first 2 years of their life — meaning if I wasn’t home they were in the crate. I loved it because I missed the whole having my home chewed phase. When they hit 2 years old the crate was removed and a cot put in its place. Since they are 2 years apart in age, that means I moved Nikki to a cot when I got Ellie because she needed to be in the crate. I couldn’t face training more than one dog at a time so I spaced them out.

    When I brought Ellie home I started building the frame and sewing the slings for Nikki’s dog cot. I bought enough materials for 4 cots — 2 downstairs where they stay when I’m gone and 2 in the bedroom for sleeping at night.  The whole time I was making the cot I was thinking I’d do all that work and they wouldn’t so much as look at it. Wrong.

    I put the first cot down in the kitchen when I was spending a lot of time remodeling it and they both climbed in. Ellie was really little at this point so they cuddled up together to nap.

    PVC cots for dogs - The DIY Girl
    1st day on new cot — they needed to include their “puppy” toy


    PVC cots for dogs - The DIY Girl
    PVC reasy to assemble
    PVC cots for dogs - The DIY Girl
    Detail of corner fittings with non-slip pads for ceramic
    PVC cots for dogs - The DIY Girl
    First sling mounted on PVC
    PVC cots for dogs - The DIY Girl
    Both slings assembled
    PVC cots for dogs - The DIY Girl
    1st corner assembled
    PVC cots for dogs - The DIY Girl
    Completely assembled cot
    PVC cots for dogs - The DIY Girl
    Level view of cot
    PVC cots for dogs - The DIY Girl
    Nikki and Ellie on current Cordura cots

    Nikki and Ellie are now 9 and 7 years old and they still love their cots.

    If you’re interested in making your own cots I can send you the dimensions I used for these. If you’d rather just put one together, email me and I can make it and ship it to you.