Tag: DIY Shaker Cabinet

  • Shaker Kitchen Cabinet Update – before and after

    Shaker Kitchen Cabinet Update – before and after

    Shaker Kitchen Cabinet Update - before and after - The DIY Girl
    Before and After

    From the Lettered Cottage
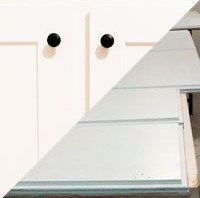
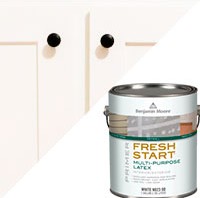
The inspiration came from the Lettered Cottage and the pictures to the left. They started with cabinets almost identical to mine so I figured I could do the same thing since I love the look of Shaker cabinets.

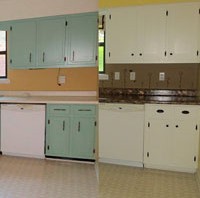
    I knew the kitchen had to be greatly improved if I was going to sell this house for a decent amount so the cabinets had to look better. They were well-built, solid cabinets, but ugly. I wanted to keep the cabinets, but lose the ugly while not spending much money.

    Many, many hours of work that required a lot of patience. This kind of project just isn’t going to be done in a day — not when you’re using a paint with a minimum 16 hour drying time and applying multiple coats.

    I was able to go cheap on hardware — Overstock.com sold knobs in packs of 25 and pulls in packs of 10 at great prices. Since it needed 20 knobs and 8 pulls this worked perfectly for me. I used one of the extra knobs on a bi-fold pantry door. Some people spend hundreds on hardware. I spent $85. I wanted much improved — not exorbitantly expensive. I did have to go out and buy longer screws to put the hardware on since I had added 1/4″ to already 3/4″ doors. That was an extra six bucks.

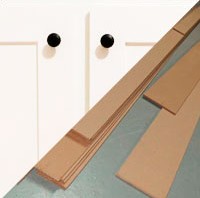
    I spent a lot more for the MDF than others on the net, especially when you factor in I had to rent a truck to get the sheets from the specialty wood store to Lowe’s where an employee cut the 4′ x 8′ sheets into strips for me. If you live in a larger city you would be able to get it much more easily and cheaper, especially if you have a pickup or van.

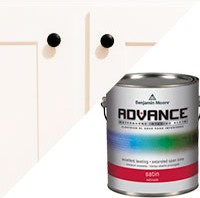
    The primer and paint from Benjamin Moore wasn’t cheap, but when you go to this much trouble you want to end up with a surface that will last while being bumped and cleaned. What I found surprising at Benjamin Moore was how reasonably priced their supplies were — their paint trays were of much higher quality (awesome paint trays) and were cheaper than the big box improvement stores.

    Item  Cost
    knobs for doors and pulls for cabinet drawers from Overstock.com       50.93
    Hinges for cabinets       34.27
    paint supplies for kitchen cabinets, primer, deglosser – Benjamin Moore       46.91
    sandpaper for cabinets         6.78
    Paint for cabinets, tray, tack cloth –  – Benjamin Moore       52.73
    trim for above cabinets, sanding block       15.35
    sanding block, misc       25.13
    2×4′s for saw horses (work surface for painting cabinet doors)       17.97
    rent truck to pick up MDF       21.33
    2 sheets 1/4″ MDF       36.96
    sawhorse brackets       18.09
    liquid nails         6.75
    liquid nails and white caulk         4.48
    sanding block         4.89
    1 1/4″ screws for knobs on cabinet doors         6.10
    TOTAL FOR PROJECT     348.67

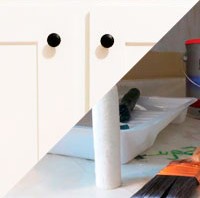
    I had someone give me one of the rollers at the left and I liked it better than the wool rollers Benjamin Moore recommended because it left a smoother surface to the paint when it was rolled and then dried with a smoother finish.

    Hardware and hanging

    I was PAINFULLY careful while drilling the holes for the knobs and pulls. After all the work I’d put into them I did not want to screw up one of them with a hole in the wrong place. I bought a template that was useless and ended up meticulous measuring and double checking before drilling. Somebody must have been looking out for me because I got them done with no boo-boo’s.

    I hate doing hinges. Five screws for each and every one and two hinges per door. I was worried about getting the doors level and even and was again meticulous in measuring before drilling for the hinges. The doors had been crooked when I took them done, so I had filled all the holes and had to start all over again when doing the hinges.

    It about broke my heart but I put a couple small scratches in a couple of doors while I was hanging them. Happy to report I touched them up and you can’t tell. So far the paint is holding up really well and food stains wipe right off.
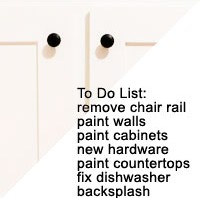
    Posts of what I did

    Here are links to all the posts I did along the way that provide all the gory details of each step:

    Shaker Kitchen Cabinet Update Plans
    Shaker Kitchen Cabinet Update – painting prep
    Shaker Kitchen Cabinet Update – adding trim
    Shaker Kitchen Cabinet Update – painting boxes
    Shaker Kitchen Cabinet Update – painting tips
    Shaker Kitchen Cabinet Update – the materials odyssey
    Shaker Kitchen Cabinet Update – applying the MDF strips
    Shaker Kitchen Cabinet Update – Painting the doors and drawers

    The cabinets look awesome so my $350 cabinet update really paid off. I almost can’t believe I did this all by myself.

    Shaker Kitchen Cabinet Update - before and after - The DIY Girl
    Large image of after
    Shaker Kitchen Cabinet Update - before and after - The DIY Girl
    Close up of cabinet detail
    Shaker Kitchen Cabinet Update - before and after - The DIY Girl
    Trim I added to hide gap between cabinets and soffit
    Shaker Kitchen Cabinet Update - before and after - The DIY Girl
    I painted the inside of the doors and the face trim on the shelves so they look great when the doors are open


  • Shaker Kitchen Cabinet Update – Painting the doors and drawers

    Shaker Kitchen Cabinet Update – Painting the doors and drawers

    Finally. It took almost 2 weeks for me to get all the MDF strips done. I was working in the basement and the cool temperatures made the drying time for the Liquid Nails take forever.

    I had stumbled across the original post where the paint choice and instructions had come from at Ask the Paint Gurus http://paintgurus.typepad.com/blog/2011/01/the-right-way-to-re-finish-kitchen-cabinets.html. It’s a Benjamin Moore site. It’s a good write-up and I’d recommend a read for anyone planning to paint their cabinets.

    Shaker Kitchen Cabinet Update - Painting the doors and drawers - TheDIYGirl.com
    Using an old door as a work table along with my cutting table

    Set up

    I had saved a wooden door (I replaced a wood interior door that led to the garage with a steel door and dead bolt) for a large work surface and also used a cutting table I have for sewing. I have a room full of doors. The drawer fronts were in the bedroom to the side. I had to remove the drawer glides from the bottom so they would sit flat for painting.

    The backs were already sanded so I just needed to wipe them down before painting.

    I wanted to start with the backs to iron out any painting problems I might run into before doing the more visible fronts.

    Priming

    Shaker Kitchen Cabinet Update - Painting the doors and drawers - TheDIYGirl.com
    Primed on right and first coat of paint on left

    I’m using the Fresh Start primer from Benjamin Moore and a wool roller to apply to primer. I primed the 3/8″ inset with a foam brush and rolled the backs applying only a very thin, but thorough coat of primer using the lightest touch possible with the roller.

    The point of primer here is to provide a good adhesion surface between the door and the new paint. The purpose isn’t to blot out any sign of the former color. 2 coats of primer to completely cover the previous color is a waste of time. One well applied coat is all that’s needed.

    When all was said and done I thought it looked a little blotchy from the roller tufts and was worried the blotches would translate to lumpy when it dried. It smoothed out fairly well when dry, but I threw out the roller. I didn’t want to risk a lumpy appearance with the paint.

    I sanded the primer with a 320 sanding block and wiped the sanding dust off with a rag dipped in mineral spirits. The doors felt smooth to the touch.

    Two coats of paint

    Shaker Kitchen Cabinet Update - Painting the doors and drawers - TheDIYGirl.com
    Doors with second coat of paint

    I switched to a different roller and still thought the paint looked a little lumpy after rolling, but this paint is incredible — it levels as it dries and by the time it had dried a few hours the alkyd paint looked really good.

    Since I was working on the backs of the doors I wanted to experiment a little before doing the fronts. After rereading http://paintgurus.typepad.com/blog/2011/01/the-right-way-to-re-finish-kitchen-cabinets.html I decided to try rolling and then doing a final full length brush strokes all the way across each door (what they call back brushing) . I had basically back rolled each door on the first coat after getting the initial coverage I did slightly overlapping strokes the full length of the doors.

    So far I think the back rolling with the roller gave better results than the back brushing after rolling. The doors have only been drying for 5 hours, so I’ll see how they look in the morning.

    Drying time

    Drying time is an issue with Benjamin Moore’s Advance paint. Since it’s an alkyd paint the standard drying time is 16 hours. Add cool temperatures and humidity and that drying time will be longer. 

    I let the doors dry for 2 days before flipping them over to do the fronts. I wanted the paint to be really dry so it wouldn’t stick to the wood blocks I set them on. I do not want paint to pull off when I lift the doors off the blocks.

    I the doors and drawers dry for a week before hanging/replacing them since I’m working on them in a cool basement, I want to make very sure they are thoroughly dry before handling them.


  • Shaker Kitchen Cabinet Update – applying the MDF strips

    Shaker Kitchen Cabinet Update – applying the MDF strips

    I need to point out the fruit or futility of this project isn’t going to be evident until the final doors are hung from their hinges and the drawers are slid into their tracks and I can see how they look. Until then — who knows? It’s an exercise in faith. Correction — an exercise in faith by a complete novice with a minimal tools. I’m sure pros would groan over my methods.

    Prep for applying strips

    Shaker Kitchen Cabinet Update - applying the MDF strips - TheDIYGirl.com
    Drawer front hanging in frame

    I built a couple of frames to assist me. For the drawers I cut sections of 2″ x 4″ and added some trashed door casing from replacing doors to hold the drawer fronts while I glued the MDF for the new fronts. That was when I got the awakening that the strips had not been cut to the requested width. The drawer strips fell a tad short of covering the original fronts.

    The second frame was a small piece of 1/4″ plywood with 1″ x 1″ on two sides to hold the long edge strip in place while the glue dried. I made really, really sure the L shape was an absolute square corner (using a square) so I could trust it for keeping the strips straight for gluing.

    As soon as I put the first drawer in the frame and put the strip of MDF on it I realized I had a problem. While the drawer was nice and snug in the frame, there was a gap with the MDF.

    I measured the strip. My drawers are all 5 1/4″ high. The MDF was about 5 1/8″. I was depressed. I ran out to the garage and checked all the strips. Each and every strip was about 1/8″ short the width I had requested they be cut.

    Too late now so I decided to have the top edge of the drawer strip even and hope the bottom wouldn’t show. The doors presented another problem. I had requested 3″ strips because that was the bare minimum to cover the holes from old cabinet pulls. I had already filled and sanded the inside holes, but hadn’t bothered with the outside since the strips would hide them. Wrong. Now I had to add the additional step of filling and sanding all the handle holes before I could apply the MDF strips to the door fronts.

    Adhesive

    I had researched and wanted to use Liquid Nails Paneling & Molding Adhesive – Low-VOC (LN-710). I hope it works well because I view it as a pain to use. I can barely get my caulk gun to force it out. Maybe I got old tubes or the stuff is just really thick. I can switch to painters caulk and the caulk gun is easy to use. When the first tube of Liquid Nails was gone I tried Heavy Duty and had the opposite problem. Even though I turned the caulk gun off so no pressure was being applied the tube continued to run out no matter what I tried so about half the tube ended up being wasted. This experience has left me less than impressed with Liquid Nails, but as long as the MDF strips stay attached to the cabinet doors I’ll be happy.

    Extent of project

    So now the extent of the project sinks in. I have to cut 7 drawer and sink fronts from the 5 1/4″ strips, and 80 door strips from the 3″ strips. 87 pieces. I don’t know about anyone else, but that’s pretty daunting to me. I don’t have a table saw so it’s cutting each one on my miter saw. I have to cut each one and glue each one. This is going to take a long time.

    Shaker Kitchen Cabinet Update - applying the MDF strips - TheDIYGirl.comDrawer fronts

    Obviously the one piece drawer fronts go fairly quickly — even though they aren’t quite the right size since they were cut less than the desired 5 1/4″.


    Filling the routed edge

    Shaker Kitchen Cabinet Update - applying the MDF strips - TheDIYGirl.comAll the drawers and doors have a rounded edge from a router and the strips I’m adding are flat so there’s a gap between the strip and the original drawer or door.

    I have decided I’m going for much improved, not perfect, so I’m going to use painters caulk to fill the gap between the original drawer or door and the added strips. It’s a learning experience applying the bead of caulk and I figure out that using a wet putty knife running along the strip and original edge is the best way to fill it with caulk. It gives a fairly flat edge, but I won’t know until I prime and paint everything if it’s really a good solution and will look good when the drawers are pulled out and the edge is visible.

    The drawer fronts were the easy part. Next the 20 doors. With their 80 pieces. Sheesh.

    Getting started on the doors

    There were 8 wall cabinet doors the same height so I cut 16 26 1/2″ vertical strips. There were 8 base cabinets that needed 21 1/2″ strips that needed 2 strips each. So I cut those 32 vertical strips first. I would cut the horizontal strips as I worked on each door. The doors over the stove and refrigerator were shorter lengths and would be the last doors I would do.

    Applying the strips

    Shaker Kitchen Cabinet Update - applying the MDF strips - TheDIYGirl.comI start by using the frame I built to glue on the long side strips. Then door by door, I measure what’s required for the connecting horizontal strips. Might I mention here that I’m using a compound miter saw to cut all the strips and I sort of suck at exact measurements. I’m hoping this exercise will improve my skills, but for now I’m cutting them a little long and then shaving slivers off until the cross pieces fit.

    This is not a fast process. I have 3 of the 20 doors done so far. Need I say more?

    But I’m excited. It’s going to be a long, long process for me to do this on my own, but I’ve found it’s doable. After the glue on the door strips dries I will have to fill slight gaps between the side strips and top and bottom strips, and caulk between the routed edges of the original doors and the new flat Shaker look strips. Patience Grasshopper, patience. It’s going to take some time, but I can get it done. Then I will have 6 drawer fronts, 1 sink front, and 20 doors to prime and paint. 

  • Shaker Kitchen Cabinet Update – the materials odyssey

    Shaker Kitchen Cabinet Update – the materials odyssey

    I had read a blog post from a couple who had found 1/4″ MDF at a lumber yard that also cut it into strips for them. This is what I was seeking. Do you think I could find it? Heck, no.

    Shaker Kitchen Cabinet Update - the materials odyssey - TheDIYGirl.com
    MDF Board

    Can I tell you how sick I am of walking into my kitchen with open cabinets and no drawers? I am so ready to get this project to be completed, my kitchen totally unpacked and fully functional.

    After making many phone calls for a month and a half I finally tracked down 1/4″ MDF in 4′ x 8′ sheets at A&M Supply where they graciously agreed to sell a couple of sheets to a non-commercial client — they’re a distributor. The only requirement was that the form of payment be cash or credit card and no returns allowed. No problem.

    A&M did not cut product for customers so from there I started checking who was nearby who would cut the MDF for me. Many, many calls later I called the nearest Lowe’s and spoke to a man who worked in the lumber department — after I explained how long I’ve been trying to get these materials for my project he said he didn’t know what Lowe’s policy was, but I should bring it in and he would personally cut it for me. I told him I would be there the next day.

    The next morning I drove to his Lowe’s to rent a truck that would hold the 4′ x 8′ sheets since my Xterra wouldn’t, then drove the truck to A&M Supply, purchased the MDF, drove back to Lowe’s, got help to unload the sheets, and then returned the truck. Sheesh. All that was a project in itself.

    I got the MDF inside and found the guy who offered to cut it into strips for me and got the feeling he could be doing something he might get in trouble for. I kept telling him I didn’t want him to do something that could cause him problems. He repeatedly told me to not worry about it as he pulled the cart back to the saw.

    He cut one entire sheet into the 3″ strips I needed for the doors. On the next sheet he cut three 5 1/4″ strips I needed for the drawer and sink fronts. I had him cut the remaining piece in half so it would fit in my Xterra.

    He was such a sweet person. I’d like to mention his name, but on the off-chance it could cause him problems at Lowe’s I won’t do that. He hauled it all back out to my truck and helped me load it in. I told him I had to resist the urge to give him a big hug and thanked him profusely for helping me out.

    Shaker Kitchen Cabinet Update - the materials odyssey - TheDIYGirl.com

    After a month and a half of searching I had the materials to start converting my cabinet doors and drawer fronts to a Shaker look.

    Assessing strips and changed requirements

    The odyssey of materials was the good part, but when I got it all home I was confronted with the reality of the project.

    I had been aware while the strips were being cut there was going to be a problem. The guy who volunteered to help my contact cut the actual strips didn’t bend over to pull the board straight across the saw and pulled each strip up toward the end of the cut. As I watched I figured the end of each board would have to be discarded. These guys were helping me out and I wasn’t about to say one word. I just upped the number of strips I’d need of each size to cover the waste at the ends.

    I also wasn’t about to check the measurements of the boards. I said 3″ and 5 1/4″ and allowed them to do the cuts without any nagging. Again — these guys were helping me out. You just don’t look a gift horse in the mouth. I was thrilled to finally have the strips cut.

    Measuring strips

    Shaker Kitchen Cabinet Update - the materials odyssey - TheDIYGirl.comSo I get home and unload the strips. I cut the first strip for the drawer front and sensed there was a problem.

    I went out and measured and the strips weren’t 5 1/4″ wide — they’re about 1/16 (or the saw blade width) short.

    You know what? I’ll just deal with it. I decide the top edge of the strip should be level with the top of the drawer and allow the 1/16″ shortage to be at the bottom of the drawer where it won’t be so noticeable to user. Not what I wanted, but I would just do the best I could with what I had.

    So on to the door fronts. I had asked for 3″ because it was the bare minimum the strips had to be to Shaker Kitchen Cabinet Update - the materials odyssey - TheDIYGirl.comcover the holes from the old door handles. Guess what? The 3″ strips were also at least a 1/16″ short so at least part of the holes for the handles would show. Peachy.

    I had filled the handle holes on the inside of the doors so they would look good when painted. I had not filled the holes from the outside since they would be covered by the strips.

    Add another step to the process. I had to fill all the handle holes on the outside of the doors so they wouldn’t show at the edges of the strips. Just what I needed — another step.

    Don’t get me wrong — I am so happy to finally have the strips and so appreciative of the man who was willing to cut them for me. It just is going to end up being more work than the project already entailed.

    If you decide to do this update and have someone else cut the strips — make sure your strips are cut to the correct width or do it yourself if you have a table saw. Boy, I wish I had a table saw.

  • Shaker Kitchen Cabinet Update – painting tips

    Shaker Kitchen Cabinet Update – painting tips

    I won’t go into detail — after everything else I’ve written about painting kitchen cabinets it would be about interesting as, well, watching paint dry. So just some observations.

    Read the label

    Shaker Kitchen Cabinet Update - painting tipsAs mentioned I am using Benjamin Moore’s ADVANCE Waterborne Interior Alkyd Paint – Satin Finish (792). I got curious about Alkyd — their site says Water Reducible Alkyd.  Apparently the major components of an alkyd coating are fatty acids and triglyceride oils and are not petroleum products, but slow the drying time so you end up with a harder finish. On kitchen cabinets this is a good thing.

    If you try the paint be sure to read the label. It is water clean up, but because of the alkyd oil they recommend a final rinse in mineral spirits for your tools. This is how my tools looked yesterday after soaking in paint for the 3 hours it took me to do the second coat.

    Shaker Kitchen Cabinet Update - painting tips
    Cleaned and ready for next coat

    The other important difference is the drying time. They say a minimum of 16 hours before sanding and applying another coat. I let it dry longer since the house is only around 65 degrees.

    Technique

    I feel the second coat went better, but that was because it got down to a routine that I knew worked. The upper cabinets take the longest, partly because I’m painting the shelf fronts, partly because the bottoms of the upper cabinets need to be painted, and partly because there are more of them. The base cabinets probably only took 45 minutes, including painting the toe kick area.

    I did treat myself to a new short handled brush to make easier working inside the cabinets edges — I purchased a Purdy XL Cub. The stubby handle is great for working in small spaces.

    I suggest a very, very light touch with the roller to prevent runs. There are so many edges and corners when painting cabinets that any pressure could unknowingly leave a load of paint that will run after you have moved on to the next section.

    With great sadness I gave up on using a foam brush and went back to my old stand by — quality bristle brushes. I may have had to spend time cleaning, but the application was so superior I was glad I made the switch. The XL Cub did a such a nice job.

    Cleaning

    The mohair roller and brush clean up first with soap and warm water. I always use Dawn dish detergent because it contains grease and oil cutters. After getting as much moisture out as possible with a towel, I then dunked both in mineral spirits and squeezed that out. They look virtually unused after cleaning.

    If you use a painter’s tool with the crescent shape to get water out of the little rollers be very gentle. I was too rough after the primer and started loosening tufts and felt the smart thing was to discard that roller or the loose tufts would end up in the paint. I quit using the painter’s tool and used my hands only to remove water and it worked a lot better. The painter’s tool is a new thing for me and I’m not good with it yet.

    The plastic rolling tray, brush, and roller are all in perfectly good condition to be used again.

  • Shaker Kitchen Cabinet Update – painting boxes

    Shaker Kitchen Cabinet Update – painting boxes

    I have been very frustrated that other blogs have introduced the idea of a Shaker kitchen cabinet update and then provided next to NO details on how to do it. No mention of what wood, what thickness, what width strips, how they cut it, what type of adhesive they used. Nothing. Very frustrating.

    So for better or worse, I’m going to provide excrutiating detail of what I do with this Shaker kitchen cabinet update. I will tell you what I do and whether it works or not.

    The paint

    Since I want the paint to bind really well to the cabinets my plan is to err way on the side of caution with drying time.

    Shaker Kitchen Cabinet Update - painting boxes - TheDIYGirl.comI put the primer on yesterday, so I allowed the cabinets to dry overnight before painting.

    After reading the post at Young House Love on cabinet painting I purchased Benjamin Moore’s Fresh Start Primer and Benjamin Moore’s Advance Waterborne Interior Alkyd Paint – Satin Finish. The primer went on yesterday and I applied the first coat of paint today. For both primer and paint I’m working with a mohair blend roller for the smoothest finish possible.

    Shaker Kitchen Cabinet Update - painting boxes - TheDIYGirl.comI followed the same routine I used for the primer written up in a previous post. The primer had allowed a lot of the green paint on the cabinets to show through, but this first coat of paint finally covered it up. I was not sorry to say goodbye to the green paint.

    I am hoping I can get by with 2 coats of paint over the primer, but will do a 3rd coat if it’s needed to cover well. I will allow a lot of drying time between coats (more than specified on the can) to make sure I get good adhesion.

    First coat

    Here’s how the cabinets are looking after a coat of primer and one coat of paint. The can says 16 hours drying time — I gave it 24 hours.

    Shaker Kitchen Cabinet Update - painting boxes - TheDIYGirl.com
    First coat of paint

    Second Coat

    I took a day off to let my hands recover. Between the split skin on my thumbs from all the drywall work and the oops cut I added today when carving the polystyrene I think my hands need a day off to recover. It would give the paint more time to dry.

    Shaker Kitchen Cabinet Update - painting boxes - TheDIYGirl.com
    Second coat of paint


    The second coat looks great. Note how nice the trim I added at the top of the cabinets looks with a coat of paint on it 🙂 It all looked good enough that I pushed the stove and refrigerator back even though I feel I need to put another coat on the bottoms of the upper cabinets. I’ve been laying on the counters to do that so the appliances won’t make a difference.

    So far I’m happy with what I chose to paint. I think painting the front edges of the shelves in the upper cabinets is going to give them a great appearance when the doors are open.

    I do think I will roll a third coat of paint on the fronts of all the cabinets because I’m applying such thin coats.

    Now if I can find someone to help me cut the wood I need to make-over the door and drawer fronts. So far I’m not having any luck. I’ve started wondering if I should just them white as is and see how that looks.

  • Shaker Kitchen Cabinet Update – painting prep

    Shaker Kitchen Cabinet Update – painting prep

    Shaker Kitchen Cabinet Update - painting prep - TheDIYGirl.com
    Deciding how much to paint

    I believe the first thing you need to do when contemplating painting cabinets is to take a real long look and decide how much. Just the face of the cabinet frames and the outside of the doors? Paint everything including the insides.

    Personally, even if you held a really big gun (and I mean something like a bazooka) you could not make me paint the inside of cabinets and fortunately I have cabinets with decent interiors.

    How much do you want to paint?

    So how much did I want to paint. The current green is only on the outside of the doors and I had already decided I wanted to paint both sides of the doors. Next the cabinet frames. I want them to really feel like white cabinets when I  open the doors (hence painting the inside of the doors) so I scrutinized where I wanted to draw the line on white. I wanted to let difficulty dictate it — not going to go there if it was too hard to do.

    The shelves on the base cabinets were recessed so I wasn’t worried about them. The design of the base cabinets made it easy to paint the inside of the door opening. I felt the upper cabinets needed the same treatment — paint the inside of the door opening. Paint the front of the shelves? The are covered with trims that cups the front edge of the shelves so I decided to paint the top, front, and bottom of this trim.

    You have to make these decisions first so you know what to prep. The more you paint the more you prep — unless you’re painting everything.

    I covered the table and all the boxes of my packed kitchen with plastic and taped plastic over the doorway to to living room to try to contain the sanding dust.

    Shaker Kitchen Cabinet Update - painting prep - TheDIYGirl.com
    Hardware removed and everything washed

    It’s important that all grease, oils, and dirt be removed so that nothing interferes with the paint adhering, so after I had removed the doors and drawers and taken off all the hardware I used a strong solution of Dawn dish washing soap (known for it’s grease cutting) and a scrubbie pad and scrubbed the living daylights out of every surface I was going to paint.

    After washing I went back and thoroughly rinsed everything to make sure there was no soap residue left on the surfaces. Again — maybe this was overkill since I was going to be sanding, but after seeing the sides of the stove I chose to err on the side of caution. Nothing would be worse than painting all the cabinets and several months down the road have the paint start peeling.

    Shaker Kitchen Cabinet Update - painting prep - TheDIYGirl.com
    cabinets sanded

    I used my palm sander with 60 grit sandpaper and went over all the surfaces I planned to paint. I followed up with 220 grit paper to smooth the surface.

    It may have been overkill but after cleaning up all the sanding dust, I followed this with wiping all the surfaces with deglosser. I know there are VOC versions of this stuff and I would recommend getting it. I had the non-VOC version and the fumes were horrible. The rag I used went outside as soon as I finished.

    Last thing to do was to tape off the bottom shelved of the wall cabinets to delineate the inside of the opening from the floor of the cabinet.

    Shaker Kitchen Cabinet Update - painting prep - TheDIYGirl.com
    taped edge

    FYI – I dreaded pulling out the stove. I wasn’t sure how it would slide over the floor and expected the floor underneath it to be gross. The floor wasn’t gross. The sides of the stove were disgusting. Lots and lots of cooking grease has run down the sides and never been cleaned. Note to self — if you live somewhere with a stove, pull the things out once a year and clean the sides. I’ve lived with a built-in oven and cooktop previous to this, so never had to deal with it.

    Shaker Kitchen Cabinet Update - painting prep - TheDIYGirl.com
    Note the grease running down the sides

    Ready for Primer

    After a lot of sanding, washing, and deglossing I felt the cabinet frames were ready for primer. Painting cabinets is such a big job I wanted to make sure the paint stuck really well.I didn’t mention, but I also sanded and deglossed the black toe kick board under the cabinets so I could get it painted white to match the cabinets.

    Putting on the primer

    Painting the frames is covering a lot of narrow areas. I opted to use a wool small roller to get the smoothest finish possible. You have to use a really light touch with the roller to avoid runs. I used a brush to get the corner of the openings, along the wall, and the sides of the shelf trim close to the door openings. Then I rolled the inside of the door openings and the shelf trim top, bottom, and front, and finally the front of the wall cabinets. Since I had pulled the stove out it was easy to reach the inside of the cabinets facing the stove.

    Shaker Kitchen Cabinet Update - painting prep - TheDIYGirl.com
    Cabinets with primer coat

    The last thing I did on the wall cabinets was paint the bottoms. They consisted of a lot of cutting in with a brush and then rolling the bottom wood.

    I moved on to the base cabinets, using a brush again to do the inside corners of the openings, rolled the inside of the door openings, rolled the fronts and then the toe kick area. Yikes. Painting cabinets is tedious, tedious, tedious…

    A note about primer. Some people think you have to completely blot out the surface below the primer. The primer I was using was meant to be a binding layer between the old paint and the new paint — not completely cover the old paint. I confirmed this with the folks at Benjamin Moore. So while I did make sure I had an even layer of primer on all surfaces, you could still see the green through it. Benjamin Moore told me a second coat of primer is not necessary.

    The worst part of painting cabinets

    Without question the worst part of the process is the under side of the wall cabinets. I ended up clearing off the counters and laying on my back so I could see what I was doing and it was still a pain. There is so much that has to be painted with a brush because of the insets. I don’t feel like it looks all that great, but I don’t figure too many people are going to perusing the bottom of my cabinets so as long as they’re white, I’m not going to worry about it.

    Shaker Kitchen Cabinet Update - painting prep - TheDIYGirl.comShaker Kitchen Cabinet Update - painting prep - TheDIYGirl.com


    Note the additional electrical outlets on the backsplash on either side of the sink and the old-fashioned board is gone over the sink 🙂

    Need I mention how hard it is to use a kitchen while you’re doing this kind of project. If it wasn’t for the stove surface, I’m not sure what I would have done…

    This shows how much I painted on the frames

    Shaker Kitchen Cabinet Update - painting prep - TheDIYGirl.com


  • Shaker Kitchen Cabinet Update Plans

    Shaker Kitchen Cabinet Update Plans

    Here’s the to do list for the kitchen update:

    Issue Plan
    1. Popcorn ceilings Back Burner
    2. Popcorn on soffits Removed and primed
    3. Gold walls Change to buttery yellow
    4. Green paint on cabinets and cabinet hardware Change look, paint, new hardware
    5. 80’s light fixtures. update
    6. Counter tops update
    7. Black toe kick prime and paint with cabinets
    8. Spindle railing live with for now
    9. Vinyl flooring live with for now
    10. Electrical issues – more outlets on back splash and hard wire light over sink with a switch get electrician to take care of

    I’m not going to worry about the ceilings unless I decide to stay here permanently and I seriously doubt that will happen. If I’m going to put this up for sale I want to spend as little as possible while maximizing the resale amount so that means doing a lot of work myself and not buying new cabinets.

    I have already scraped the popcorn off the soffit and primed them for painting. When I pulled the board that connected the cabinets on each side of the sink I realized the popcorn on the bottom of the soffit wasn’t going to work so that has been scraped off and primed as well.

    I have to resolve the light over the kitchen since the current light was attached to the board across the front that’s been eliminated. Not into the scrolled woodwork and it opened up the window so it looks a lot bigger.

    An electrician came out a couple of days ago to quote installing the bathroom fan/heater/light, hard wiring a light fixture over the kitchen sink, and adding two outlets to the kitchen back splash area. He emailed a quote the next day of $200 for all that. I’m totally on board with that and asked to get it scheduled.

    The same man also happens to do cabinets and countertops on the side so I talked to him about my ideas to improve the appearance of my cabinets. I showed him the pictures I had gotten from The Lettered Cottage. The “before” cabinets are almost identical to mine and I would love to achieve their “after”.

    Shaker Kitchen Cabinet Update Plans - TheDIYGirl.com
    From The Lettered Cottage
    Shaker Kitchen Cabinet Update Plans - TheDIYGirl.com
    From The Lettered Cottage

    These are the only picture they posted of how the change in cabinet appearance was done. I emailed asking for details on thickness of the wood and how it was attached but never received a response.

    Shaker Kitchen Cabinet Update Plans - TheDIYGirl.com
    From The Lettered Cottage

    I don’t want the middle piece, but I want the Shaker like frame. He had all sorts of ideas and seemed to have no problem helping me update my kitchen in a low-cost way. He thought he could have all the wood for the doors and drawers ready for around $200. What a deal.

    The cabinet-maker suggested cutting off the lip of the door and then adding another life with the window frame and then adding invisible hinges. I’m not sure about making the inset of the doors a full 3/4″ instead of its current 3/8″ and was somewhat aghast at the cost of invisible hinges. I found $11 a pair to be a common price and with 20 doors that $220 for hinges alone compared to just updating to black hinges for around $40.

    He checked out the cabinets and said they were custom and well-built so they were definitely worth updating and painting.

    I’m hoping this will work out, but also realize people are kind of flaky so I’m not totally confident it will happen. If I don’t hear from the guy I will check other options.

    Note: Despite emails and calls the guy went MIA so I had to come up with a different plan.