When I moved into this house I found out the blind on the living room window had all three of it’s pull strings that raise and lower it were broken. I wasn’t surprised because the six foot wide blind is a beast to pull up.
After finding out a new blind would cost a minimum of $100 I went to Joann and bought blind cord for $7 and re-threaded the pull cords. Easy fix. That was 8 months ago.
Last week I had to blinds open and went to tilt them up when it got dark out. The piece that goes up into whatever turns the blinds snapped off and the wand clattered to the floor. Peachy.
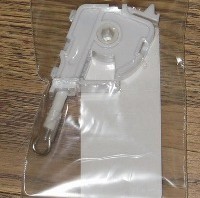
I went online and first had to figure out what the little buggers were called — that’s where I found the term tilt mechanism. Several places carry the parts for various blind sizes. I took the blind down and removed the broken piece so I would know what to purchase. It was a matter of popping out the plastic end cap and pulling the broken tilt mechanism out. It was easy.
Broken tilt mechanism still on metal bar with end cap removedBroken tilt mechanism removed. The part that connects to the wand is missing (I broke that off) and you can see six-sided hole that fits over six-sided metal bar.
The most important thing with this type of repair is determining if the blind is even worth it. Spending $10 for this part and shipping was worthwhile since a new blind would cost 10 times that. Not sure I would do it for a $35 blind, but since I hate throwing stuff out if it can be repaired there’s a good chance I would.
If you’re doing this repair make sure you get the correct size tilt mechanism with the correct hole. That metal bar that spans the width of your blind has to fit into the hole so it will tilt your blinds up and down. My bar is 6 sided and the height of my header is 1 1/2″. They sell the tilt mechanisms with the plastic parts like what broke in mine and more expensive ones that have metal parts.
I ordered from Fixmyblinds.com. They shipped it on Monday and it was in my mailbox on Wednesday.
The repair consisted of angling in the piece that sticks out to attach to the wand through the hole in the head rail, sliding the tilt mechanism over the metal bar and then snapping it into the head rail. It was much harder getting that 6′ blind down and back up again than actually doing the fix.
new partNew part installed on bar, snapped into place, and end cap replaced
Now I hope nothing else breaks on the blind before I sell the house.
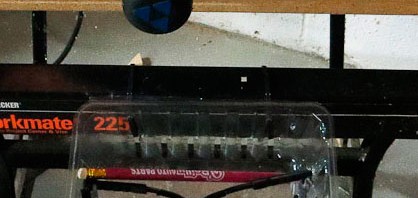
I love to re-purpose things and when I found myself getting annoyed every time I wanted to make a cut on my compound miter saw because I couldn’t remember where I had set my safety glasses down or put the pencil I decided I needed a solution.
I eat strawberries all the time so I grabbed a recently emptied clear basket and cut the top off. There were openings near the top where a cable tie could be threaded through so I made a couple of more holes about half way down the container.
Two cables ties and it was firmly attached to the table and I now always know where my glasses are! Since it has a lot of ventilation holes it’s even easy to blow the saw dust out of it.
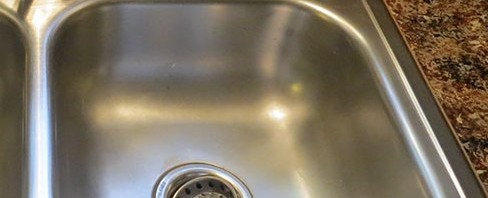
I’m sorry I don’t have “before” pictures, but the sink in this house was so bad when I bought it that I didn’t think it could be salvaged. Whatever workmen had been in the house had used the sink to dump everything and clean everything. It was in horrible condition with drywall mud and paint caked in places. It was terribly discolored from chemicals that had been washed down it. I thought the sink would have to be replaced and I was seriously concerned about the condition of the septic tank, but that’s another issue.
I am a strong believer in Barkeepers Friend for stainless steel sinks. If you’ve neglected the sink or inherited one with lots of stains and build it the stuff works wonders. It doesn’t happen the first time you use it, but if you keep using Barkeepers friend you will see the sink look better and better all the time. If you haven’t used it before, be sure to wear gloves. It has oxalic acid in it and it could burn and irritate your skin.
I’d chipped off all the paint and other stuff that was stuck to the sink being careful not to scratch it anymore than it already was and then started scouring it. It took a while, but I ended up being relieved that it was coming around and I wouldn’t have to buy a new one.
Bar Keepers Friend + Magic Eraser = Gorgeous Stainless Steel
Then one afternoon I was cleaning up the sink from painting and there was a magic eraser sitting out. For some reason I decided to use it along with Bar Keepers Friend. Wow — it took my sink to a whole new level of bright and clean. Except for scratches it looked virtually brand new. It destroyed the magic eraser, but it was worth it.
I wore a new shirt this morning to go get my drivers license and deftly dropped the black ball point pen when completing the application and put a nice ink mark on the shirt. I was bummed.
I got home and tried what I’ve done in the past — hairspray. It doesn’t matter if it’s the cheapest stuff they sell or expensive designer hairspray.
Put a towel (that you don’t mind staining) under the ink spot. Have another rag towel ready. Spray the hairspray on the ink spot and directly blot the spot without moving the towels around. Carefully move both the bottom towel and top towel to a clean spot — the ink is liquified at this point so it will transfer from the towel to the garment easily. You don’t want to make the problem worse.
Spray the spot and blot again. Repeat this moving to clean spots on the towels, spraying, and blotting until all the ink is gone.
When the ink stain is completely removed rinse the hairspray from the garment and wash as you usually would.
No fancy cleaners, no harsh acetone — just hairspray. It’s worked every time for me.
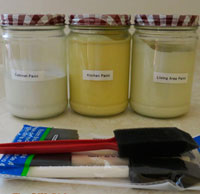
I’ve recently seen some name brand touch up paint containers. They leave me wondering how tightly they seal and how long the paint lasts. I believe in handy to use touch up paint for the rooms you’ve painted in your house. No more trucking out to the garage, maybe having to let the paint warm up. No stirring cans, dealing with possible rusted cans. Just reach under the sink and dab a little paint where you just scraped the wall.
I started doing this when my son was little so when he hit the wall with one of his toys it was no big deal. I had the paint if I owned the home and I asked for the paint when I rented. People I rented from were thrilled to death when they did the final walk through because the walls always looked so good. An added bonus — it makes it easy to touch up the paint when you take pictures down and patch the holes.
I’ve talked about this in other posts. It was a life saver when I was preparing to move in January and I left them for the new owner.
If I empty a jar that has a rubber seal around the lid like peanut butter or pickle jars, I wash them thoroughly and save the jars for paint. Pictured above, I have a jar for touching up my newly painted kitchen cabinets, the kitchen walls, and the living area walls.
I tried hand written paper labels in the past, but over time the paint name gets wiped off and if you have close colors you’re not quite sure which one to use. If you use the wrong one, it evident as soon as it dries.
I keep the jars stashed under the kitchen sink in the back where they’re out of the way and I keep a handful of small foam brushes with them. When I need to touch up a spot I shake them really well, do the painting, wipe off the tip rim of the jar and put the lid back on. The rubber seals keep the paint fresh for a long, long time, are basically free, and beat the heck out of wrestling with rusty paint cans.
The house I’m in had a couple of screens with serious holes in them. It looked like vines had grown up and sent anchoring tendrils into the screen and someone had attempted to rip the vine off. The vine was gone and so were patches of screen.
I have replaced screening before. It’s any easy job anyone can do. You need a spline (the rubber stuff that holds the screen in the frame), a spline roller, and screen. The spline and the roller will cost you about $3 or $4 and a roll of 36″ by 25′ fiberglass screen should be around $15.
Just be careful when you’re cutting the excess screen off and don’t slice your finger like I did…
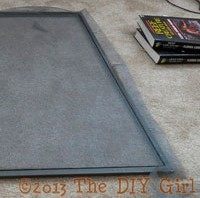
This is one of my almost completed screen — I have one side left to cut the excess screen off. You can see the books I used as a weight over to the right and the left over spline to the left.
Spline in 2 side of the screen
The screens look great and I can open the windows now 🙂
I have added instructions below for materials and cutting for medium and small PVC dog cots as well as the original large PVC dog cots. The small size looks so cute when next to the large one.
I went to buy smaller diameter PVC for the medium and small and didn’t like the amount of flex (bending) in 1″ PVC so all 3 sizes are designed using 1 1/2″ PVC. Make the legs shorter for the smaller sizes.
All the general instructions remain the same — just use the correct set of measurements you need for your dog.
Update 2/15/2015 – let me know if you need a specific size
Sarah contacted me yesterday asking if I could help her with measurements for a dog cot that would fit inside their dog crate. Since I had done my calculations for the new medium and small size cots in Excel I was able to come up with all the measurements fairly easily. If you need a specific size, let me know and I will help if I can. Just don’t go too small since the slings get harder to put on small frames.
Tutorial
I had a reader request I sew one set of slings for the PVC dog cots and send them to her so she could then sew two more for her 3 dogs. I figured a step by step tutorial on how to do it might be warranted.
This is basic sewing so anyone can do this project. All that’s required are straight rows of straight or zigzag stitches so it would be a good beginner project.
This tutorial is based on using 1 1/2″ PVC pipe and fittings only for a 30″ by 36″ bed for a large dog. Before making, be sure you have the floor space to accommodate the bed. If you have a smaller dog and want a smaller bed you will have to calculate different measurements. If you need help doing this you can contact me.
What you need for the project:
The first thing you will need to track down is the elbows that will be the corners of the bed. You can find the elbows on Amazon and they are also available at US Plastics and other places. Update: when I made my first cots these 3 way elbows were not available locally. Appears the big box stores carry them now, which makes this project even easier. Note added February 21, 2017: Bob let me know he ordered the 3-way elbows on-line at Home Depot, a pack of 4 for $10.26 with free shipping to the store: 1-1/2 in. Furniture Grade PVC 3-Way Elbow in White (4-Pack) Internet #: 205749500 UPC Code: 812039024359
You can go to your local big box home improvement store to find 1 1/2″ pvc in 8 ft. lengths. It’s reasonably priced.Look for 3 way elbow fittings and for this tutorial they must be 1 1/2 inch. Note added February 21, 2017: Bob also thought I should specify that expensive furniture grade PVC isn’t necessary, but schedule 40 pipe is important since it’s much stronger and thicker than schedule 30. So be sure to get schedule 40 PVC pipe. Take the measurements for each side and see if they will cut the pipe for you.
Note added February 21, 2017: Last but not least Bob mentioned rubber caps that would prevent slipping on hard floors with part information Home Depot # Model # PQC-101 Internet # 100372302 Store SKU # 688053. They are $2.97 each. He suggested they be glued to the bottom of the legs so it doesn’t harm your dog. I ran into a sliding problem and bought rubber pads for furniture legs and glued them on the legs. Either idea works well and will also protect floors.
Cutting the PVC
They sell PVC cutters that work amazingly well. I didn’t have one for this size PVC so I cut the pipe with my compound miter saw. Cut the pipe into 2 32″ and 26″ pieces. When fitted into the elbows this will create a frame with the outside dimensions of 30″ by 36″.
You will also need 4 small pieces for the legs. I recently increased the legs on mine after finding out one of my dogs has arthritis in her spine and I want to make sure she’s suspended above the floor. 4″ or 5″ legs would work fine for smaller/younger dogs.
Fabric
I’ve tried 100% cotton, cotton/polyester blend, and Cordura. 100% cotton stretches a lot. Cordura is exceedingly tough, but I don’t like it because it’s noisy — every time the dogs move around on their beds it’s very noisy. I like cotton/polyester the best. The cotton makes it soft for the dogs and the polyester makes it durable.
The important thing about the fabric is that it must be over 48″ in width (you will need to cut the selvages off). The last fabric I purchased was Crosstalk Target at Joann which is a 65/35 cotton/poly blend that is 53″ wide. If it’s not on sale make sure you have one of their 40% off coupons – the coupons can be loaded on your smart phone. If you buy another fabric make sure it’s machine washable and at least 48″ wide.
How much fabric you’ll need
Fabric layout for 2 large dog cots
Cutting out the fabric
These instructions are written for someone with little sewing experience, so forgive me if you are an experienced seamstress.
Note: Cut the edge selvages off before measuring and cutting the slings.No pattern needed. I use a T-square to square up the fabric and make straight lines for cutting, marking the lines with a chalk pencil and then cut. I always buy a little more fabric than required because fabric stores often don’t cut the fabric straight. Once you square it up you can lose a couple inches, so better to be safe than sorry.
Sewing the slings
I recommend Gutermann thread. Cheaper threads aren’t of consistent thickness and will jamb up in the sewing machine. Gutermann is quality thread and a dream to sew with.
That said — you don’t need an expensive sewing machine. My expensive machine died and no longer had replacement parts available and I wasn’t in the mood to spend $1,500 to $2,000 on a machine. I purchased a cheap machine and it does just fine for basic sewing. Cheap machine = okay. Cheap thread = not okay.
The ironing board and iron are both your friends. If you want to turn out a decent sewing project they are almost more critical than the machine you sew on.
Sew outside hems
inch hems ironed on side of each sling
After the panels are cut use an iron to turn 1 inch hems on the sides of the panels. You can go the further step of then folding the seam under again for the 1/2 inch hem you want in the end, but I find ironing the 1″ fold makes it easy to tuck the 1/2 inch under for the finished seam while I’m sewing — but I’ve been sewing since I was 5 years old, so the extra step of folding under the hem may be easier for those of you new to sewing.
Sew the 4 outside hems. A single line of stitching is fine
for these hems since they won’t take a lot of abuse from the dogs using the beds. The narrow slings should have a finished width of 23″ and the wider slings should be 29″.
Sew end pockets for PVC tubing
Use the iron to turn under a 1/2″ hem on each end of the slings.
Fold the ends under 4″ to form the pockets and pin. Double and triple check before sewing that the finished length of the wide sling is 31 1/2″ and the finished length of the narrow sling is 37 1/2″.
The most important thing is the finished length of each sling. If they are too long they will droop on the floor and defeat the whole purpose of the bed. If they are too short you won’t be able to assemble the bed.
When you are sure you have the correct length, stitch the pockets. I do three rows of stitching since these are the seams that will take the most abuse from the dogs jumping on the beds. I have two 75 lb. dogs who at times both leap on the same bed — I haven’t had a seam fail yet. The zigzag stitch is very strong, so you can use that as well. Just make sure the pocket for the PVC pipe is 6 1/2″ total or 3 1/4″ folded since the circumference of the 1 1/2″ PVC is 6″.
Assembly
My QA department making sure I do a good job on the cotThis is what the assembled frame looks like without the slingsFinal corner ready for assemblyFully assembled dog cot
You have your finished slings and you’ve cut the PVC pipe to the required lengths. You also have you PVC elbow for the corners and the short pieces for the legs. You are ready for assembly.
The first three corners will be easy. If you’ve sewn the slings to the correct length, the final corner should be a pain to assemble because everything will be tight. That’s a good thing, so don’t worry. Note: as the cots get smaller they are harder to get that last corner on so the medium and small are hard, but doable. You want the fabric to be tight, so don’t get upset if it a bear to do the last corner.
I have assembled the beds in a multitude of ways. I prefer to put the slings over the appropriate length of pipe and then added the corners. The 4th corner should be difficult to do — you may have to tilt the opening of the corner and work the pipe into it.
Maintenance
The beds are easy to dismantle so the slings can be run through the washing machine. The PVC can easily be wiped down as well. After washing and drying the slings just reassemble.
I had gone into the kitchen update fully expecting to replace the countertops so I dribbled paint on them and had no concern for them whatsoever.
So follow this with the decision to keep the countertops and paint them. Need I say I thoroughly regret my earlier lack of care that resulted in swipes and sprinkles of primer and cabinet paint?
Note to self: Don’t ever assume you’re going to discard something until it’s discarded. Take great care while you’re working on things. Better to be careful now than sorry later.
The curse of poor workmanship – again
Don’t you just love it when someone smears thick blobs of raggedy caulk around and leaves them to dry. It only takes a moment to get a wet rag and wipe the excess off.
Once again I found myself wanting to strangle the person responsible for crappy work. Someone had smeared caulk ½” to ¾” up the wall and across the top of the backsplash of the countertop. Evidently no one had instructed that person on cutting a small hole on the end of the caulk tube, minimally applying caulk, and then wiping the excess when you overdo. Sheesh.
Come on folks – even a newbie can do a decent caulk install if they wipe up with a damp rag after it’s a applied. Who did this abominable level of work?
Fixing the mess
I spent the morning with a skill knife, window scraper (razor blade), putty knife, small screwdriver, and needle nose pliers removing the caulk that was on the top of the back splash and wiped up the wall.
Caulk is a serious adhesive so removing it removed the top layers of the drywall. Whenever drywall repairs get you down to paper it’s a multi-step process to fix the drywall before it’s safe to paint it.
Sand it to remove as much loose paper as possible
Apply primer to seal the exposed paper layers and allow it to dry
Apply thin layers of drywall mud to level it and all the mud to dry
Sand the drywall until it’s smooth (I like drywall sanding screens)
Apply primer to the new drywall mud
Paint
All these steps because someone thought applying thick lines of caulk and wiping it all over the place was a bright idea.
Razorblading my paint drips off the counters: 15 minutes. Removing caulk smeared all over the place: 4 hours. You tell me – what was the stupidest move?
This is purely an opinion and maybe a discussion point, but I’m pretty much opposed to the extended use of paper towels.
I have been at the homes of friends and watched in amazement as they roll off yards of paper towels to wipe up things and then throw the whole mess in the trash. The whole time I’m puzzled why they didn’t just wipe it up with rags.
When I use paper towels
I try to use rags as much as possible and try to limit my use of paper towels to things that are too gross to put in the washing machine.
In the end — there aren’t that many things that can’t go in the washer and it takes me forever to go through a roll of paper towels. I use paper towels to cool some cookies on when removed from the oven. Other than that — like I said, it takes me a long time to use a roll of paper towels.
Camping is an exception, since disposability is plus..
When I don’t use paper towels
This all needs to be balanced out with the fact I have an abundance of rags. My mother was a smoker and when she died I brought her towels home and watched them disintegrate along the edges that had been exposed to the smoke. (Boy — is that an anti-smoking example or what? If it eats fabric what the heck is it doing to lungs?) All those towels have been reduced to rags.
But my non-use of paper towels is also based on my use of toilet paper to clean up the rare instance of dog poop in the house. I figure that can be flushed down with the rest of the poop.
Dog vomit? I clean it up with rags and wash them. Even oily crap from working on automotive stuff. I wash them alone, but I wash them.
My reasoning
I don’t want to add to the mountains of landfill with piles of paper towels from my home. I don’t want to spend the money on rolls of paper towels when I have an ample supply of rags in my house.
My thinking could be all wrong — maybe the energy to heat the water, the water used to wash the rags, and the power to run the dryer to dry the rags is far worse than paper towels in the landfill.
I’m just doing what I think is best for the environment and I thinking reusing beats constant disposing almost every time.
I recently read a post by another blogger who stated she only uses disposable rollers and foam brushes. She admitted it wasn’t “green”, but it was easy.
While I agree (and love) the ease, there are overriding issues with these two brush types.
Why I hate bristle brushes
When I was a little girl my skills were not deemed good enough to paint, but they were deemed good enough for clean up. So while the big people painted, the pans, rollers, and brushes were handed to me to clean. And the big people were picky. Needless to say I got really good at cleaning.
The funny thing is how the nasty tasks you’re stuck with as a child become the tasks you absolutely abhor as an adult. I can get through the biggest painting project without batting an eye, but I totally blanch at the clean up that inevitably follows. If I felt okay with it, throwing it all away would be absolute bliss for me. Unfortunately I still have those brushes of incredible quality that my dad used to paint with so I am forced to care for them.
Forced isn’t really an accurate term — I lovingly care for those brushes because in doing so I remember the man who used them and taught me how to use them with skill. Still hate the whole brush cleaning process. Sorry daddy.
Why I love (quality) bristle brushes
There’s more to foam brushes vs. brushes you clean and keep than “easy” or “green” — there’s quality of application.
I’m not buying that anyone can cut in along the ceiling with a foam brush. I also don’t believe anyone can get paint up into tight corners with a foam brush. Top this off with the fact that they quickly break down and don’t last long enough to complete a big project.
Case in point: I’ve been painting kitchen cabinets for the first time in my life. I bought high quality mohair rollers (which I would want to clean) and tried to get by with foam brushes for all the corners, etc.
There were several problems with the foam brush. It didn’t apply a nice coat of paint to the cabinets where I used it. When I was working on the bottom of the cabinets (the most dreaded part of this operation) I could not, for the life of me, force paint up into the corners. Wouldn’t you think foam would do a better job than bristle? Wrong. No matter how much I tried, I couldn’t get paint up there.
On the second coat of paint for the cabinets I switched to a quality bristly brush. Where I had been totally unable to fill paint into the corners, it flowed in with no problem. Where the foam brush provided smeared coverage of boards that couldn’t be rolled, the brush flowed paint on with smooth coverage.
One the baseboards (where I was trying to cover black with snow white) the brush flowed paint on with thorough coverage.
It was a thing of beauty.
Final analysis
While I absolutely detest cleaning brushes after a paint job, I have such good results when cutting in around ceilings, windows, doors, and baseboards, filling paint into corners that I will suffer the pain of cleaning brushes for the outstanding application.
Where do I think foam brushes are perfect? I always keep a stash of touch up paint (in old peanut butter jars that have rubber seals) and a good quantity of foam brushes for touching up spots on the walls to keep them looking perfect. That way me and the dogs don’t have to be perfect. Accidentally slam a chair into the wall? Throw a dog toy that marks the wall? No worries — take a few minutes every once in a while to touch up the marks.
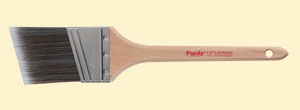
Big project? Use a high quality brush that’s appropriate for the type of paint you’re going to use. Personally, I love Purdy brushes, but I suspect Wooster and others are also good.
And be patient with yourself. Learning to cut in is a skill that includes knowing what side of the brush to load the paint on, how much paint to load, and how to angle the brush. It takes practice, but once learned provides beautiful results. And painting can become fun. I’m not sure the clean up can ever be fun…