Category: Household Tips

Household Tips for Cleaning and Organizing

  • Restoring auto trim

    Restoring auto trim

    Sheesh — I’ve been so bored waiting between house showings that I’ve worked on all sorts of weird projects that were easy to quickly put away. Here’s another one.

    I have a 2006 Xterra. I love my little SUV and plan to drive it until it drops. I bought it used in 2008 and it has been a trooper requiring very little in the way of repairs. The fuel gauge sensor died around 50,000 miles, a known failure, and that’s been about it except for normal maintenance.

    Plastic trim

    While I love the vehicle I have not been happy with how the plastic trim looks on it. The worst is the plastic running along the base of the windshield where the wipers mount. It was almost bleached white. The rear bumper, that gets a lot of abuse from the dogs, looks bad. There are steps toward the back on each side that were faded. The door handles looked lousy. The plastic’s poor appearance had been exacerbated by my accidental brushing with wax when I was waxing the paint.

    I have tried a lot of products to make the plastic look better. They would all look only okay when done and then quickly fade to their previous bad appearance. I was unhappily accepting there was nothing I could do about it.

    One product I had never tried was Turtle Wax Trim Restorer so I decided it give it a try.

    Application

    I started with the worst areas first — the area at the base of the windshield. I started applying it and took a picture of how the applied area compared to the faded plastic.

    Restoring auto trim - The DIY Girl

    Then I did a test area on the rear bumper and let it sit overnight.

    Restoring auto trim - The DIY Girl

    The next day I went hog wild. I applied another coat on the wiper area, I finished the rear bumper, I did the entire front bumper and the black honey comb grill. I moved to the sides and did the side mirrors and the plastic that holds them to the vehicle, I did the door handles, the running boards, plastic strips that run along the bottom of the door, the side steps that wrap around to the rear bumper. I checked the front of the luggage rack and found it was also faded plastic so I coated it and the brackets that hold the rest of the rack. Lastly I did the plastic where the windows slide up and down.

    The package says to apply the restorer, allow it to sit for 10-15 minutes, and then wipe with a microfiber cloth. Microfiber doesn’t absorb so all that did was wipe it around without removing the excess. That worked fine for the areas needing additional coats, but I didn’t want the finished areas to get gooey by letting the excess sit there. When areas were completely restored I wiped them down with a cotton towel to remove any excess.

    Results

    What I found is there are very different types of plastic on my one vehicle. The front bumper needed one coat to be restored to beautiful color. The door handles needed about three coats. The uber faded wiper area needed five coats. The cool thing is I didn’t know the wiper area and door handles were black — they were so faded I thought they were gray. Now they look like new black plastic. Don’t expect all areas to react the same — go by appearance and keep putting on coats until the color looks great.

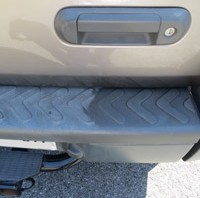
    Side step before – don’t know if you can tell how really faded and nasty it looked.

    Restoring auto trim - The DIY Girl

    Side step after using restorer – in person it looks gorgeous

    Restoring auto trim - The DIY Girl

    Wiper area after – it’s black now!

    Restoring auto trim - The DIY Girl

     Front bumper and grill look awesome.

    Restoring auto trim - The DIY GirlThe front of the rack looks like new.

    Restoring auto trim - The DIY Girl

    Now the real test is how long it lasts. The package says up to 3 months. I will post an update on how it holds up and how long it is until I feel the need to treat it again.

    I think it looks great for an eight year old vehicle 🙂

  • What’s living in Your keyboard? How to clean a keyboard

    What’s living in Your keyboard? How to clean a keyboard

    I do a lot of typing so when my space bar started missing about half the time it became incredibly annoying. I have a wireless keyboard so I checked the batteries and they were in good shape.

    I was typing an email this morning and I was missing almost every space in a sentence and out of utter annoyance I got a small screw driver and popped the space bar off. My jaw dropped.

    There was so much dog hair and so many crumbs under it I had no idea how it had been able to function at all. Yes, I do eat at my desk. But the dogs live on the floor — how did so much hair get in there?

    I have to confess I was so mortified by the filth I immediately blew it out with a compressed air can and wiped it out with a cotton swab so I have no pictures to memorialize it. It was gross.

    I am not kidding — if mice were small enough they could have started a colony under there. Between the dog hair for nest building and the crumbs for sustenance they could have had a wonderful life.

    I figured I better check under more keys and this is what it looked like after I popped the control key — this key was about half as bad as the space bar had been and look how bad it is. Man – was it ever time to figure out how to clean a keyboard.

    What's living in Your keyboard? - The DIY Girl

    I probably popped a dozen keys off. I blew out the hair and crumbs and used a swab dipped in alcohol to wipe out the gunk. And believe me, there was gunk as you can see on the bottom of the control key.

    What's living in Your keyboard? - The DIY Girl

    Reassembly

    A lot of the keys were simple to pop back on. A few like the space bar, control key, enter key and delete key had little metal bars that had to be put under a bracket on the keyboard and then the key turned to snap down. I have no idea why these keys need the little bar, but it’s kind of a fragile set up on the back of the keys so I was careful with them.What's living in Your keyboard? - The DIY GirlThis, like the washing machine rust, was a little cleaning project I should have addressed a long time ago. I had idea how much crap could accumulate under those close fitting keys.

  • Best knife sharpener

    Best knife sharpener

    My son thought the Accusharp was the best knife sharpener you could buy. I’ve researched and he was correct. On his recommendation — he actually bought one for me — I have used the thing for years. I don’t have great, high quality knives. I have the knives he purchased for me as Mother’s Day gifts when he was little. The aren’t the best quality — they ARE the best knives as far as I’m concerned, due to sentimental value.

    Recently they have all become pretty dull so I got out the Accusharp to sharpen them. It occurred to me there had to be videos to show me the proper technique. What an eye opener.

    Turns out I have been using it improperly all this time. I hold the knife wrong. I use the Accusharp wrong. I had no idea you could reverse the blades. First, let’s reverse the blades I have probably mangled from misuse.

    Reversing the blades

    accusharp_how_to_use_2

    From Accusharp’s website: The tungsten carbide sharpeners of AccuSharp® are of high-grade industrial quality and are one of the hardest materials known. Even so, after several years of use, they may become worn. Due to their unique design the sharpeners can be reversed for double life.

    To reverse the sharpeners lay the AccuSharp® on its side with the screws up. Remove the screws and carefully separate the two halves of the handle as shown in the following illustration. The sharpeners should remain in the lower half. Simply switch the position of the sharpeners (front sharpener to rear and rear sharpener to front) taking care to keep the reference dot (n) on the sharpeners facing toward the tail end of the handle. If the finger guard becomes disengaged during this operation, secure both ends of it in the slots provided prior to reassembly.

    CAUTION: DO NOT REASSEMBLE THE KNIFE SHARPENER WITHOUT THE FINGER GUARD. SERIOUS INJURY MAY RESULT. Reassemble the two halves of the handle and secure with the three screws.

    DO NOT OVER TIGHTEN SCREWS. The factory torque setting is about 5 inch pounds of pressure. Tighten them only until you feel increased resistance. If sharpener has any cracks around the screw heads ­do not use it. Either discard the sharpener or return it under the terms of the warranty.

    AccuSharp® is perfectly safe when used properly. As a precaution, the knife blade should be thoroughly cleaned after sharpening.

    Now let’s see how it should really be used

    I have been way too harsh when using the Accusharp thinking harder is better at sharpening — turns out it works best with a lighter touch.

    I have used the sharpener incorrectly for years and it’s done a marvelous job of sharpening my knives. I can’t imagine how many more years it will serve me now that I actually know how it’s supposed to be used.

    s(I am not sponsored by AccuSharp in any way.)

  • How to whiten yellowed pillows

    How to whiten yellowed pillows

    Man — I can’t believe how boring it is to have a house up for sale. I have all my projects either completed or put on the back burner so everything can be put away and the house look perfect all the time. I don’t have anything to do.

    Hence the experiment to see if you really can whiten yellowed pillows without bleach. My pillows are in good shape so no need to replace them, but they were due for a bath (pillows should be washed a couple of times a year) and they were definitely yellowed. I didn’t just want them clean, I wanted them white again. And I really wanted to do it without resorting to bleach. Below is the recipe I used.

    How to whiten yellowed pillows - The DIY Girl

    I poured the peroxide and vinegar into my top loading washer and started to fill it with hot water while I brought 1 liter of water to boil in my kettle. When the washer was half full I added the detergent and borax and agitated it until I felt the borax was well dissolved and everything was mixed.

    Before the washer was full for a large load, I poured in the boiling water and finished filling. I put one pillow on each side and squished them down into the water as well as I could. I have fiberfill pillows and it was like they filled with air. I let my pillows go all the way through the normal wash cycle, I left the door open so it stopped before emptying. I turned them over so top side could get the same cleaning and ran it through another was cycle, this time closing the door so it would empty and rinse. I rinsed them a second time to make really sure the soap was out.

    Into the dryer with dryer balls to dry, and dry, and dry. I had read you should dry fiberfill at a low setting. After an hour plus on low and they were still wet, I turned it back to the warmest setting for another 40 minutes and they felt really dry. I didn’t want to put my head down on a pillow that night and find it was still soggy.

    That’s it. They turned out beautifully and I was glad to not sleep with residue of chlorine beach every night. And no, I did NOT take before pictures. There are some things I’m just not gonna share…

    How to whiten yellowed pillows - The DIY Girl

  • Dripping faucet is an easy fix

    Dripping faucet is an easy fix

    I have a Moen kitchen faucet that suddenly started dripping right after I put my house on the market to sell. Not exactly the look I wanted for showing – a spattered sink and dripping faucet.

    A failing faucet cartridge is almost always the reason for a dripping faucet and is usually not a difficult fix.

    Figuring out what cartridge you need

    In the past I have taken bathroom faucet cartridges to the hardware store and they have matched it up to the correct replacement. This time I couldn’t even get the handle off and needed directions on how to accomplish that. There was a hole on the back of the handle and using a mirror I could tell there was a set screw in the hold that most likely needed an allen wrench. I tried and tried and could get a wrench to seat and couldn’t get the handle off. While most faucets are really easy to disassemble, this particular faucet was not a friendly design for repairs.

    I searched the Moen site. Since I purchased this house as a foreclosure I had no idea what the model of the faucet was. I took pictures of the faucet and emailed them to Moen customer service and they emailed me back with the model number so I could order the replacement cartridge – this process took about 48 hours so be patient. (Note: if you are the original owner of the faucet, Moen guarantees their faucets for like and will probably send you a new cartridge for free.)

    Unfortunately this Moen cartridge wasn’t available locally so I had to order it from Moen at over $20. Yikes.

    Replacing the cartridge

    When the cartridge arrived I called customer service to ask how to remove the handle. It required a 3/32 allen wrench – you have to be kidding me. They don’t etch sizes into little allen wrenches and I didn’t have a fold out tool that had sizes that small. Since it faced away from me I asked specifically whether I needed to turn the wrench clockwise or counter-clockwise and was told counter-clockwise while facing the faucet. That seemed counter intuitive to the lefty loosey/righty tighty idea, but okay. I assumed they knew their faucets. Note the instruction below do NOT show a faucet with a set screw in the back.

    Dripping faucet is an easy fix - The DIY Girl
    Cartridge and instructions

    Before replacing a faucet cartridge TURN THE WATER OFF going to the faucet.

    Working blind I tried allen after allen and finally felt one seat into the screw. I turned the wrench to the left or counter-clockwise and the handle wouldn’t let go. I didn’t want to ruin the set screw, so back on the phone to Moen to confirm which way would loosen. I had been told incorrectly —  I needed to turn it to the right or clockwise to loosen the set screw.

    Dripping faucet is an easy fix - The DIY Girl
    Faucet with allen wrench finally in place
    Dripping faucet is an easy fix - The DIY Girl
    View from the top with allen wrench in place
    Dripping faucet is an easy fix - The DIY Girl
    Handle off, ring removed, and nut removed
    Dripping faucet is an easy fix - The DIY Girl
    It was easy to pull out the cartridge — not all cartridges remove this easily
    Dripping faucet is an easy fix - The DIY Girl
    New cartridge inserted

    After figuring out the set screw the repair was a breeze. The handle came off, a top cover ring slid off, a nut easily came off and I was able to pull the old cartridge out by hand. I popped in the new cartridge, put all the parts back together, turned the water on and no drip!

    Don’t ever let a faucet drip. Avoid the annoyance and the wasted water and do this easy fix as soon as it’s needed.

  • Tips on preparing house to sell

    Tips on preparing house to sell

    Maybe some things you might not think of in the flurry of activity to get your house on the market…

    Clean Windows — clean them and keep them that way checking before each showing to make sure dogs or kids haven’t left smears behind. If bright and sparkling sells houses, letting the light in through clean glass is the first step.

    Tips on preparing house to sell - The DIY GirlClean fans blades — you don’t want everything else to be sparkling clean and have a prospective seller look up and find caked on dust layered fan blades. Get up there with a ladder and give the entire fan a thorough dusting.

    Clean bugs out of all light fixtures — while you have the ladder in to clean fan blades clean you ceiling fixtures. Dirty globes block light and you don’t want a prospective buyer looking up and seeing a collection of dead bugs. You don’t want a prospective buyer to even think the word bug while in your house.

    Tips on preparing house to sell - The DIY GirlBaseboards — it won’t do a lot of good to clean the carpet and floors if the baseboards are grimy. Get down and wash the base boards — especially if they’re white. If they run along carpet use a crevasse tool to vacuum all the crud that can accumulate between the baseboard and the carpeting. I find that crevasse to be an amazing dog hair catcher.

    Refrigerators – a lot of refrigerators are the family show place. Kid’s art is hung there, family pictures, magnets from past vacations. All that stuff screams “This is somebody else’s house!” when prospective buyers walk into the kitchen. You want them thinking “Hmmm. Nice kitchen. I could see our family in here.” Take the stuff down and pack it safely away for your new house. The kids will understand why it has to disappear for a short while.

    Pictures and showings – I got this from a professional photographer who has a very successful business taking pictures for house listings on the internet. He said houses look best with all curtains and blinds open and every single light turned on. He was right — the pictures he took of my house were spectacular.

    He told me the follow-up was to do the same thing for every showing of the house. The worst thing you can do is have your house look great in pictures and then disappointing in person because you haven’t opened every blind and turned on every light so the house looks the same as it did in the pictures. Last thing you should do before walking out is turning every single light on for your prospective buyers.

    Create a checklist – create a list of the finishing touches you leave until the last minute and put it on your smart phone. I have mine in Evernote and I consult it before every showing. Little things like doing a toilet check to make sure they’re flushed…


  • Surge protection for appliances – do it now!

    Surge protection for appliances – do it now!

    After a repairman told me a surge probably fried the electronics controlling the compressor on my refrigerator and suggested I get a single outlet surge protector I started doing some research.

    Which appliances are at risk?

    Appliances used to be a lot simpler than they are now. Now everything is digital and electronic. I found the following comment on BobVila.com:

    Interesting how refrigerators have changed… Now 2013, leading OEM’s include leading electronics manufacturers, Samsung, LG, etc. Today they are laden with electronics, motherboards, digital displays in the door, LED’s, etc. all subject to surge damage, especially in those regions that experience weather with lightning/energy surges.

    The more I read, the more it made sense to follow the advice of the guy who repaired my refrigerator and get a surge suppressor to protect it. But I also found out there are a lot of other appliances that need protection as well.

    If I have a new refrigerator, washer, dryer, or stove with fancy electronic displays I’m putting a surge protection plug on them. Same thing goes for my flat screen televisions. I also read putting one on a garage door opener is a good idea. Anything with complex electronics inside should be treated as carefully as a computer. A refrigerator alone is over $2000 — I’m going to try to keep it and other expensive appliances as healthy as I can.

    First step in protecting your appliances

    The first step is making sure the outlet for your sensitive appliances is grounded. For under $10 you can get a tester like the once pictured left and easily determine the condition of the outlet. If it doesn’t test correctly here’s a good WikiHow that walks you through testing and correcting a problem: http://www.wikihow.com/Ground-an-Outlet.

    Second line of defense

    Some articles suggested a 3 step approach: verifying ground on outlet, whole house surge protection, and outlet surge protection. I’m not sold on the whole house step and will stick with grounded outlets augmented by a surge protector.

    This Old House has a good article on surge protection that gives these guidelines when buying a protector:

    utilitech-1-outlet
    This is the surge protector I picked up at Lowes

    Before buying a plug-in unit, check that it does the following:
    •Meets UL Standard 1449 (second edition)
    •Has a clamping voltage — the amount that triggers the diversion of electricity to the ground — of 400 volts or less. The lower the number, the better the protection
    •Absorbs at least 600 joules of energy
    •Protects all three incoming lines: hot, neutral, and ground. Look for “L-N, L-G, N-G” (line to neutral, line to ground, neutral to ground) on the product’s spec sheet
    Stops functioning when its circuits are damaged by a surge
    Both whole-house and plug-in types can get zapped without your knowing it; look for indicator lights that signal when a unit no longer works.

    Did you read the “stops functioning when its circuits are damaged by a surge? I’d add one more item to that list of things to look for – an audible alarm. Indicator lights are usually hidden behind the appliance or cabinet and surge protectors with an audible alarm are a safer option. The surge protector I got at Lowes has an audible alert and protects up to 900 joules for $7.30.

    I don’t, however, know how long the surge protector will sound. Since I just came home from a 9 day trip to find a dead refrigerator I don’t know if the alarm would have still been sounding when I got home. But if my refrigerator gets a power surge when I’m home I want to hear about it right away. Below are some samples I found – my top pick is the RCA which has 1500-joule surge protection with audible alarm that allows you to plug into the side so the appliance can be closer to the wall, but it’s $18.23:

  • Refrigerator repair – DIY or not?

    Refrigerator repair – DIY or not?

    This Sunday I returned from a nine-day camping trip to find a totally dead refrigerator. In fact, the inside of the refrigerator was much warmer than the house since I’d turned the heat way down. Apparently the fans and other parts heat things up when the compressor stops cooling. Oh joy.

    It must have died several days before because everything was completely thawed and stinky and all the food was a total loss. The good news? It was a terrific opportunity to clean the fridge and freezer since it wasn’t cold and full of food 😉 Trying to look on the bright side here… Couldn’t face the sadness of throwing all that food out Sunday night so Monday morning I emptied both the refrigerator and freezer and thoroughly cleaned both sides.

    The repair

    I did a lot of research online Sunday night and couldn’t find good information on how to figure out what was wrong. I lucked out and was able to get a repair person out Monday afternoon — no small feat in the rural community I live in.

    The guy quickly diagnosed it was the run capacitor and relay for the compressor, told me the repair would be $229 ($129 for parts and $100 for labor), and went out to his truck to get the replacement part. When I saw the part number on the capacitor I looked up it up on the internet. The part shown at left was $11.24 on Amazon. $229 vs. $12??? It was a tough call for me, but since I didn’t know much about compressors and had struck out finding information the night before I decided to let him do the work and have a functional refrigerator immediately. He knocked the price down to $200 when he did the bill. By the way — if I would have decided to do the repair myself I would have owed a $75 service call charge.

    Further research

    whirlpool-run-capacitor-2169373-ap3131713_01_mSince there were two parts involved I tracked down the other one on Appliance Parts Pros. This parts sells for $33.30 so the total parts to do it myself would have been $44.54. $44.54 vs. the $100 final price isn’t quite as bad. $100 to have the man drive way out to my house and spend 45 minutes here is fairly reasonable. The net difference would have been $119.54 with the service call vs. his repair of $200. I can live with that.

    Next time

    If the same thing happened again and I was home and stood a chance of saving all the food if the refrigerator could be repaired quickly I probably would have someone come to the house again and cough up another $200.  That said — if all the food was ruined and I wasn’t in a huge rush I would order the parts and do the repair myself — now that I know what needs to be done.

    Could there be a next time? The repairman said the parts he replaced were probably fried by a power surge and strongly suggested I get an appliance surge protector to prevent it from happening again. I bought one that afternoon.

    See next post Surge protection for appliances – do it now! for information on surge protection.

    I found this at http://appliance911seabreeze.com/ to help next time:

    HOW TO CHECK FOR A BURNED OUT COMPRESSOR

    Unplug the refrigerator and remove the back panel that covers the compressor. There should be 3 wires going inside the cover of the compressor. Mark all 3 and mark their location so if compressor is OK you can put them back in same order. The plastic cover may snap on and you may need to squeeze the sides to unlock the cover and sometimes there is a metal clip holding the cover in place. Remove the cover. May look hard but it’s simple. There will be three connections under the cover and 2 will go through the start relay. Unplug them leaving the three prongs exposed. They may be marked R =Run, S=Start and C=Common. Set your meter on continuity and then begin by testing 2 at a time until you have checked S to R and R to C an C to S and S to R again. You should get a reading all the way around. If no reading between any of the pairs as you go around you should get no reading between any two the compressor has an open winding and is defective. Then if it passes that test then touch one probe to R and the other to the copper pipes or clean metal on outside of compressor, then S to metal outside and C to metal outside. If you get a reading this way even just a little. The compressor is a burnout.

  • Ladderless window cleaning

    Ladderless window cleaning

    Ladderless window cleaning - The DIY Girl

    Bucket + extension pole + brush + rags = no ladder

    My house sits on very hilly terrain so figuring out a flat surface to prop a ladder is nearly impossible. Mix that difficulty with my lifelong fear of ladders and I was pretty committed to figuring out a way to clean my windows without risking my life.

    Needed tools

    My goal was to do it without having to go purchase a bunch of stuff.

    I have had one of the Mr. Long Arm Pro-Pole Extension Poles for years. This pole has allowed me to do a whole lot of painting without a ladder, especially ceilings, and I love the thing. The pole extends up to 12 feet.

    I had a brush on a broom pole for scrubbing outside decks, but the brush was really stiff so not the best for windows. I used the brush, but wrapped towels around it secured with binder clips.

    The only other things needed was a bucket large enough to dunk the towel wrapped brush head into the cleaning solution.

    Cleaning solution

    I figured a clean rinsing solution was critical to my success. I found two posts; one at She Wears Many Hats The Best Window Cleaner Ever … Like Ever  and the other at Made by Pinterest The Magic Way to Clean Your Windows. I have them both pinned on my Pinterest board Recipes, How To for Cleaning, etc.

    best-window-cleaner-ever
    magic-window-cleaning

    I think Dawn Dishwashing Liquid is one of the modern wonders of the world. It is so good at cleaning so many things, cutting grease and oil, and leaving no residue behind, so it was a no-brainer to use it. Since white vinegar is also a great cleaner I added some of that and a small squirt of Jet Dry for sheeting the water off the windows.

    Technique

    Even with the extension pole all the way out I still had to use a step-ladder to reach one window. It wasn’t a big deal — I positioned the bucket of cleaning solution so I could reach it while up on the ladder.

    The extension was a little ungainly to handle, especially with the added weight of the towel dripping wet with cleaning solution, but once I had it up by the window it was easy to scrub up and down.

    After I had scrubbed the whole surface of the window I sprayed with clear water to rinse. I cheated with the one window that was really high up and dragged out the electric pressure washer to rinse that one. I’m not sure I could have reached it with the hose sprayer.

    Results

    I am amazed at how clean and unspotted the windows turned out.

    I think the key to this method is washing your windows every few months so they’re not too terribly dirty. If they were long neglected with a lot of build up it would require a trip up the ladder so you could scrub harder and use a glass scraper.

    I love cleaning the windows this way. Since I will be using my extension again,  I plan to start looking for a soft bristle brush I can attach to it.

    I doubt I will ever use a ladder to wash windows again.


  • Cheap Magic Erasers

    Cheap Magic Erasers

    Cheap Magic Erasers - The DIY GirlDo you like using Magic Erasers to clean? Are you aware they are simply melamine sponges?

    How they work

    “Rubbing with a slightly moistened foam may remove otherwise “uncleanable” external markings from surfaces. For example, it can remove crayonmagic marker, and grease from painted walls, wood finishings, plastic-adhering paints from treated wooden tables, adhesive residue, and grime from hub caps.[3] If the surface being cleaned is not sufficiently hard, it may be finely scratched by the melamine material. The foam wears away, rather like a pencil eraser, leaving behind a slight residue which can be rinsed off.” ~source Wikipedia

    Buying bulk quantities

    You may have known how they work, but did you know they can be purchased in bulk at significantly lower prices? Since these mighty little sponges wear out fairly quickly, more and cheaper is a lot better than less and expensive.

    I’ve found them both on Amazon and Ebay. But watch out for small size sponges — some of them are tiny and you won’t be happy when your package arrives. I purchased 30 from Ebay for $7.65 and shipping was free and they are about the size of a Magic Eraser but missing the pretty logo on the top. Who cares about a logo.

    Here’s a sampling of the prices I just found online with my purchase on the bottom line. The each price is a significant savings. Which price would you like to pay?

    Cheap Magic Erasers - The DIY Girl