A little over a year ago I purchased a Mukoko 20 oz Stainless Steel Vacuum Insulated Mug. I like a big cup of coffee in the morning and I have to admit I love this mug. I had grown tired of my coffee getting cold and this mug keeps it warm a long time even when not using the lid.
What I haven’t loved is the coffee stains that ended up lining it. I tried vinegar, Bar Keepers Friend, and a variety of other cleaning options and nothing really cleaned the mug. It stayed stained.
Then I tried denture tablets. It required some experimenting before I found the perfect combination. This morning I boiled water in my kettle, added a little to the mug, dropped in 4 (yes, I said 4) tablets and added boiling water until the foam was at the top. I let the foam die down, stirred it around a little, and then topped off with boiling water until the mug was completely full and let it sit for about an hour.
I couldn’t believe how great the mug looked when I dumped the water/denture tablet solution out. There was just a little film that was easily removed by a melamine sponge.
I wish I would have taken a before picture to show how nasty the inside looked but this is how it looks now. It looks like it did when I took it out of the box at least 700 cups of coffee ago. I can’t wait to have coffee tomorrow.
Note about melamine sponges: I quit paying the outrageous prices at grocery stores for magic erasures a long time ago. Just research melamine sponge on Amazon and you can purchase a quantity at very reasonable prices and they clean just as well.
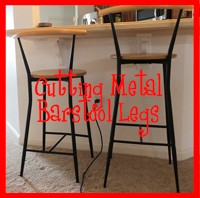
I moved from a house with a bar height bar to a counter height bar. I have great sentimental attachment to the bar stools I have to the point I don’t really care if the “go” with the house and decor, I can’t part with them — too many memories when I look at them. Maybe you found a great deal on bar stools with metal legs at a thrift shop but they are too tall for where you want to use them. There is a remedy.
Research
I found a good starting place with an ehow article How to Cut Metal Bar Stool Legs so I knew it was possible. I should have taken the advice offered in the article…
Look for 24″ high stools for a 36″ counter and 30″ high bar stools for 42″ high counters.
Then I needed to know how much room should be between seat and bottom of counter for user comfort and found this at HowtoDecorate.com:
Keep in mind you need 9″-13″ between the seat and the counter for seating comfort.
Now I knew how much I wanted to cut off, but didn’t relish the idea of using a hacksaw on 8 legs.
Methods tried
Keep in mind I had a little room for scratches since I planned on replacing the rubber legs tips when I was done cutting and they would cover any scratches right at the bottom of the legs.
The easy tools – tubing cutter and multi-tool. Both were failures.
I decided to try a power tool first in hopes it would quickly whisk the 8 legs off. I taped and marked the legs to prevent damage and found the multi-tool bounced all over the place before actually biting in and starting to cut. This could be the result of my lack of experience and a more experienced user might have much better luck. With great disappointment I decided that was not the way to go.
Next was the copper tubing tool I had from plumbing projects. It worked great on consistent diameter tube. It does not, however, work great on tapered tubing like the legs. I spiraled down the taper and there was no way I would get an accurate cut. I again set a tool aside with great disappoint.
What actually worked
The dreaded hack saw. I went to work with the hack saw, and while not fun, I cut all the legs off and corrected the bad cut from trying the copper tubing tool and both stools were mostly level when placed on a hard surface. I had one leg that was just a little short.
Leg tips
I had hoped to reuse the leg tips. Unfortunately, once cut the leg diameter went from 1/2″ to 5/8″. I wondered how much trouble I would have to go to to find 5/8″ black rubber legs tips. On online search showed HD and the hardware store were a waste of time. I have found that L may have things on their website and not in there stores. I almost jumped and down with joy when I walked in and found 4 packs of 5/8″ rubber tips in black.
Now for getting the buggers on.
Attaching the leg tips
Okay, so maybe the tubes were a tad over 5/8″ and the legs got wider where the tops of the tips would sit.
I had figured I could correct the the short leg by adding washers to the bottom of that leg tip. Then I decided washers would also prevent the ends of the legs from working their way through the legs tips over time so I bought a pack that fit perfectly into the leg tips. I used the handle of a wooden spoon to force the washers down into place.
It pretty much took brute force to start the leg tips and a hammer to get them all the way on. Good thing there were washers in there to prevent me hammering right through the bottom of the tips. All 8 tips on are. Man, I hope I never want them off. I would probably have to cut them off. On the bright side — I don’t ever have to worry about them falling off and the stools are nice and level.
So pleased
I don’t know if I may at some point paint the metal or the wood, but I do know when I put those stools in place and stepped back to look at them I just smiled. Silly how attached you get to things, but I am so glad I found a way to make them work with the shorter counter height and people will actually be able to sit on them 🙂
Having moved into a house with next to no storage I needed a big piece of furniture for the living room to store media, electronics, and other things.
I lucked out and stumbled across this cabinet which is the base for a huge china hutch. It was very dark pine, 72″ across, weighed a ton, and cost $50.
Cabinet as purchased
It may look great in this picture but it was badly beaten up with scrapes and gouges in the top and front that weren’t repairable in its current finish. This was okay since I wanted it to be white anyway.
I filled the damaged areas with wood filler and sanded them smooth.
Beginning work on cabinet
Now for the idiot mistake. I painted the first coat on the cabinet thinking I had grabbed the can of primer. Do you believe it? It was so hot and humid in the garage and I was so miserable that I did an entire coat before it dawned on me that it was semi-glossy and not flat like primer. I had grabbed the cabinet paint can instead of the primer.
I debated what to do, but I have to admit the intense heat and humidity in my garage was the deciding factor. I couldn’t force myself to sand it off and start over so I’m going to find out what happens when you sand and degloss pine furniture and apply paint without primer. I’ll let you know how that turns out but from what I read it may take a year or two to fail.
Because of no primer coat it took me FIVE coats of paint to cover the dark brown. Maybe I should have sanded that first coat off.
I bought some glazing gel and added black acrylic and wiped it on the detailing and then wiped most of it off — all I was going for was the details to being accented. So this is what I ended up with.
I am really happy with how it all turned out. Oh, and I spray painted all the hardware black while I had it off.
Note the little piece of fleece under the Roku box? That’s the only piece of electronics I want outside the cabinet and I didn’t want it to put dents in the new paint so I have fleece under it until the paint has a month to cure. Never every rest things on newly painted furniture for the first month. Mark it on your calendar when it will be safe.
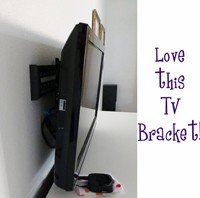
TV mounting bracket
Now the big deal to me is the TV wall mount I bought to get the TV off the cabinet and on the wall. It was only $25 and it’s a rock solid bracket and installation.
What few negative comments I’ve seen on it are in regard to the little level that’s included with the product. My advice is never, ever use these tiny bubble levels. Everyone should have a decent level so they can check anything they hang on the wall.
The bracket comes with a little long handled Allen wrench so you can adjust the bracket once it’s installed. Since I was doing this solo I took my best guess at the angle I needed and had the screws locked down before the thing went on the wall.
I really, really didn’t want to drop my television so this project made me a little nervous. I guess I should point out that as I am not a huge fan of TV I only have a 32″ inch flat screen. A larger screen would definitely up the difficulty of this project and require more than one person.
While it fits very close to the wall I have since been able to reach behind and connect a coax cable for an antenna. The low profile look is so nice.
I never would have thought you could get a good TV wall mount for $25 and doubt I will ever have a TV sitting on a stand again.
Just a quick post with a tip on cleaning paint brushes.
Not quite sure why I tried it or if I read it somewhere, but after painting with a brush for 10 hours and finding a mess of dried latex paint on it I decided to let it soak overnight in Murphy oil soap. I didn’t even submerge it — I had a small rectangular plastic dish, coated up both sides of the brush with straight Murphy Oil Soap, and let it sit. When I walked by I squish the bristles to make sure the soap was thoroughly coating them.
I washed the brush the next day. I always use a nail brush to brush away from the ferrule to dislodge any gooed up paint. The dried paint just whisked away and the brush was spotless in no time. Every bit of the dried on paint was gone.
When the brush was dry I couldn’t believe how the bristles felt — the bristles were like when it was brand new. I purposely used one of my dad’s old brushes the next time I painted so I could use the Murphy Oil Soap on that. Same results. Not only was that old brush really clean, but the bristles were soft and supple.
If you have gunked up brushes you should try soaking them Murphy Oil Soap!
Brush on left is my new one. Brush on right is my dad’s and has been used over and over for years. Both were just cleaned with Murphy Oil Soap.
Being the frugal person that I am, I have been doing a lot of searching both online and in stores for a good deal on nice cabinet hardware for my bathrooms. Both bathrooms have builder’s grade cabinets and no hardware. I’m currently painting the cabinets so I’ll need the hardware when I’m finished. I’m also going to be building some shelves for the master bathroom that will have hooks, so I need a bunch of those too and store prices are ridiculous. I would like these projects to come in on budget.
For the record I am NOT sponsored by Gliderite. Heck, I’m not sponsored by anybody and will happily tell you when somebody’s gives me something for free. I’m sharing this because when I find a good deal I like to share it.
Previous cabinet hardware deal
I had found a good buy on hardware at Overstock.com last year. At least what I thought was a good deal. Now I’m kicking myself. I ordered 10 packs of Gliderite hardware for $29.95 and thought I’d hit the jackpot. Sorry Overstock, but I won’t be buying from you again.
When I got the hinges last year for my Shaker Cabinet Update I found some of the packets were missing screws. I called Gliderite directly and talked to a very nice customer service person who apologized for the inconvenience and simply shipped me 10 sets of hinges no questions asked. I don’t run across that kind of service much anymore and prefer to give my dollars to companies who treat you well.
Gliderite cabinet hardware
This time around I went directly to the source and found Gliderite.com and got what I think is an incredible deal.
Cabinet Hardware Knob Round Ring – Satin Nickel (Pack of 10) $11.95
Classic Bin Cabinet Pull – Satin Nickel (Pack of 10) $19.95
Satin Nickel Large Robe/Coat/Hat Tri-Hook (Pack of 10) $19.95
They don’t charge for shipping within the US. I placed my order on Sunday and got an email by midday Monday that my order had shipped. $51.85 for 10 knobs, 10 pulls, and 10 triple hooks? I thought the hooks alone were going to end up running me $50-70 so needless to say I am thrilled.
I love a good deal so I thought I’d share it. FYI — I once again called customer service to see if they sold a template for drilling holes in the door and drawers (I really stress over this job). They don’t have one, but had suggestions and once again were incredibly nice.
I have recently had appallingly bad luck with wall anchors. I was hanging shelves in my sewing room and most of the wall anchors I tried were a complete disaster. I tried toggle bolts, molly bolts and some new contraption and they were all awful. My wall ended up looking like Swiss cheese from my failed attempts and left me with a lot of drywall to repair.
All I want is an easy to use anchor that it strong enough to hold things and I can install with pinpoint accuracy so things end up level. I like level. Crooked makes me crazy. Swiss cheese makes me crazy too if it’s on my walls.
Bathroom hardware
I painted my guest bathroom and decided it was a good time to move one towel bar and the toilet tissue holder to better locations. I cringed. That meant more hollow wall anchors/potential failures. With very nice freshly paints walls I didn’t want Swiss cheese again.
I hated the kind I was using so I started researching to see what other people like. I found this funny little video from a guy who I assume is in Australia:
I went to HD and bought the kind he demonstrated. I got a 4 pack of E-Z Ancor Twist-N-Lock 75 Medium Duty #8 x 1-1/4 in. White Nylon. It took me minutes to successfully re-install the towel bar and toilet tissue holder in perfectly level, firmly attached beauty. I was sold. But I was out of anchors.
I was at Walmart and picked up Bulldog Auger Anchors. Same basic thing and I hung a bracket for a three tiered hanging basket in the kitchen that is perfectly straight and currently loaded down with fruits and vegetables in about 5 minutes. No swiss cheese, no cursing and swearing.
These will be my go to anchors for anything that doesn’t have to hold a ton of weight. Of course, if I’m hanging shelf units I’ll be back to my nemesis molly bolts. Why don’t I same capable of putting molly bolts in level??
I was approached by a reader to assist in coming up with measurements for a smaller dog cot for her dogs. Donna was kind enough to send pics of her puppies and the cots so I could post them. Aren’t they cute?
Donna built the PVC frame using 1″ pipe: the long sides of the PVC were cut 24″, the short side of the PVC were cut 18″.
Donna told me that when assembled there was 22″ and 16″ of the PVC exposed between the corners so that had to be the width of the finished slings
Donna told me the circumference of the 1″ pipe is approximately 4 1/4″ so that’s what had to be added to wrap around the pipes.
I came up with cutting the fabric pieces 18″ x 35.5″ and 24″ x 28.5″ and Donna told me that working out perfectly once the 1″ side hems and the loops to go around the pipes were sewn. That means you only need 1 yard of fabric to make each set of the small dog slings.
Follow the step by step for the large dogs PVC cots subbing in the smaller PVC and fabric measurements.
These are the cots Donna made — she did a beautiful job!
Email me if you have questions, but I may have to defer to Donna’s expertise since I haven’t actually made the smaller size cots.
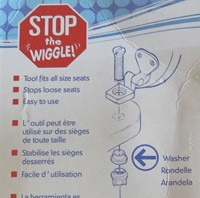
Brand new house and brand new toilets and the seats wouldn’t stay in place! It was driving me insane. With the total craziness of moving and unpacking and you can’t even have a calm respite when you go to the bathroom that’s free of problems so it was time for a little toilet repair.
I figured out the problem was the bolts were smaller than the holes in the toilet, so even though they were tight they were able to slide around inside the holes.
Enter the Ginsey Toilet Seat Tool kit available on Amazon and even a little more cheaply at Lowes.
The kit consists of a tool for holding the bottom nut in place and 6 washers. The washers shown here are black, but the kit I purchased at Lowes can with white ones. I think white is better… unless you happen to have black toilets. The only other thing you need is a screwdriver.
The washers fill the holes so the bolts have nowhere to move. I’m not sure the tool is completely necessary — a package of the washers would have been just fine. I guess it did make it easier to hold the nut on the bottom while I tightened the bolts from the top.
Using tool to hold the nut (not sure it’s really necessary)
For some reason no matter what I tried the seat still doesn’t sit perfectly center on the toilet, but I guess that’s a problem for another day. At least it doesn’t slide all over the place anymore.
Economical kit, easy fix, and corrects three toilets. What more can you ask for except just maybe having the seats properly installed when you buy the house? Ah, but that would be too easy.
Having just installed 5, count them 5 (house came with no fans) ceiling fans since moving in, I have some pointers for newbies that will make the process a little easier. Ceiling fan installation isn’t bad, even when doing it alone. Some of this information comes by way of learning from my past mistakes…
Know the support you’re installing into: If your outlet isn’t a braced outlet do not trust it. My builder said all ceiling lights were braced to hold fans, even the light on the outside covered patio. I’m not thrilled that I have to go on trust and would like to see it — just not bad enough to climb into an attic in summer in Florida.
If in doubt, remove the existing box and install one of the supports pictured right — they’re available at all big box home improvement stores. It’s easy and a whole lot better than having a fan crash down unexpectedly. I once had a fan I had not installed spontaneously crash down on the bed in a spare bedroom as I watched. The fan wasn’t running and I hadn’t touched it. Fortunately no one was injured, but the event left a lasting impression.
Always, always turn the power off at the circuit breaker: Never work on electricity with just the wall switch off — be safe and turn the breaker for the circuit off until installation is complete.
Unpack all the parts: more than once I have had missing parts or a broken globe for the light. It is really annoying when you are part way through the install and are stopped dead with this kind of problem. FYI – Before I got smart enough to check all parts in advance I refused to take the fan back but instead returned with my receipt and made the store open a box and replace my missing/broken parts.
Really read the directions: All fans seem to go together a little differently. Read the instructions that come with them. It will avoid a lot of headaches.
Strip the wires on the floor: Before hefting the fan motor into place strip a little additional insulation off the wires. They come with maybe 3/8″ exposed and I like more exposed wire to guarantee a good connection with the wires coming out of the fixture box. Just make sure it’s not so much you have exposed wire showing above the wire nuts when connected. It is so much easier to do with the motor sitting on the floor than when it’s hanging from the ceiling.
Use the correct size wire nuts for your connections and make sure they are tight. Here’s a video if you’re new to it.
Assemble fan blades per instructions: This is important since you want a balanced fan that doesn’t wobble. Another thing that seems to vary a little between fans.
Make sure all assemblies are tight: Unless you like rattling noises from your fan be sure to get everything installed with appropriately tight connections.
Test sooner, rather than later: As soon as the motor is up and the light kit installed I stick the bulb in temporarily, turn the power on for a moment, and test to make sure the motor turns and the light bulb comes on. Turn the power back off until you’re completely done. I believe somewhere in my sordid past I have completely finished and put everything away only to discover something didn’t work properly…
Let’s get this up front – I am not sponsored in any way by Pledge or SC Johnson. This is a totally unbiased user review by someone who stumbled onto great advice.
I could not keep the stainless appliances looking good
The house I moved into came with new GE appliances. While the French door refrigerator is really pretty, the noise from it is enough to drive me insane so I called GE to have it checked out.
I thought my stainless steel appliances looked terrible. A neighbor had told me a repairman said to use WD40 – I thought that was a gross idea, tried it on a spot and didn’t like the result. I read a blog that suggested all you needed to have gleaming stainless was water and a microfiber cloth. Maybe so, but that method was extremely work intensive and didn’t last 5 minutes. I tried stainless steel cleaners and the appliances still didn’t look nice. It annoyed me every time I walked in the kitchen. I wanted to know how to clean stainless steel appliances!
Anyway — I asked the GE repairman if he had any suggestions for cleaning them. Oh boy, did he.
Pledge on stainless
He asked if I had a can of Pledge. I did. He told me he’d do the right side door of the refrigerator. These were his recommendations for cleaning all your stainless steel appliances. This includes refrigerators, stoves, dishwashers, microwaves, coffee makers, etc. If it has stainless put Pledge on it.
I suggest you run your hand over the surface of the appliance before so you know how stainless steel feels without Pledge.
For appliances with a large amount of stainless and no glass (refrigerators and dishwashers) put towels down on the floor to protect it from spray. I learned this the hard way when I oversprayed Pledge on hardwood at my previous house and both me and the dogs would almost slip and fall every time we walked on that spot.
For smaller appliances and appliances with glass, spray a heavy coating of Pledge on a cloth and apply to the stainless. The other option is to spray Pledge directly on the appliance and spend some time cleaning the Pledge off the glass. I applied it to a cloth.
For large appliances: spray Pledge on heavily and swirl it around really getting into the stainless. Allow it to sit for a few minutes to soak in. You don’t need to worry about the grain of the stainless. He suggested wiping it heavily in circles so that it really gets into the surface.
Use an old t-shirt to thoroughly remove the heavy coating of Pledge. Again, don’t worry about the grain of the stainless and wipe in circles, changing to clean areas of the cloth until all the Pledge is removed.
Now run your hand over the stainless. It feels like satin. It’s wonderful.
Left door coated with Pledge
After doing this to my refrigerator it was absolutely gorgeous. Best part is that it takes minor touch-ups once a week with Pledge to clean up the splatters from the ice maker/water dispenser in the door and the messy fingerprints on the handles. I live alone and am the only person who cooks in my kitchen – I can’t figure out what idiot keeps grabbing the refrigerator door handles with slop all over their fingers…
Pledge on Corian
The GE guy said Pledge is also great on Corian and did a small area. I have since Pledged the living daylights out of the countertops in the kitchen and both bathes. You really have to feel the surface before and after. There is a rough drag when you pull your fingers across the surface before. When you coat them with Pledge everything slides effortlessly across the surface.
Corian will need to be re-coated more often since you’re constantly wiping your counters down, but it even makes that easier since stuff seems to stay on top of the Pledge. I went hog-wild and did the entire kitchen and both bathrooms. The Corian looks awesome.
I am SO glad I asked the GE repairman the question and really appreciate his information.
Follow up: I’ve been using Pledge to clean my stainless steel appliances for over a month and I’m amazed how clean they are staying and how easy the once a week touch up is to keep them looking great. If my water/ice dispenser on the refrigerator didn’t splatter so much my fridge would look perfect all the time.