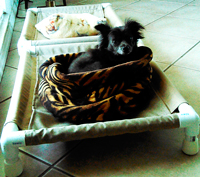
I am in the middle of massive downsizing and have 2 small and 1 medium sets of slings, corner fittings, and end caps for the legs from the test samples I made. I would love to see these go to good homes where puppies can enjoy them. The color is dark brown in the top and middle cots pictured above.
The 2 small sets and medium set have been claimed.
Actually, I have the PVC for the sides and legs too, but after checking boxes and shipping it’s cheaper for you to buy the PVC locally and cut it than to pay for the shipping.
If you don’t mind paying for shipping for medium USPS priority shipping box at $12.35 (doesn’t that seem high for a medium box??? Feel free to check the rates), then I will send the slings, corners, and caps to you. You will then need to buy 1 1/2″ PVC (directions can be found on the tutorial) and assemble the frame. I recommend you go to Harbor Freight and buy a cheap PVC cutter if you don’t have one. The cost is half what the big box stores charge.
If you are interested, leave a comment below or go to the contact page and send me a message. I will need payment sent via PayPal before shipping the slings.
Please let me know if you have any questions. These are for smaller or medium dogs — you need a large cot for large breed dogs.
I can help you out by providing everything but the PVC and you can help me out by getting them out of here without it costing me shipping. Sounds like a win-win to me 🙂
I wanted to post pictures of some of the pvc dog cots that have been made. If you have used the tutorial to make a dog cot I would love to post pictures of your project and pets as well so send me an email. I’ll add more images as I receive them.
Kristin in Ontario
Kristin ordered a couple slings for her dogs Keely (fox red Labrador mix) and Ranger (brindle boxer-Wheaton terrier mix). The captions are Kristin’s from Instagram. I had to resist the urge to download 50 pictures because they were all so cute.
[nggallery id=12] Lisa in Colorado made a pvc dog cot (I sewed the slings for her) for Jenell. She couldn’t find the corner fittings in 1 1/2″ so she went with 1″ PVC and she said its supporting Jenell just find. I found out Jenell is part of a large family – 4 dogs, 5 cats, and 2 guinea pigs, most of which are rescue animals. As you can see, Jenell isn’t the only pet to like the PVC dog cot.
[nggallery id=10]
Crystal is the owner of P-King Kennels in Sarnia, Ontario and contacted me about making the dog cots to be used in the kennel She has had a little chewing of the fabrics slings, but overall is happy with the cots. Here’s some pictures of her cots and guests at the kennel.
[nggallery id=9]
Debbie and her husband are making a cot for their dog Lily.
Donna made two small cots for her dogs Pepe, Tawny, and Tia.
[nggallery id=7]
Tarah is making a variety of sizes as a fundraiser – here’s her first dog cot.
I added small and medium dog slings on 2/10/2015 for people who don’t sew. Prices are for fabric slings only. The instructions on how to make the PVC frames can be found at PVC Dog Cot Tutorial.
Outside Dimensions
Price
Large
30 x 36
$58
Medium
24 x 30
$54
Small
18 x 24
$50
I’ve been mentally wrestling with this idea since Christmas and need to make a decision. The mental wrestling has been a result of really wanting to help out the non-sewers who have asked me to make dog cot slings for them, but feeling guilty about the price I have to charge so I won’t be giving my time away.
You probably should also be aware the first time I tried making slings for a reader who asked me she then refused to pay when they were ready to ship. Kind of left me with a “no good deed goes unpunished” feeling. It wouldn’t have been so bad if she simply told me she changed her mind, but instead she kept telling me over and over she would send the money. After weeks I got the point and gave up. When I finally sold the slings to others it was to really nice people who were fun to deal with and promptly paid. Thanks to them for the positive experience.
Explanation of process: If someone orders one I have to go to Joann to buy the fabric and matching thread. Get an okay from the person ordering that the color will work for them. Then I have to lay it out, measure and mark the fabric, cut the fabric, iron the hems, sew the hems, measure, mark and sew the loops, iron both pieces, request payment, arrange for shipping. It all takes time if you want nicely done dog slings. I just want you to understand I didn’t arrive at the price lightly. Even at $56 it will most likely work out to me making less than $10 an hour, especially when you factor in gas. This is not a mass production shop, but me sewing one at a time in my home.
Costs of fabric slings only for large dog cot frame only:
The picture shows the current price of duck cloth at Joann and the colors that were available the day of the picture (the black box in the upper right corner isn’t duck cloth so I blocked it out). I can’t promise every color will be available with at least 1 5/8 yard on the bolt. Some of those skinny bolts probably don’t have enough yardage on them. And it all depends on what’s in stock on any given day.
This is for the fabric slings onlyfitting the large dog cot frame. The corners and PVC are available locally so you would buy and assemble the frame and then add the slings when they arrive. The PVC pipe sides would be cut 32″ and 26″ for these slings.
I do have 8 corners if anyone can’t find them. They are $3 each and I would need to ship in a larger box so shipping would be higher.
The above cost is based on the current price of duck cloth and thread at Joann and subject to change. I know Joann has coupons, but I can’t count on that so I have to go with the list price.
I applied for a FL sales tax certificate, but only FL residents would be subject to that.
The shipping cost is based on my ability to cram the slings into a Priority Mail™ Padded Flat Rate Envelope and subject to change if I am not able. If anyone has cheaper shipping options I’m open to ideas.
It would be 10 days from time of order to request for payment. When payment is received I will immediately arrange for shipping. If I can get them done sooner, I would ship as soon as they are completed.
Color — always keep in mind your monitor may not be showing the same color as my picture, so color can be close, but not exact unless you go to Joann and see it in person.
The duck fabric is sturdy 100% cotton and can be washed and dried.
How to order
Please use the contact page to email me. Tell me which color in the picture below – I numbered the top and bottom row so tell me “top row 8 dark brown” or “bottom row 14 purple” as examples. Please send two colors in case your first choice isn’t in stock. Be descriptive since getting the right color will make me nervous. I will get back to you about availability once I go to the store.
Payment
I prefer QuickPay through online banking since there are no service fees involved and I’m trying to keep the price down. I will send a payment request to your email address. If you have other suggestions for payment, let me know.
I would love to have payment in advance of sewing, but just don’t feel right about that. Once the order is placed I will start making the slings and have them ready to ship in a maximum of 10 days. I will send a request for payment and the slings will ship as soon as the payment is received.
If anyone has questions or concerns don’t hesitate to contact me. Happy to answer questions and open to discussion.
Large, Medium, and Small sizes available
I went ahead and made frames for medium and small (as well as the original large) and will be selling the slings in all three sizes at the prices listed above.
Still not sure?
Here’s a link to a thank you post one of my reader’s (and purchaser of the dog cot slings) posted on her blog Keely and Ranger’s Dog Cots.
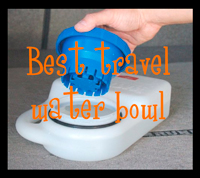
Image courtesy of Amazon (not my dog, not my vehicle). You will need to strap or bungee the bowl to keep it from sliding around
The Waterboy travel water bowl is hands down one of the best purchases I have ever made for my dogs. I think adequate hydration is important for everyone, including my dogs, and now I don’t have to worry about it whether we’re running around doing errands or on the road for a trip.
Gone are the days of the dogs only being able to drink at stops along the way. The Waterboy travels full of water and I can hear the dogs in the back of my SUV lapping up water while on the road. It stays in my vehicle all the time. Best thing? It doesn’t spill water.
The little blue bowl allows just a small amount of water into the bottom and refills as the dog drinks. That’s why there’s never enough water in it to slop all over the place. I love it.
My timid dog Ellie started using it as soon as I filled it and set it down on the kitchen floor before taking outside to my vehicle. My fearless dog Nikki looked at it with a baleful eye, sniffed it with disdain, and had an expression that said “I’m not drinking out of that thing.” When she got thirsty enough on our first trip with it she gave in and used it readily after that. So don’t expect every dog to be immediately thrilled with the little pool of water available at the bottom of the blue cup.
waterboy-ring
I have read reviews where people complain about leaking. The big black o-ring shown in the picture is like any other o-ring. It needs periodic maintenance in order to keep doing it’s job. Every once in a while I take the o-ring off, wipe all the accumulated dried slobber and crud off of it, wipe on a fresh thin coating of petroleum jelly and put it back on the bowl. It seals beautifully and my Waterboy never leaks.
There’s only one thing I had to add — the bowl was driving me crazy sliding all over the back so I have a small bungee cord on the handle that is hooked to the side of the cargo area. No more sliding and it’s right where the dogs need it.
I do still keep a jug of water stored in the SUV in case the dogs empty the bowl and there isn’t any water available, but it doesn’t hardly ever get used anymore.
Depending on where you get it, the Waterboy will cost you $15-20. It’s worth every penny.
I’m not sponsored by anyone so this is just the opinion of me as a dog owner.
I was approached by a reader to assist in coming up with measurements for a smaller dog cot for her dogs. Donna was kind enough to send pics of her puppies and the cots so I could post them. Aren’t they cute?
Donna built the PVC frame using 1″ pipe: the long sides of the PVC were cut 24″, the short side of the PVC were cut 18″.
Donna told me that when assembled there was 22″ and 16″ of the PVC exposed between the corners so that had to be the width of the finished slings
Donna told me the circumference of the 1″ pipe is approximately 4 1/4″ so that’s what had to be added to wrap around the pipes.
I came up with cutting the fabric pieces 18″ x 35.5″ and 24″ x 28.5″ and Donna told me that working out perfectly once the 1″ side hems and the loops to go around the pipes were sewn. That means you only need 1 yard of fabric to make each set of the small dog slings.
Follow the step by step for the large dogs PVC cots subbing in the smaller PVC and fabric measurements.
These are the cots Donna made — she did a beautiful job!
Email me if you have questions, but I may have to defer to Donna’s expertise since I haven’t actually made the smaller size cots.
I have 2 dog cot slings for the large dog cots with PVC pipe sides that measure 32″ and 26″. One sling is khaki and the other in nutmeg. Both are made of 100% duck cloth and washable.
I had someone contact me asking me to sew the slings for her – even nagged me over Memorial Day weekend about getting them done – and then refused to ever send payment. Sigh. Does this fall under “no good deed goes unpunished”? Due to this I am rescinding my offer to sew slings for people in the future.
Each sling is $35. $10 for fabric, $20 for labor (they each take 2-3 hours to measure, cut, iron, and sew), $5 dollars for shipping.
If you’re interested either leave a comment or send me a message from the contact page. They need a good home with a dog who will appreciate them 🙂
Update October 19, 2014
The nutmeg sling went to Crystal in Ontario, Canada who is starting a dog kennel and will be using one as a template to make a lot more. I am really tickled about this since I’ve always thought the dog cots would be perfect for kennels.
I have people emailing me about the remaining khaki sling so I suspect it will be gone soon. I will consider sewing more, but due to the time it takes and the increase in the cost of fabric I would charge $40 a set. I checked duck cloth at Joann yesterday and there are a lot of colors in stock so if you’re interested I will check if they have a color that will work with your dog and decor. So if you don’t own a sewing machine and would like to buy the standard size slings for large dogs send me an email through comments or from the contact page.
Update November 24, 2014 – the khaki sling sold also.
Okay, so I had the problem solved for my dog Ellie with her preferred point of entry – the back of my SUV. You can see the DIY for the trailer hitch dog step here. But what would happen when I’m pulling a trailer? An event that was imminent with our move to Florida.
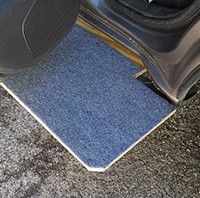
As luck would have it, my Xterra is tall to step into so it has full length running boards on either side of the SUV. It hit me that I might be able to use them to create a side step if there was a way to wedge a board in between the running board and the bottom of the vehicle.
I tried a square piece of board, but the flare out of the body at the back edge wouldn’t let the board fit in. I cut a corner out of a piece of plywood to accommodate the curve in the bottom of the Xterra. In case Ellie stumbled I cut the sharp corner off so she wouldn’t hurt herself. The board fit perfectly.
I was out of carpet scraps to I ran to Lowe’s and bought 1′ of gray carpet runner — it cost about $2.50. I generously stapled the carpet to the plywood to make sure there were no loose edges.
The cool thing about how this worked out is the open door holds the board in place so it can’t spring up — I didn’t want it to act like a diving board when she landed on it and the problem solved itself once I opened the door.
Complete success. I showed Ellie the step and she put her paws on it without my asking. Of course there was a treat sitting up in the truck enticing her. I told her “Up!” the command to get in the truck and she went up without hesitation. You can’t tell by the still picture, but her tail was wagging. Of course, that too had something to do with treats and lots of praise.
The was an incredibly easy project to help a dog get into the side door of an SUV, but it will only work for those of us who have running boards. I’m so glad Ellie has an easy dog step to get in the SUV when I’m pulling a trailer.
Ellie is my dog with the incredible vertical leap. She’s also the dog who accidentally got her rear right leg broken when she was five months old. She’d snagged a dog bone and ran with Nikki chasing when she abruptly screeched to a halt. 45 pound puppy was hit full speed by 75 pound adult dog equaled snapped leg.
After nine years of watching her rocket into the back of my SUV with room to spare I was shocked when she started missing (not quite making it in) and getting progressively more and more frightened of the effort. All the while I’m watching my eleven year old lab, who never had that great of a vertical leap, jump into the vehicle with ease.
For the last year Ellie has been becoming more and more skittish. She’ll be sound asleep and suddenly jump up like someone has poked her with a cattle prod. I’ve seriously wondered if it’s some kind of canine dementia since Nikki’s personality was staying completely the same.
All to say – I don’t know if Ellie can’t jump into my SUV or if she’d gotten spooked and convinced herself she can’t. Bottom line – it doesn’t really matter. She’s scared to death to jump in my vehicle.
Failed efforts
I tried helping her by putting her front paws on the bumper so I could then pick up her rear and help her in. Oh my god – she’s terrified of that and hates it so it’s been a complete disaster.
Building the dog ramp that Ellie wouldn’t even try
Figuring both Labs would end up needing one, I built a really nice ramp that Nikki would go up and down. Ellie wouldn’t even consider it. No amount of treats, begging, pleading, cajoling, or ordering was going to make her try it. Great.
I have always kept the back seat folded down so the dogs would have the entire back of my Xterra to move around in. I put up the back seat to see if she’s climb up on the floor and then jump on the seat. Same round of treats, begging, pleading, cajoling, or ordering. Forget it. She wasn’t having any of that either.
I tried picking her up (questionable I could wrestle a struggling 75 pound dog) but she fought me every inch of the way on that too. Sheesh. I was getting really desperate since she hates being stuck at home and was terrified of jumping in the vehicle.
Step for receiver hitch
Looking online there were a lot of dog steps in various configurations. I didn’t see her being willing to try any of them because they were so foreign to what she was accustomed to. Most particularly I didn’t want anything that would move and scare her to death.
I then found the Otto Step. Nice dog step, but at $80 and having no way to secure in the receiver hitch (no hole for a pin) I was afraid it would move or even come out and freak Ellie out.
I then found the Twist Step. Wow - awesome idea, but $250??? You've got to be kidding me.
I was sure I could come up with something for less. I continued my research and found the Bully AS-551 trailer hitch step for people at $39. $40 was more palatable for an experiment that she might turn her nose up at. My plan was to attach a carpet covered board to provide a larger platform for her to use as an interim step into the back of the vehicle.
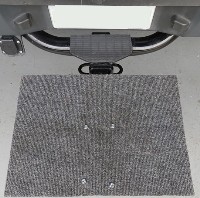
Modifying the Bully AS-551
The Bully AS-551 is a nice step. As you can see in the picture below it has a 2" pivoting bar with a stainless steel platform that is about 9" x 6". You can see the releasing pin so the platform arm can be swung perpendicular to the vehicle and tucked underneath when not in use.
It was, however, more problematic than expected to add a larger platform board. I had planned on the screws going in from the top, but the nuts couldn't go on the bottom because the outside row of holes were too close to the steel post. I put the screws through large washers from the bottom and tightened the nuts on the top of the board hoping they wouldn't bother Ellie.
[caption id="attachment_2296" align="aligncenter" width="640"] The step shifted on the board because of how close the holes are to the tube. I didn't figure Ellie would care.[/caption]
The picture below shows the step inserted into my receiver hitch.
I put her front paws on it one time (which she hates me doing) and she bounded up. She jumped down not using the step, but jumped back into the SUV using it four more times. I took her to the park for a walk. She happily used the step to get back into the vehicle. Success at last.
I tried it again today and she’s in and out of the SUV in a heartbeat. She isn't frightened of the step, it's big enough she has room to maneuver, and it makes life easy for her. Hallelujah.
FYI - I do not drive with the step in place. I store it in the back of the SUV and put it in place when she needs to jump up. The board isn't weatherproof and I didn't want someone to inadvertently hit it because it kind of blends into the bumper.
$39 for the Bully AS-551, $4 for bolts, washers, and nuts. I had a piece of carpet and piece of board here so that was free. I used contact cement to attach the carpet to the board. Great dog step for a lot less than $250. And Ellie likes it :-)
I’m in a bit of an odd place here. I’m finally moving from a foreclosure DIY project house in an area I have not liked the entire year I’ve been here to a brand spanking new house in area I hope I will adore.
The DIY Girl in a new house??? After 17 years in a three-story monster on a heavily wooded lot and the last year in a foreclosure badly in need of work and updates I feel like I’m due for an easier home. Hopefully home repairs will be few and far between for a while, but there will still be maintenance to keep it in good shape and it will be a blank palette I want to customize and turn into a coastal cottage look on the inside. I also want to get more heavily into finding flea market furniture and refinishing, some furniture building projects, and major garden work.
Mourning
The kicker is a recent loss I’ve experienced. I have been the more than proud owner of two gorgeous Yellow Labs – okay, I admit to a certain degree of prejudice. Last Friday night I watched the eldest dog Nikita, just days short of being eleven years old, die in agonizing pain with me alone and helpless to do anything but just be with her. It was hideous. I am heart-broken. I also feel like a failure for allowing a much-loved animal to die in terrible pain. Not to mention how horribly I miss her. She went from running around full tilt to dead in a few days. I guess I’m simply in shock.
For dog owners who understand, I am moving to an area in the very northeast corner of Florida minutes from the beach. I very much wanted Nikki to make that move and enjoy beach walks and swimming in the ocean. I am terribly sad that she didn’t make it. For non-pet owners who think all this hoopla about losing a pet is silly, I have lost my only child and now my dogs are my only family. Understand it or not, losing one of them is a big deal.
It’s like all the personality has left the house. Ellie (nine year old Lab) spends most of her time alone in her bed with no interest in what I’m doing. We both are depressed and struggling with the enormous hole Nikita has left in our lives. I’m trying to find ways to get Ellie excited about life again, but I worry how hard a move will be on her so quickly on the heels of losing her life long companion. It’s just not a good situation.
I would have liked to add a picture of Nikki to this post, but I can’t stand to look at pictures right now.
I’m trying to stay motivated about packing to move and dealing with the whole fun cycle of “keep the house perfect and leave for showings”.
So blog and Pinterest followers, I will be posting and pinning when I can, but not as exuberantly as I have been. I have a lot of ideas and plans, but I may be a little slow in posting for a while. I need to get moved and get my joie de vivre back.
I was planning a Thanksgiving trip to the beach in South Carolina and was worried about my older yellow labs getting chilled when they were still a little wet from swimming. No matter how dorky they might look I decided they should have coats to keep them warm.
Coming up with a pattern
I did some research on the internet to get ideas about the pattern. One of the sites I found was SewDoggyStyle.com which offered measuring and pattern suggestions. After measurements I drew out the pattern on craft paper. I while back I bought a roll of paper at Lowes that was intended for taping on floors, but I keep it on hand for patterns.
I don’t know about other dogs, but the whole trying on the pattern experience should have been captured on video. Having never done anything like this to my dogs before they couldn’t figure out what I was doing with the paper. Ellie wouldn’t have any of it, so I finally wrestled it onto Nikki and marked it for some adjustments. The top edge of the pattern below was on the fold of the fabric.
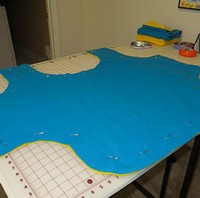
Pattern cut out and ready to cut fleece pieces
Constructing the coats
I had pieces of fleece left over from other projects that were big enough for the coat pattern. I wanted two layers of fleece for each coat. I know from doing fleece blankets for Project Linus the double fleece is much warmer than a single layer. I would have preferred yellow with black for both of them, but I had enough yellow for 2 pieces, and then 1 black, and one blue.
Pieces laid out flat so I could pin the layers together
I used the same technique as the Project Linus blankets. After pinning the layers together I put a crocheted blanket edge all the way around the coat.
Below is the fleece with blanket edging and the Velcro pieces pinned and ready to sew on.
Velcro pinned in place and ready to sew
Ellie avoided me like the plague so Nikki ended up being the model again
Ellie avoiding and Nikki modeling
I took it as a good sign that Nikki was comfortable enough wearing that coat she would lay down on the floor.
Nikki laying down with blanket on
The dogs wore them after getting wet at the beach and while sleeping in my camper when absolutely arctic weather blew in on a trip over Christmas and New Year. They had no problem with me putting them on and keeping them on all night. I like to think they knew I was just trying to take care of them with this odd new behavior.
The only problem with the coats, and I knew this going into it, is that Yellow Labs are prolific shedders and that hair sticks like glue to fleece. Maybe a little extra insulation?