Author: TheDIYGirl

  • Refrigerator repair – DIY or not?

    Refrigerator repair – DIY or not?

    This Sunday I returned from a nine-day camping trip to find a totally dead refrigerator. In fact, the inside of the refrigerator was much warmer than the house since I’d turned the heat way down. Apparently the fans and other parts heat things up when the compressor stops cooling. Oh joy.

    It must have died several days before because everything was completely thawed and stinky and all the food was a total loss. The good news? It was a terrific opportunity to clean the fridge and freezer since it wasn’t cold and full of food 😉 Trying to look on the bright side here… Couldn’t face the sadness of throwing all that food out Sunday night so Monday morning I emptied both the refrigerator and freezer and thoroughly cleaned both sides.

    The repair

    I did a lot of research online Sunday night and couldn’t find good information on how to figure out what was wrong. I lucked out and was able to get a repair person out Monday afternoon — no small feat in the rural community I live in.

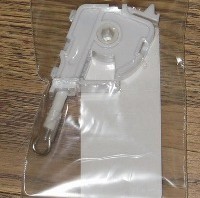
    The guy quickly diagnosed it was the run capacitor and relay for the compressor, told me the repair would be $229 ($129 for parts and $100 for labor), and went out to his truck to get the replacement part. When I saw the part number on the capacitor I looked up it up on the internet. The part shown at left was $11.24 on Amazon. $229 vs. $12??? It was a tough call for me, but since I didn’t know much about compressors and had struck out finding information the night before I decided to let him do the work and have a functional refrigerator immediately. He knocked the price down to $200 when he did the bill. By the way — if I would have decided to do the repair myself I would have owed a $75 service call charge.

    Further research

    whirlpool-run-capacitor-2169373-ap3131713_01_mSince there were two parts involved I tracked down the other one on Appliance Parts Pros. This parts sells for $33.30 so the total parts to do it myself would have been $44.54. $44.54 vs. the $100 final price isn’t quite as bad. $100 to have the man drive way out to my house and spend 45 minutes here is fairly reasonable. The net difference would have been $119.54 with the service call vs. his repair of $200. I can live with that.

    Next time

    If the same thing happened again and I was home and stood a chance of saving all the food if the refrigerator could be repaired quickly I probably would have someone come to the house again and cough up another $200.  That said — if all the food was ruined and I wasn’t in a huge rush I would order the parts and do the repair myself — now that I know what needs to be done.

    Could there be a next time? The repairman said the parts he replaced were probably fried by a power surge and strongly suggested I get an appliance surge protector to prevent it from happening again. I bought one that afternoon.

    See next post Surge protection for appliances – do it now! for information on surge protection.

    I found this at http://appliance911seabreeze.com/ to help next time:

    HOW TO CHECK FOR A BURNED OUT COMPRESSOR

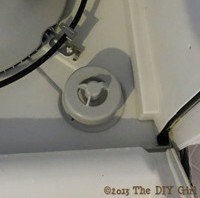
    Unplug the refrigerator and remove the back panel that covers the compressor. There should be 3 wires going inside the cover of the compressor. Mark all 3 and mark their location so if compressor is OK you can put them back in same order. The plastic cover may snap on and you may need to squeeze the sides to unlock the cover and sometimes there is a metal clip holding the cover in place. Remove the cover. May look hard but it’s simple. There will be three connections under the cover and 2 will go through the start relay. Unplug them leaving the three prongs exposed. They may be marked R =Run, S=Start and C=Common. Set your meter on continuity and then begin by testing 2 at a time until you have checked S to R and R to C an C to S and S to R again. You should get a reading all the way around. If no reading between any of the pairs as you go around you should get no reading between any two the compressor has an open winding and is defective. Then if it passes that test then touch one probe to R and the other to the copper pipes or clean metal on outside of compressor, then S to metal outside and C to metal outside. If you get a reading this way even just a little. The compressor is a burnout.

  • DIY Dog coats made with double fleece

    DIY Dog coats made with double fleece

    I was planning a Thanksgiving trip to the beach in South Carolina and was worried about my older yellow labs getting chilled when they were still a little wet from swimming. No matter how dorky they might look I decided they should have coats to keep them warm.

    Coming up with a pattern

    I did some research on the internet to get ideas about the pattern. One of the sites I found was SewDoggyStyle.com which offered measuring and pattern suggestions. After measurements I drew out the pattern on craft paper. I while back I bought a roll of paper at Lowes that was intended for taping on floors, but I keep it on hand for patterns.

    I don’t know about other dogs, but the whole trying on the pattern experience should have been captured on video. Having never done anything like this to my dogs before they couldn’t figure out what I was doing with the paper. Ellie wouldn’t have any of it, so I finally wrestled it onto Nikki and marked it for some adjustments. The top edge of the pattern below was on the fold of the fabric.

    DIY Dog coats made with double fleece - The DIY Girl
    Pattern cut out and ready to cut fleece pieces

    Constructing the coats

    I had pieces of fleece left over from other projects that were big enough for the coat pattern. I wanted two layers of fleece for each coat. I know from doing fleece blankets for Project Linus the double fleece is much warmer than a single layer.  I would have preferred yellow with black for both of them, but I had enough yellow for 2 pieces, and then 1 black, and one blue.

    DIY Dog coats made with double fleece - The DIY Girl
    Pieces laid out flat so I could pin the layers together

    I used the same technique as the Project Linus blankets. After pinning the layers together I put a crocheted blanket edge all the way around the coat.

    Below is the fleece with blanket edging and the Velcro pieces pinned and ready to sew on.

    DIY Dog coats made with double fleece - The DIY Girl
    Velcro pinned in place and ready to sew

    Ellie avoided me like the plague so Nikki ended up being the model again

    DIY Dog coats made with double fleece - The DIY Girl
    Ellie avoiding and Nikki modeling

    I took it as a good sign that Nikki was comfortable enough wearing that coat she would lay down on the floor.

    DIY Dog coats made with double fleece - The DIY Girl
    Nikki laying down with blanket on

    The dogs wore them after getting wet at the beach and while sleeping in my camper when absolutely arctic weather blew in on a trip over Christmas and New Year. They had no problem with me putting them on and keeping them on all night. I like to think they knew I was just trying to take care of them with this odd new behavior.

    The only problem with the coats, and I knew this going into it, is that Yellow Labs are prolific shedders and that hair sticks like glue to fleece. Maybe a little extra insulation?


  • Ladderless window cleaning

    Ladderless window cleaning

    Ladderless window cleaning - The DIY Girl

    Bucket + extension pole + brush + rags = no ladder

    My house sits on very hilly terrain so figuring out a flat surface to prop a ladder is nearly impossible. Mix that difficulty with my lifelong fear of ladders and I was pretty committed to figuring out a way to clean my windows without risking my life.

    Needed tools

    My goal was to do it without having to go purchase a bunch of stuff.

    I have had one of the Mr. Long Arm Pro-Pole Extension Poles for years. This pole has allowed me to do a whole lot of painting without a ladder, especially ceilings, and I love the thing. The pole extends up to 12 feet.

    I had a brush on a broom pole for scrubbing outside decks, but the brush was really stiff so not the best for windows. I used the brush, but wrapped towels around it secured with binder clips.

    The only other things needed was a bucket large enough to dunk the towel wrapped brush head into the cleaning solution.

    Cleaning solution

    I figured a clean rinsing solution was critical to my success. I found two posts; one at She Wears Many Hats The Best Window Cleaner Ever … Like Ever  and the other at Made by Pinterest The Magic Way to Clean Your Windows. I have them both pinned on my Pinterest board Recipes, How To for Cleaning, etc.

    best-window-cleaner-ever
    magic-window-cleaning

    I think Dawn Dishwashing Liquid is one of the modern wonders of the world. It is so good at cleaning so many things, cutting grease and oil, and leaving no residue behind, so it was a no-brainer to use it. Since white vinegar is also a great cleaner I added some of that and a small squirt of Jet Dry for sheeting the water off the windows.

    Technique

    Even with the extension pole all the way out I still had to use a step-ladder to reach one window. It wasn’t a big deal — I positioned the bucket of cleaning solution so I could reach it while up on the ladder.

    The extension was a little ungainly to handle, especially with the added weight of the towel dripping wet with cleaning solution, but once I had it up by the window it was easy to scrub up and down.

    After I had scrubbed the whole surface of the window I sprayed with clear water to rinse. I cheated with the one window that was really high up and dragged out the electric pressure washer to rinse that one. I’m not sure I could have reached it with the hose sprayer.

    Results

    I am amazed at how clean and unspotted the windows turned out.

    I think the key to this method is washing your windows every few months so they’re not too terribly dirty. If they were long neglected with a lot of build up it would require a trip up the ladder so you could scrub harder and use a glass scraper.

    I love cleaning the windows this way. Since I will be using my extension again,  I plan to start looking for a soft bristle brush I can attach to it.

    I doubt I will ever use a ladder to wash windows again.


  • LED replacement bulbs for camper

    LED replacement bulbs for camper

    LED replacement bulbs for camper - The DIY Girl
    LED bulbs on providing on nice white light
    LED replacement bulbs for camper - The DIY Girl
    LED bulbs on providing on nice white light

    LED replacement bulbs for camper - The DIY GirlConverting the standard interior camper or RV lights to LED is incredibly easy once you determine the bulb size in the fixtures.

    I was not too enthralled with the lighting in my camper. The interior lights were dual 921 bulbs that would get smoking hot when used for a short time (figuratively, not literally) and provided a harsh light. I’m in a Rockwood A128S which is an A frame hardside pop-up camper that folds down in transport and there are warning stickers that lights must cool down before closing the camper. Need I say more?

    I was very interested in LED lights. Who needs bulbs heating things up when it’s already hot outside? Who needs to worry about closing up the camper and burning something because the bulbs get so hot? Who needs to bleed their battery dry when running on 12 volt when better alternatives exist?

    Experiment

    I had no idea what would work. I had seen a forum post that showed LED’s with 2 prongs and the guy said they worked great, but did not say which specific bulb to buy, so I took the lead from that and did more research.

    I went with Deal Extreme since the cost of each LED was the best I could find. I didn’t know what I would like so I ordered 3 different kinds to test which worked best. The first one pictured is 51141 — it looks so similar to 126235, but it will not stay in the socket. I ordered 2 of these at $2.30 each. The middle one 34606 comes with multiple plugs for different bulbs sockets. It was the most expensive at $4.74 each. I ordered only one for my trial. I’m glad because I didn’t like it at all since it casts a blue light. The last one is 126235 and cost $4.40 each. I think it’s the best one.
    Deal Extreme 126235 - The DIY GirlDeal Extreme 51141 - The DIY Girl dealextreme-sku_34606_1

    This is bulb #34606 installed
    LED replacement bulbs for camper - The DIY Girl

    This is the blue light given off by the middle bulb above #34606.
    LED replacement bulbs for camper - The DIY Girl

    This is what my lights look like with the best LED replacement 126235. The bulb replacements have been on a couple of trips and I’m amazed they stay in place. I figured the prongs wouldn’t hold, but they seem to do really well. The bulbs provide light that is a nice clean white.
    LED replacement bulbs for camper - The DIY Girl
    LED replacement bulbs for camper - The DIY Girl
    LED bulbs installed with covers on fixture

    LED replacement bulbs for camper - The DIY Girl
    LED bulbs on providing on nice white light

    Deal Extreme is in China. That’s explains the good prices, so be prepared for long ship times and order them well in advance of a trip. The 126235 sell for $4.40 and they don’t charge for shipping so replacing all four bulbs in my camper would run $17.60. Not bad for better light, less power draw, and virtually no heat.

  • Hey Honey, could you take care of this?

    Hey Honey, could you take care of this?

    Hey Honey, could you take care of this? - The DIY GirlI do pretty good on my own. I devise ways to move things that are too heavy for me. I use penetrating oil to loosen a bolt that I can’t budge for the life of me. I keep a fairly good sense of humor about taking care of problems/disaster/repairs by myself.

    But every once in while I hit the wall. I did that today.

    I’ve come to realize it’s not the degree of difficulty or the lack of upper body strength, or just not being big enough or strong enough in general — it’s the grossness value. That’s what stops me dead in my tracks.

    The problem

    I headed my vehicle out the driveway this morning and was faced with two buzzards sitting out by my mailbox. I hate buzzards. They are parasitic creatures who wait for something else to kill some poor unsuspecting critter and then they sweep in to reap the rewards. Of course, you have to bear in mind those rewards consist of rotting carcasses. Am I unkind or can someone tell me what’s to love about these birds?

    One buzzard politely flew away as I approached in my vehicle. The other sat there and looked at me. It ticked me off so I blew the horn until it flew away. Yep – there was a dead animal right at the base of my mailbox.

    I have utterly shocked male friends with what a complete and total weenie I am with dead animals. Oh joy. What was I going to do with this one? This past year I had lived in a rural area so there was no animal control office to call for assistance.

    Fortunately I had to meet a friend so I could back burner the problem until I returned. Later that day I headed home with the intention of loading up my dogs to go to a park and walk.

    I paused at the entrance of my drive and discovered those buzzards (or some other critter) had had the last laugh. They had dragged the dead carcass down to sit in the middle of my driveway. OMG – gross!!!

    And NO, I did not take photos. The images burned in my brain are bad enough, I don’t need pictures.

    I followed through on my plan and took my dogs on their walk. Driving home I pondered what I would face when I got there. There was no one to call, no man to say “Honey – would you take care of this for me?” I was stuck and unsure I could screw up the resolve to deal with it myself.

    When I got home I told myself to stop thinking about it and suck it up. I put the dogs in the house so they wouldn’t try to participate (how gross would that be?). I got a shovel from the garage. I steeled myself and walked out to the dead animal. Thank the heavens it had not been eviscerated and it wasn’t a gory mess. I got it onto the shovel and walked across the road to a wooded area that is county property that no one used and pitched the poor little critter as far into the woods as I could. There was no way I was loading it into my SUV to take to the dump. Sorry – no way I could hack that. I’d be imagining dead animal odor for months.

    I mosied up to the garage thinking how lovely it would have been to have a man around I could have asked to deal with the dead critter. I was hesitant to put the shovel back without disinfecting it. That may be stupid, but I don’t know and I worry about the dogs contracting something.

    Hey Honey, could you take care of this? - The DIY GirlSo it got me thinking of where I draw the line on what I am comfortable taking care of. Dead animals are definitely on the negative side of that line. Sewage problems would reside there as well. Flooding basements fall in that category, but that’s due to previous history more than revulsion. It would be nice to call on someone else when the dogs have digestive problems that result in piles of grossness coming from one end or the other. I need to think about where I draw the line some more. I do know my plan is to move back into a city so there are people I can call for some of these problems.

    By the way – the poor deceased creature was a pretty little gray raccoon. Sniff. It made me very sad. It has my sincere apologies for not giving it a proper burial, but I did the best I could under the circumstances. Now I’m worried the buzzards will discover it and once again drag it over to my driveway…

  • Leaking dishwasher float

    Leaking dishwasher float

    Having recently moved to an extremely humid area I was not happy with how mildewy the dishwasher was getting between uses earlier this summer. I live alone, don’t go through the many dishes most of the time and they were sitting in that damp environment too long. Wash my dishes in a moldy, mildewy environment? It just wasn’t very appetizing so I decided to quit using the dishwasher and hand wash for the remainder of the summer.

    Now it’s October and I’m getting ready to sell the house so I thought it was time to go back to using the dishwasher — make sure it clean and working properly. I opened it up and sure enough — mold and mildew despite the fact I had cleaned and dried it after I stopped using it. A little online research and I decided to throw in some bleach and run a heavy-duty cycle to sanitize it.

    I was about to walk out the door to take the dogs to the park when I thought I hadn’t used the dishwasher in a while so maybe I should check it before leaving. OMG! There was water all over the kitchen floor. Talk about a panic. The kitchen is over a finished basement and I did NOT want to ruin the drywall down there.

    Leaking dishwasher float - The DIY Girl
    Three layers of flooring

    While redoing the kitchen I had discovered there were 3 layers of flooring in. The bottom layer is a lovely orange indoor/outdoor carpet, the middle a rigid tile, the top the current vinyl flooring. I knew the carpet would be soaking up a ton of water so I had to hurry.

    I turned if off, but the water kept pouring out. I got a bucket and started bailing the water out of it. It was still leaking while I did this.

    Warning: Always assume someone before you has done something totally stupid to what you’re currently working on. 

    I’m working on dragging the dishwasher out from the wall. I am well aware that water and electricity are not a safe mix so I wanted to get the thing out so I could unplug. As I pull it out there is electrical sparking under the dishwasher. What the heck?

    I then make 10 trips back and forth to the electrical box until I finally figure out which breaker turns off the dishwasher. Note to self: thoroughly label the electrical box.

    I finally get the dishwasher completely out from the cabinets and guess what I discover? Someone somewhere along the way had pulled the electrical connectors that I assume go to the heating element. Did they cap them off? No. Did they wrap them in electrical tape? No. They left them dangling with current running through them so they’d drag through the water and cause an electrical short sending sparks everywhere.

    I repeat: Always assume someone before you has done something totally stupid to what you’re currently working on.  Find the circuit breaker first and then move the dishwasher if water is present.

    Dishwasher float mechanism stuck

    The dishwasher had been fine the last time I used it so I couldn’t image what happened to cause the leak. I got online to research what could have caused the leak after I set up a fan and space heater to start drying out the carpet. I found a stuck float mechanism in the right front corner tends to be a common ailment. Some have washers that fail, my Maytag didn’t have a washer since the tube the float sits in is molded into the bottom of the dishwasher.

    My understanding is the float is what tells the dishwasher to stop filling. It rises with the water and releases the switch that turns off the fill. Either the switch or the float had failed on mine.

    Leaking dishwasher float - The DIY Girl
    Float inside the dishwasher

    As suggested in some posts I removed the float and found a lot of solidified gunk in the very top of it. I used a Q-tip to dig it out and get it completely clean.

    Leaking dishwasher float - The DIY Girl
    Float switch on bottom of dishwasher – you can see the gray stem of the float resting on the switch mechanism

    I removed the switch, cleaned all the years of accumulated gunk off of it and replaced it.

    Test run

    I had to do a test run to see if I’d solved the problem and I wanted it out on the vinyl floor so I could contain it. If you ever do this, be prepared for the noise. I about had a heat attack when I turned it on, thinking something was terribly wrong, but a dishwasher is just really loud when not encased in cabinets. And my dishwasher model is a “Quiet 300”. No leaking after a 9 minute rinse cycle.

    Maybe the gunk inside the float hardened while not being used and froze the float. Who knows? Just glad it’s working properly once again.

    Dishwashers are designed to not leak when level

    So how do you level a dishwasher once it’s inside the cabinet? I could level it while it was out in the middle of the kitchen, but with all the flooring thicknesses in the cabinet I had no way of knowing if the front to back level would change. I had opted to put 2 strips of 1/4 MDF down to raise the floor in the cabinet to the same level as the rest of the kitchen floor — that way I wouldn’t have to worry where each of the 4 feet were sitting.

    Leaking dishwasher float - The DIY Girl
    MDF strips to level dishwasher — I can’t get over how hideous that carpeting is…

    Once again — If your dishwasher leaks control the panic over water flowing everywhere long enough to kill the power first. Then start containing the flood. I’m lucky I didn’t zap myself.

  • Cheap Magic Erasers

    Cheap Magic Erasers

    Cheap Magic Erasers - The DIY GirlDo you like using Magic Erasers to clean? Are you aware they are simply melamine sponges?

    How they work

    “Rubbing with a slightly moistened foam may remove otherwise “uncleanable” external markings from surfaces. For example, it can remove crayonmagic marker, and grease from painted walls, wood finishings, plastic-adhering paints from treated wooden tables, adhesive residue, and grime from hub caps.[3] If the surface being cleaned is not sufficiently hard, it may be finely scratched by the melamine material. The foam wears away, rather like a pencil eraser, leaving behind a slight residue which can be rinsed off.” ~source Wikipedia

    Buying bulk quantities

    You may have known how they work, but did you know they can be purchased in bulk at significantly lower prices? Since these mighty little sponges wear out fairly quickly, more and cheaper is a lot better than less and expensive.

    I’ve found them both on Amazon and Ebay. But watch out for small size sponges — some of them are tiny and you won’t be happy when your package arrives. I purchased 30 from Ebay for $7.65 and shipping was free and they are about the size of a Magic Eraser but missing the pretty logo on the top. Who cares about a logo.

    Here’s a sampling of the prices I just found online with my purchase on the bottom line. The each price is a significant savings. Which price would you like to pay?

    Cheap Magic Erasers - The DIY Girl

  • Rehab for faux wood blinds

    Rehab for faux wood blinds

    When I moved into this house I found out the blind on the living room window had all three of it’s pull strings that raise and lower it were broken. I wasn’t surprised because the six foot wide blind is a beast to pull up.

    After finding out a new blind would cost a minimum of $100 I went to Joann and bought blind cord for $7 and re-threaded the pull cords. Easy fix. That was 8 months ago.

    Last week I had to blinds open and went to tilt them up when it got dark out. The piece that goes up into whatever turns the blinds snapped off and the wand clattered to the floor. Peachy.

    I went online and first had to figure out what the little buggers were called — that’s where I found the term tilt mechanism. Several places carry the parts for various blind sizes. I took the blind down and removed the broken piece so I would know what to purchase. It was a matter of popping out the plastic end cap and pulling the broken tilt mechanism out. It was easy.

    Rehab for faux wood blinds - The DIY Girl
    Broken tilt mechanism still on metal bar with end cap removed
    Rehab for faux wood blinds - The DIY Girl
    Broken tilt mechanism removed. The part that connects to the wand is missing (I broke that off) and you can see six-sided hole that fits over six-sided metal bar.

    The most important thing with this type of repair is determining if the blind is even worth it. Spending $10 for this part and shipping was worthwhile since a new blind would cost 10 times that. Not sure I would do it for a $35 blind, but since I hate throwing stuff out if it can be repaired there’s a good chance I would.

    If you’re doing this repair make sure you get the correct size tilt mechanism with the correct hole. That metal bar that spans the width of your blind has to fit into the hole so it will tilt your blinds up and down. My bar is 6 sided and the height of my header is 1 1/2″. They sell the tilt mechanisms with the plastic parts like what broke in mine and more expensive ones that have metal parts.

    I ordered from Fixmyblinds.com. They shipped it on Monday and it was in my mailbox on Wednesday.

    The repair consisted of angling in the piece that sticks out to attach to the wand through the hole in the head rail, sliding the tilt mechanism over the metal bar and then snapping it into the head rail. It was much harder getting that 6′ blind down and back up again than actually doing the fix.

    Rehab for faux wood blinds - The DIY Girl
    new part
    Rehab for faux wood blinds - The DIY Girl
    New part installed on bar, snapped into place, and end cap replaced

    Now I hope nothing else breaks on the blind before I sell the house.

  • Treating eczema

    Treating eczema

    I have no idea what brought it on since it’s usually stress related, but recently on a Thursday night I rubbed the back of my thigh and felt bumps — lots of them. From there it rapidly spread to the back of my neck and shoulders, up across my butt, then started creeping down my arms and legs and all over my mid-section. It was even on my scalp and a little of my forehead. Whether you call it eczema or atopic dermatitis I was having a major outbreak and it sucked and I needed a good way of treating eczema.

    The one true blessing this time was that it barely itched at all. About the only places it itched was when it reached my hands and the bottom of my feet, but even that wasn’t too bad.

    I got online and started reading how it could go on for extended periods of time. I didn’t want that to happen and I wanted non-prescription ways to fight it.

    Albolene

    I already had this stuff on hand. I love it because it has so few ingredients and no alcohols at all: Mineral Oil; Petrolatum; Paraffin; Ceresin; Beta Carotene. It comes in a big tub so I had plenty to use.

    I started applying Albolene to the worst areas, but almost my entire body was involved so I didn’t cover everything, obviously not on my scalp.

    The eczema had been getting worse every day for about 4 days. When I started using Albolene things held for a while and then started getting better.

    I found an article Commonly Used Beauty Staple Clinically Proven to Help Treat Eczema that said Albolene works as well at treating eczema. After the experience I had with it I would agree.

    Borage Oil

    I normally take a borage oil gel cap once a day. When I read it could help with eczema I doubled up on the borage oil and also took other GLA (gamma-linolenic acid) caps.

    Results

    I don’t know if it was luck or what I was doing that made it better.

    One night when I was getting ready for bed I looked at where the eczema was terrible and laughed — at least it was being really polite and staying where clothes covered it. It literally was under my shorts and sleeveless top. Then I thought — wait a minute! It’s under my clothes. I hadn’t changed anything lately — same soap, same shampoo, same laundry detergent. I had bought a new bottle of laundry detergent that I had just started using. Could it be a bad bottle? You can literally drive yourself nuts trying to figure out what triggered an outbreak.

    It must not have been any of those things because after coming out of nowhere, building to a crescendo in five days, it proceeded to fade away and was gone nine days after it started. I’d like to think I sped the process with Albolene and borage oil, but I don’t really know. But I can tell you that I’ll use the same eczema treatment the next time it happens.

  • Securing deadbolts

    Securing deadbolts

    I’ve been living in an area that has made me more security conscious — didn’t know when I moved here that it’s a high crime area and can’t wait to move again. Anyway — I’ve discovered some low-cost interesting ideas.

    I watched the video at Super Grip Lock where they mentioned bump keys. Bump keys? A quick search led me all too quickly to YouTube where an ass jerk young man explained in-depth how easy bump keys are to make and use and how most home owners are too stupid to know about them. Just peachy. Glad to know we’re educating our criminals.

    Now I really want to further secure my deadbolts

    First step to secure deadbolts

    The first thing you should do is check the screws and strike plates for your deadbolts. Most locks come with screws that are too short and flimsy strike plates. Replace screws with at least 3″ screws that will go through the door frame and well into the studs that frame the door. Screws are cheap.

    I prefer a strike plate with a metal pocket. It will need a hole chiseled out of the door frame for the pocket to fit in. That’s a little bit of work to that, but in my opinion it’s more than worth it. The strike plate should also be secured with screws that are long enough to go through the door frame and into the studs.

    Both the long screws and the better strike plate will slow down or stop kicking  a door in, but we all know if someone really wants in they find a way. These ideas are to make another, easier house more appealing so maybe they’ll leave mine alone.

    Deadbolts with screws on inside

    SIMLock installs as a secondary lock on a current deadboltI stumbled across Simlock and it took me about 2 seconds to decide to order one. Right now they have a 2 for 1 sale so I got 2 for $9.98. They describe it as “SIMLock installs as a secondary lock on a current deadbolt”.

    Takes more time to get the screwdriver than to install the device. When it’s in position your key, a bump key, or whatever is not going to be able to turn the lock and unlock the door. What a great, simple idea. The deadbolt is a little harder to unlock since it now drags across the top of the screw, but I can live with that.

    Securing deadbolts - The DIY Girl
    Simlock in lock position
    Securing deadbolts - The DIY Girl
    Simlock released

    Deadbolts without screws on inside

    As I have 3 deadbolts. One has screws on the inside. Two do not. So how to secure those without screws?

    As mentioned above I ran across an article about Super Grip Lock. I like this idea not just for my doors at home, but what a great thing to carry as a woman traveling alone.

    There were a couple negative comments on Amazon about it not being long enough if your deadbolt and handle aren’t close together. Mine are close, but since I have a ton of Velcro on hand I decided to make my own. After watching the video on the Super Grip Lock website it didn’t look too hard to do so I made two for the doors that couldn’t use the SimLock since no screws on the inside.

    I have a tutorial here on how I made mine.

    Patio Doors

    At my previous house I had French doors that both opened in from the middle. One side had slide locks that went into the top and bottom of the door frame and no knob since it was supposed to be fixed most of the time. The other just locked with a double keyed deadbolt. I knew if some just pushed fairly hard the door would probably open. The local police did vacation watches and they didn’t like those doors for the same reason.

    It didn’t concern me too much when I was at home because there was a motion detector alarm that would go off. After paying an alarm company for years I had disconnected from their service, so the alarm would scare people, but not call the police. The one time I had the alarm go off at 4:00 AM (for absolutely no reason) I hit speed dial for 911 and the police were there in minutes.

    What worried me was when I was gone for extended periods (I’ve done a couple two month trips) and people could empty my house through those doors that faced the backyard. I came up with a solution, but it wasn’t pretty. I didn’t care because it was only there when I was out-of-town for long periods.

    I went to one of the big box stores where they sell stainless steel cable. I had them cut a length that would reach from the door frame next to the fixed door to the door knob on the door that opened with extra for wrapping around the knob. They helped me bend loops on each end and secure with crimps.

    I had what I regard as a huge eye bolt – 4″ long with an 1″ eye. I sank that bolt all the way up to the eye into the studs along the door frame. When I was going to leave I hooked one end of the cable on the eye bolt, pulled it tight across to the door knob, wrapped it around the knob until I just had enough cable to barely get back to the eye bolt. Then I put a pad lock through both loops of the cable and the eye bolt. Here’s a sketch of the general idea.

    Securing deadbolts - The DIY Girl

    When the cable was installed the door would open, but just barely. The opening wasn’t big enough for a person to fit through. Again — if someone really wanted in they could just break the glass out of the french doors. This was to make trying to get in unappealing.

    A couple of people asked what the eye bolt was for. No big deal. Before I put the house up for sale I removed the eye bolt, filled the hole, touched up the paint and no one knew it had ever been there.

    Avoiding paranoia

    Life only makes you as miserable as you let it. I do what I think keeps me reasonably safe and then let it go hoping for the best from life. But I have never been broken into and felt the violation that comes with that experience and sympathize with those who have. These ideas just make me go back to sleep a little bit more easily when things go bump in the night.