I do a lot of typing so when my space bar started missing about half the time it became incredibly annoying. I have a wireless keyboard so I checked the batteries and they were in good shape.
I was typing an email this morning and I was missing almost every space in a sentence and out of utter annoyance I got a small screw driver and popped the space bar off. My jaw dropped.
There was so much dog hair and so many crumbs under it I had no idea how it had been able to function at all. Yes, I do eat at my desk. But the dogs live on the floor — how did so much hair get in there?
I have to confess I was so mortified by the filth I immediately blew it out with a compressed air can and wiped it out with a cotton swab so I have no pictures to memorialize it. It was gross.
I am not kidding — if mice were small enough they could have started a colony under there. Between the dog hair for nest building and the crumbs for sustenance they could have had a wonderful life.
I figured I better check under more keys and this is what it looked like after I popped the control key — this key was about half as bad as the space bar had been and look how bad it is. Man – was it ever time to figure out how to clean a keyboard.
I probably popped a dozen keys off. I blew out the hair and crumbs and used a swab dipped in alcohol to wipe out the gunk. And believe me, there was gunk as you can see on the bottom of the control key.
Reassembly
A lot of the keys were simple to pop back on. A few like the space bar, control key, enter key and delete key had little metal bars that had to be put under a bracket on the keyboard and then the key turned to snap down. I have no idea why these keys need the little bar, but it’s kind of a fragile set up on the back of the keys so I was careful with them.This, like the washing machine rust, was a little cleaning project I should have addressed a long time ago. I had idea how much crap could accumulate under those close fitting keys.
I have an “antique” washing machine — it was made in 1995 and has served me well for almost 20 years. At one point I had a home warranty and it broke down and was $7 short of being replaced, but instead the bearings were replaced.
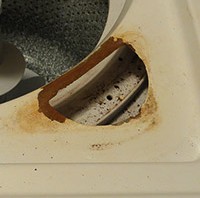
I have always been good about leaving the door up on my top loading machine after using it so it could dry out. But I started noticing rust spots on some of my clothes and realized it was rusting around the plastic insert for the bleach dispenser. I finally pulled the dispenser out and was appalled by the amount of rust.
This photo is after I had scraped the peeling paint so it really looks bad. I found a video online that showed how easy it was to remove the cabinet so I removed the control panel and popped the cabinet off. It’s in a small room so I couldn’t pull it all the way off, so I leaned it forward against the wall.
When I looked underneath I found the entire front rim of the cabinet had rust, but the rust around the bleach dispenser was by far the worst.
I scraped the paint and loose rust off and used Ospho. I had used it on 14 steel posts that held up second and third floor decks at my old house and love this stuff. You can see that post at Refinishing Rusty Metal – Ospho
Ospho turns the actively oxidizing rust into an inert substance. I applied Ospho to all the washing machine rust areas and let it sit overnight. The next day it had turned all black.
Since I couldn’t get the washing machine cabinet outside (and it was too cold anyway) to use spray enamel I purchased a 1/2 pint can of Rustoleum Oil Based Protective Enamel in Gloss White that I got at Wal-Mart for $3.97. I figured it didn’t matter how it looked, since it was a 20-year-old machine — I was most concerned with covering the rusty areas.
I applied 2 coats allowing the first coat to dry overnight. I painted the underside of the rim, the area around the bleach dispenser, and the underside of that area.
I’m amazed how well the paint matches. Now only time will tell how well it will extend the life of my washing machine. I realize I’m on borrowed time, but appreciate any extension I can get. And now I shouldn’t be getting rust spots on clothes due to rust flakes falling into the machine.
My son thought the Accusharp was the best knife sharpener you could buy. I’ve researched and he was correct. On his recommendation — he actually bought one for me — I have used the thing for years. I don’t have great, high quality knives. I have the knives he purchased for me as Mother’s Day gifts when he was little. The aren’t the best quality — they ARE the best knives as far as I’m concerned, due to sentimental value.
Recently they have all become pretty dull so I got out the Accusharp to sharpen them. It occurred to me there had to be videos to show me the proper technique. What an eye opener.
Turns out I have been using it improperly all this time. I hold the knife wrong. I use the Accusharp wrong. I had no idea you could reverse the blades. First, let’s reverse the blades I have probably mangled from misuse.
Reversing the blades
From Accusharp’s website: The tungsten carbide sharpeners of AccuSharp® are of high-grade industrial quality and are one of the hardest materials known. Even so, after several years of use, they may become worn. Due to their unique design the sharpeners can be reversed for double life.
To reverse the sharpeners lay the AccuSharp® on its side with the screws up. Remove the screws and carefully separate the two halves of the handle as shown in the following illustration. The sharpeners should remain in the lower half. Simply switch the position of the sharpeners (front sharpener to rear and rear sharpener to front) taking care to keep the reference dot (n) on the sharpeners facing toward the tail end of the handle. If the finger guard becomes disengaged during this operation, secure both ends of it in the slots provided prior to reassembly.
CAUTION: DO NOT REASSEMBLE THE KNIFE SHARPENER WITHOUT THE FINGER GUARD. SERIOUS INJURY MAY RESULT. Reassemble the two halves of the handle and secure with the three screws.
DO NOT OVER TIGHTEN SCREWS. The factory torque setting is about 5 inch pounds of pressure. Tighten them only until you feel increased resistance. If sharpener has any cracks around the screw heads do not use it. Either discard the sharpener or return it under the terms of the warranty.
AccuSharp® is perfectly safe when used properly. As a precaution, the knife blade should be thoroughly cleaned after sharpening.
Now let’s see how it should really be used
I have been way too harsh when using the Accusharp thinking harder is better at sharpening — turns out it works best with a lighter touch.
I have used the sharpener incorrectly for years and it’s done a marvelous job of sharpening my knives. I can’t imagine how many more years it will serve me now that I actually know how it’s supposed to be used.
Man — I can’t believe how boring it is to have a house up for sale. I have all my projects either completed or put on the back burner so everything can be put away and the house look perfect all the time. I don’t have anything to do.
Hence the experiment to see if you really can whiten yellowed pillows without bleach. My pillows are in good shape so no need to replace them, but they were due for a bath (pillows should be washed a couple of times a year) and they were definitely yellowed. I didn’t just want them clean, I wanted them white again. And I really wanted to do it without resorting to bleach. Below is the recipe I used.
I poured the peroxide and vinegar into my top loading washer and started to fill it with hot water while I brought 1 liter of water to boil in my kettle. When the washer was half full I added the detergent and borax and agitated it until I felt the borax was well dissolved and everything was mixed.
Before the washer was full for a large load, I poured in the boiling water and finished filling. I put one pillow on each side and squished them down into the water as well as I could. I have fiberfill pillows and it was like they filled with air. I let my pillows go all the way through the normal wash cycle, I left the door open so it stopped before emptying. I turned them over so top side could get the same cleaning and ran it through another was cycle, this time closing the door so it would empty and rinse. I rinsed them a second time to make really sure the soap was out.
Into the dryer with dryer balls to dry, and dry, and dry. I had read you should dry fiberfill at a low setting. After an hour plus on low and they were still wet, I turned it back to the warmest setting for another 40 minutes and they felt really dry. I didn’t want to put my head down on a pillow that night and find it was still soggy.
That’s it. They turned out beautifully and I was glad to not sleep with residue of chlorine beach every night. And no, I did NOT take before pictures. There are some things I’m just not gonna share…
Okay, so I had the problem solved for my dog Ellie with her preferred point of entry – the back of my SUV. You can see the DIY for the trailer hitch dog step here. But what would happen when I’m pulling a trailer? An event that was imminent with our move to Florida.
As luck would have it, my Xterra is tall to step into so it has full length running boards on either side of the SUV. It hit me that I might be able to use them to create a side step if there was a way to wedge a board in between the running board and the bottom of the vehicle.
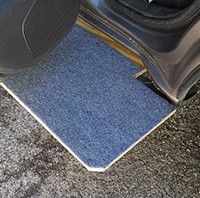
I tried a square piece of board, but the flare out of the body at the back edge wouldn’t let the board fit in. I cut a corner out of a piece of plywood to accommodate the curve in the bottom of the Xterra. In case Ellie stumbled I cut the sharp corner off so she wouldn’t hurt herself. The board fit perfectly.
I was out of carpet scraps to I ran to Lowe’s and bought 1′ of gray carpet runner — it cost about $2.50. I generously stapled the carpet to the plywood to make sure there were no loose edges.
The cool thing about how this worked out is the open door holds the board in place so it can’t spring up — I didn’t want it to act like a diving board when she landed on it and the problem solved itself once I opened the door.
Complete success. I showed Ellie the step and she put her paws on it without my asking. Of course there was a treat sitting up in the truck enticing her. I told her “Up!” the command to get in the truck and she went up without hesitation. You can’t tell by the still picture, but her tail was wagging. Of course, that too had something to do with treats and lots of praise.
The was an incredibly easy project to help a dog get into the side door of an SUV, but it will only work for those of us who have running boards. I’m so glad Ellie has an easy dog step to get in the SUV when I’m pulling a trailer.
Ellie is my dog with the incredible vertical leap. She’s also the dog who accidentally got her rear right leg broken when she was five months old. She’d snagged a dog bone and ran with Nikki chasing when she abruptly screeched to a halt. 45 pound puppy was hit full speed by 75 pound adult dog equaled snapped leg.
After nine years of watching her rocket into the back of my SUV with room to spare I was shocked when she started missing (not quite making it in) and getting progressively more and more frightened of the effort. All the while I’m watching my eleven year old lab, who never had that great of a vertical leap, jump into the vehicle with ease.
For the last year Ellie has been becoming more and more skittish. She’ll be sound asleep and suddenly jump up like someone has poked her with a cattle prod. I’ve seriously wondered if it’s some kind of canine dementia since Nikki’s personality was staying completely the same.
All to say – I don’t know if Ellie can’t jump into my SUV or if she’d gotten spooked and convinced herself she can’t. Bottom line – it doesn’t really matter. She’s scared to death to jump in my vehicle.
Failed efforts
I tried helping her by putting her front paws on the bumper so I could then pick up her rear and help her in. Oh my god – she’s terrified of that and hates it so it’s been a complete disaster.
Building the dog ramp that Ellie wouldn’t even try
Figuring both Labs would end up needing one, I built a really nice ramp that Nikki would go up and down. Ellie wouldn’t even consider it. No amount of treats, begging, pleading, cajoling, or ordering was going to make her try it. Great.
I have always kept the back seat folded down so the dogs would have the entire back of my Xterra to move around in. I put up the back seat to see if she’s climb up on the floor and then jump on the seat. Same round of treats, begging, pleading, cajoling, or ordering. Forget it. She wasn’t having any of that either.
I tried picking her up (questionable I could wrestle a struggling 75 pound dog) but she fought me every inch of the way on that too. Sheesh. I was getting really desperate since she hates being stuck at home and was terrified of jumping in the vehicle.
Step for receiver hitch
Looking online there were a lot of dog steps in various configurations. I didn’t see her being willing to try any of them because they were so foreign to what she was accustomed to. Most particularly I didn’t want anything that would move and scare her to death.
I then found the Otto Step. Nice dog step, but at $80 and having no way to secure in the receiver hitch (no hole for a pin) I was afraid it would move or even come out and freak Ellie out.
I then found the Twist Step. Wow - awesome idea, but $250??? You've got to be kidding me.
I was sure I could come up with something for less. I continued my research and found the Bully AS-551 trailer hitch step for people at $39. $40 was more palatable for an experiment that she might turn her nose up at. My plan was to attach a carpet covered board to provide a larger platform for her to use as an interim step into the back of the vehicle.
Modifying the Bully AS-551
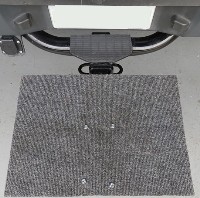
The Bully AS-551 is a nice step. As you can see in the picture below it has a 2" pivoting bar with a stainless steel platform that is about 9" x 6". You can see the releasing pin so the platform arm can be swung perpendicular to the vehicle and tucked underneath when not in use.
It was, however, more problematic than expected to add a larger platform board. I had planned on the screws going in from the top, but the nuts couldn't go on the bottom because the outside row of holes were too close to the steel post. I put the screws through large washers from the bottom and tightened the nuts on the top of the board hoping they wouldn't bother Ellie.
[caption id="attachment_2296" align="aligncenter" width="640"] The step shifted on the board because of how close the holes are to the tube. I didn't figure Ellie would care.[/caption]
The picture below shows the step inserted into my receiver hitch.
I put her front paws on it one time (which she hates me doing) and she bounded up. She jumped down not using the step, but jumped back into the SUV using it four more times. I took her to the park for a walk. She happily used the step to get back into the vehicle. Success at last.
I tried it again today and she’s in and out of the SUV in a heartbeat. She isn't frightened of the step, it's big enough she has room to maneuver, and it makes life easy for her. Hallelujah.
FYI - I do not drive with the step in place. I store it in the back of the SUV and put it in place when she needs to jump up. The board isn't weatherproof and I didn't want someone to inadvertently hit it because it kind of blends into the bumper.
$39 for the Bully AS-551, $4 for bolts, washers, and nuts. I had a piece of carpet and piece of board here so that was free. I used contact cement to attach the carpet to the board. Great dog step for a lot less than $250. And Ellie likes it :-)
I’m in a bit of an odd place here. I’m finally moving from a foreclosure DIY project house in an area I have not liked the entire year I’ve been here to a brand spanking new house in area I hope I will adore.
The DIY Girl in a new house??? After 17 years in a three-story monster on a heavily wooded lot and the last year in a foreclosure badly in need of work and updates I feel like I’m due for an easier home. Hopefully home repairs will be few and far between for a while, but there will still be maintenance to keep it in good shape and it will be a blank palette I want to customize and turn into a coastal cottage look on the inside. I also want to get more heavily into finding flea market furniture and refinishing, some furniture building projects, and major garden work.
Mourning
The kicker is a recent loss I’ve experienced. I have been the more than proud owner of two gorgeous Yellow Labs – okay, I admit to a certain degree of prejudice. Last Friday night I watched the eldest dog Nikita, just days short of being eleven years old, die in agonizing pain with me alone and helpless to do anything but just be with her. It was hideous. I am heart-broken. I also feel like a failure for allowing a much-loved animal to die in terrible pain. Not to mention how horribly I miss her. She went from running around full tilt to dead in a few days. I guess I’m simply in shock.
For dog owners who understand, I am moving to an area in the very northeast corner of Florida minutes from the beach. I very much wanted Nikki to make that move and enjoy beach walks and swimming in the ocean. I am terribly sad that she didn’t make it. For non-pet owners who think all this hoopla about losing a pet is silly, I have lost my only child and now my dogs are my only family. Understand it or not, losing one of them is a big deal.
It’s like all the personality has left the house. Ellie (nine year old Lab) spends most of her time alone in her bed with no interest in what I’m doing. We both are depressed and struggling with the enormous hole Nikita has left in our lives. I’m trying to find ways to get Ellie excited about life again, but I worry how hard a move will be on her so quickly on the heels of losing her life long companion. It’s just not a good situation.
I would have liked to add a picture of Nikki to this post, but I can’t stand to look at pictures right now.
I’m trying to stay motivated about packing to move and dealing with the whole fun cycle of “keep the house perfect and leave for showings”.
So blog and Pinterest followers, I will be posting and pinning when I can, but not as exuberantly as I have been. I have a lot of ideas and plans, but I may be a little slow in posting for a while. I need to get moved and get my joie de vivre back.
I have a Moen kitchen faucet that suddenly started dripping right after I put my house on the market to sell. Not exactly the look I wanted for showing – a spattered sink and dripping faucet.
A failing faucet cartridge is almost always the reason for a dripping faucet and is usually not a difficult fix.
Figuring out what cartridge you need
In the past I have taken bathroom faucet cartridges to the hardware store and they have matched it up to the correct replacement. This time I couldn’t even get the handle off and needed directions on how to accomplish that. There was a hole on the back of the handle and using a mirror I could tell there was a set screw in the hold that most likely needed an allen wrench. I tried and tried and could get a wrench to seat and couldn’t get the handle off. While most faucets are really easy to disassemble, this particular faucet was not a friendly design for repairs.
I searched the Moen site. Since I purchased this house as a foreclosure I had no idea what the model of the faucet was. I took pictures of the faucet and emailed them to Moen customer service and they emailed me back with the model number so I could order the replacement cartridge – this process took about 48 hours so be patient. (Note: if you are the original owner of the faucet, Moen guarantees their faucets for like and will probably send you a new cartridge for free.)
Unfortunately this Moen cartridge wasn’t available locally so I had to order it from Moen at over $20. Yikes.
Replacing the cartridge
When the cartridge arrived I called customer service to ask how to remove the handle. It required a 3/32 allen wrench – you have to be kidding me. They don’t etch sizes into little allen wrenches and I didn’t have a fold out tool that had sizes that small. Since it faced away from me I asked specifically whether I needed to turn the wrench clockwise or counter-clockwise and was told counter-clockwise while facing the faucet. That seemed counter intuitive to the lefty loosey/righty tighty idea, but okay. I assumed they knew their faucets. Note the instruction below do NOT show a faucet with a set screw in the back.
Cartridge and instructions
Before replacing a faucet cartridge TURN THE WATER OFF going to the faucet.
Working blind I tried allen after allen and finally felt one seat into the screw. I turned the wrench to the left or counter-clockwise and the handle wouldn’t let go. I didn’t want to ruin the set screw, so back on the phone to Moen to confirm which way would loosen. I had been told incorrectly — I needed to turn it to the right or clockwise to loosen the set screw.
Faucet with allen wrench finally in placeView from the top with allen wrench in placeHandle off, ring removed, and nut removedIt was easy to pull out the cartridge — not all cartridges remove this easilyNew cartridge inserted
After figuring out the set screw the repair was a breeze. The handle came off, a top cover ring slid off, a nut easily came off and I was able to pull the old cartridge out by hand. I popped in the new cartridge, put all the parts back together, turned the water on and no drip!
Don’t ever let a faucet drip. Avoid the annoyance and the wasted water and do this easy fix as soon as it’s needed.
Maybe some things you might not think of in the flurry of activity to get your house on the market…
Clean Windows — clean them and keep them that way checking before each showing to make sure dogs or kids haven’t left smears behind. If bright and sparkling sells houses, letting the light in through clean glass is the first step.
Clean fans blades — you don’t want everything else to be sparkling clean and have a prospective seller look up and find caked on dust layered fan blades. Get up there with a ladder and give the entire fan a thorough dusting.
Clean bugs out of all light fixtures — while you have the ladder in to clean fan blades clean you ceiling fixtures. Dirty globes block light and you don’t want a prospective buyer looking up and seeing a collection of dead bugs. You don’t want a prospective buyer to even think the word bug while in your house.
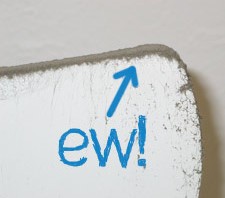
Baseboards — it won’t do a lot of good to clean the carpet and floors if the baseboards are grimy. Get down and wash the base boards — especially if they’re white. If they run along carpet use a crevasse tool to vacuum all the crud that can accumulate between the baseboard and the carpeting. I find that crevasse to be an amazing dog hair catcher.
Refrigerators – a lot of refrigerators are the family show place. Kid’s art is hung there, family pictures, magnets from past vacations. All that stuff screams “This is somebody else’s house!” when prospective buyers walk into the kitchen. You want them thinking “Hmmm. Nice kitchen. I could see our family in here.” Take the stuff down and pack it safely away for your new house. The kids will understand why it has to disappear for a short while.
Pictures and showings – I got this from a professional photographer who has a very successful business taking pictures for house listings on the internet. He said houses look best with all curtains and blinds open and every single light turned on. He was right — the pictures he took of my house were spectacular.
He told me the follow-up was to do the same thing for every showing of the house. The worst thing you can do is have your house look great in pictures and then disappointing in person because you haven’t opened every blind and turned on every light so the house looks the same as it did in the pictures. Last thing you should do before walking out is turning every single light on for your prospective buyers.
Create a checklist – create a list of the finishing touches you leave until the last minute and put it on your smart phone. I have mine in Evernote and I consult it before every showing. Little things like doing a toilet check to make sure they’re flushed…
After a repairman told me a surge probably fried the electronics controlling the compressor on my refrigerator and suggested I get a single outlet surge protector I started doing some research.
Which appliances are at risk?
Appliances used to be a lot simpler than they are now. Now everything is digital and electronic. I found the following comment on BobVila.com:
Interesting how refrigerators have changed… Now 2013, leading OEM’s include leading electronics manufacturers, Samsung, LG, etc. Today they are laden with electronics, motherboards, digital displays in the door, LED’s, etc. all subject to surge damage, especially in those regions that experience weather with lightning/energy surges.
The more I read, the more it made sense to follow the advice of the guy who repaired my refrigerator and get a surge suppressor to protect it. But I also found out there are a lot of other appliances that need protection as well.
If I have a new refrigerator, washer, dryer, or stove with fancy electronic displays I’m putting a surge protection plug on them. Same thing goes for my flat screen televisions. I also read putting one on a garage door opener is a good idea. Anything with complex electronics inside should be treated as carefully as a computer. A refrigerator alone is over $2000 — I’m going to try to keep it and other expensive appliances as healthy as I can.
First step in protecting your appliances
The first step is making sure the outlet for your sensitive appliances is grounded. For under $10 you can get a tester like the once pictured left and easily determine the condition of the outlet. If it doesn’t test correctly here’s a good WikiHow that walks you through testing and correcting a problem: http://www.wikihow.com/Ground-an-Outlet.
Second line of defense
Some articles suggested a 3 step approach: verifying ground on outlet, whole house surge protection, and outlet surge protection. I’m not sold on the whole house step and will stick with grounded outlets augmented by a surge protector.
This Old House has a good article on surge protection that gives these guidelines when buying a protector:
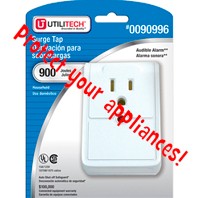
This is the surge protector I picked up at Lowes
Before buying a plug-in unit, check that it does the following:
•Meets UL Standard 1449 (second edition)
•Has a clamping voltage — the amount that triggers the diversion of electricity to the ground — of 400 volts or less. The lower the number, the better the protection
•Absorbs at least 600 joules of energy
•Protects all three incoming lines: hot, neutral, and ground. Look for “L-N, L-G, N-G” (line to neutral, line to ground, neutral to ground) on the product’s spec sheet
•Stops functioning when its circuits are damaged by a surge
Both whole-house and plug-in types can get zapped without your knowing it; look for indicator lights that signal when a unit no longer works.
Did you read the “stops functioning when its circuits are damaged by a surge? I’d add one more item to that list of things to look for – an audible alarm. Indicator lights are usually hidden behind the appliance or cabinet and surge protectors with an audible alarm are a safer option. The surge protector I got at Lowes has an audible alert and protects up to 900 joules for $7.30.
I don’t, however, know how long the surge protector will sound. Since I just came home from a 9 day trip to find a dead refrigerator I don’t know if the alarm would have still been sounding when I got home. But if my refrigerator gets a power surge when I’m home I want to hear about it right away. Below are some samples I found – my top pick is the RCA which has 1500-joule surge protection with audible alarm that allows you to plug into the side so the appliance can be closer to the wall, but it’s $18.23:


 This, like the washing machine rust, was a little cleaning project I should have addressed a long time ago. I had idea how much crap could accumulate under those close fitting keys.