For a while my blog is going to take a completely different slant. Several months ago I made the decision to travel full-time as a volunteer at different parks across the country so all projects at home came to a halt as I prepared the house to sell.
The house is sold, the travel trailer ordered, and starting in mid June I will be on the road for (hopefully) the next few years. This is a big change so no telling how I’m going to feel about it until I am deeply into it.
I will still be posting to the blog, still sewing dog cot slings for people who don’t sew — there’s no way I’m going anywhere without a sewing machine. I have already mentally designed window covering for my new trailer home and they will be my first project. In truth — I have a long list of things I plan to do to my new much smaller home to make it livable.
I have never wanted to talk about it because it was too painful, but I have now lost both yellow labs you can see in the posts about the PVC dog cots. Nikki died February 21, 2014 after surgery to remove a spleen tumor the size of a volleyball (no exaggeration — they showed it to me). It was a long shot to do the surgery and she bled out (a complication of surgery) at home alone with me and Ellie. It was a traumatic experience that made me appreciate the wisdom of euthanasia to prevent suffering.
Ellie died December 14, 2015. She had developed a bad limp that took months to get diagnosed as bone cancer and I made the decision at her age to spare her the pain of amputation and chemotherapy and had a mobile vet come and put her to sleep at home while I petted Ellie and told her how much I loved her and was going to miss her. I like to think Nikki and Ellie are together now watching over me and waiting me to join them someday.
Both dogs were just short of 11 years old when they died. Way too much cancer going around for everyone on two and four legs as far as I’m concerned. For a while I will be traveling alone, but plan to get another yellow lab when I settle into my new way of life. Dogs are too much fun to live without them.
So I’ll still be the DIY girl, but maybe should change it to “traveling diy girl”, “wandering diy girl”, “crazy diy girl”…
I am in the middle of massive downsizing and have 2 small and 1 medium sets of slings, corner fittings, and end caps for the legs from the test samples I made. I would love to see these go to good homes where puppies can enjoy them. The color is dark brown in the top and middle cots pictured above.
The 2 small sets and medium set have been claimed.
Actually, I have the PVC for the sides and legs too, but after checking boxes and shipping it’s cheaper for you to buy the PVC locally and cut it than to pay for the shipping.
If you don’t mind paying for shipping for medium USPS priority shipping box at $12.35 (doesn’t that seem high for a medium box??? Feel free to check the rates), then I will send the slings, corners, and caps to you. You will then need to buy 1 1/2″ PVC (directions can be found on the tutorial) and assemble the frame. I recommend you go to Harbor Freight and buy a cheap PVC cutter if you don’t have one. The cost is half what the big box stores charge.
If you are interested, leave a comment below or go to the contact page and send me a message. I will need payment sent via PayPal before shipping the slings.
Please let me know if you have any questions. These are for smaller or medium dogs — you need a large cot for large breed dogs.
I can help you out by providing everything but the PVC and you can help me out by getting them out of here without it costing me shipping. Sounds like a win-win to me 🙂
I’ve had six good quality resin Adirondack chairs for quite some time. I bought them for my house in Texas that was a soft moss-green with snow-white trim and the original forest green color of the chairs was perfect for the white decks on that house. I also had three forest green tables and one white table. They all held up really well on the west-facing decks that baked in 110 degree Texas summers, but I did freshen up the color on them three years ago with a coat of forest green paint.
The problem in 2015 was they were no longer the perfect color for my house in Florida which is light gray with white trim and a bronze screened in porch. The bronze wasn’t my choice. The screen installers accidentally installed on the wrong house when there were several new construction homes on the block so the builder ended up giving it to me for free. Not my color choice, but I loved the price. Forest green furniture in bronze screened porch is a complete snooze-fest, yawn, boring.
I wrestled with what to do. Should I get rid of the furniture? Did I want to invest a whole lot of money in new furniture? In the end, I couldn’t justify getting rid of perfectly good stuff so I decided to paint the chairs and tables vibrant beach colors to brighten up my screen porch and patio.
Color and Paint Choices
[nggallery id=11]
Note: the colors in the pictures in no way represent the actual colors – the actual colors are much better than the pictures.
Six chairs meant six colors. I had painted one chair white last fall, and while it was boring, I thought I would leave it for now.
The first color I tried was Rustoleum American Accents 2X Ultra Cover in Lagoon. I bought 2 cans and it took less than one can to cover one of the chairs and the color was gorgeous. I was sold on painting the chairs.
Next I tried Rustoleum American Accents 2X Ultra Cover in Coral. Again it covered flawlessly and the chair was beautiful. I bought Rustoleum American Accents 2X Ultra Cover Seaside (a light aqua I love) and Sun Yellow and ran out of colors I liked so I bought Krylon Cover Maxx Ultimate Coverage in Sea Glass which has some green in it. I just didn’t like the Lime Green Rustoleum offered so I finished up a couple of tables with Valspar Tropical Foliage Satin.
Lagoon – Rustoleum American Accents 2X Ultra Cover
Seaside – Rustoleum American Accents 2X Ultra Cover
Sun Yellow – Rustoleum American Accents 2X Ultra Cover
Coral – Rustoleum American Accents 2X Ultra Cover
Sea Glass – Krylon Cover Maxx Ultimate Coverage
Tropical Foliage – Valspar
Painting the Furniture
I was completely happy with how the Rustoleum paints went on in their colors. The Seaside and especially the Sun Yellow took a little more paint to cover the forest green, but the application was easy and nice quality. I could turn the cans sideways or even upside down to get to awkward spots and the spray was uniform and beautiful.
The Valspar Tropical Foliage took more paint to cover and the application was close to the Rustoleum paints except for a tendency to splatter heavier drops on a regular basis. I have no idea why it was happening. I had thoroughly shaken the cans and continued to shake them throughout the spraying process so that wasn’t the cause.
I didn’t paint the bottom of the seat on the chairs since it would never show in any way, but I did paint all sides of the legs and the backs of the chairs thoroughly so they would look good from any direction.
Krylon Cover Maxx
Spraying the Krylon Cover Maxx Ultimate Coverage was an entirely different experience. The paint didn’t cover well at all, was watery so it ran where the Rustoleum paints never did. The application and coverage were so poor compared to what I experienced with the other paints I was really disappointed. The color was gorgeous, but when it proved to be a massive pain to get it on the chair I didn’t have any interest in trying it on a table, especially since it took the entire two cans to cover one chair.
Coverage
For the record, two cans of Rustoleum paint covered a chair, a table, and a bowling ball (for yard décor) in Lagoon, Seaside, and Coral. It took almost two cans of Sun Yellow to cover the chair.
One can of Valspar covered two tables which was not impressive coverage.
Two cans of Krylon Cover Maxx barely covered a chair and that was barely covering it.
My vote is for Rustoleum American Accents 2X Ultra Cover
Since the resin furniture I have painted a couple of wood items with left over paint and still love the Rustoleum American Accents 2X Ultra Cover.
My money is on Rustoleum American Accents 2X Ultra Cover in the future if I want an easily applied flawless finish without having to buy many cans of paint to do it.
If you want to know if a can of paint will spray in all directions (upside down, sideways), check the cleaning directions. If the can says turn it upside down and spray until no paint comes out that means it isn’t meant to be used upside down. If it says wipe the spray nozzle off when done using it, that’s the type you want.
Just a quick post about a product I’m trying — I am not sponsored by these folks are anyone else.
I read about StopLossBags in The Family Handyman magazine and wanted to try them since I’ve had to throw away a considerable amount of varnish and polyurethane over the years. Storing polyurethane and varnish is a matter of protecting it from air and these bags look like they will solve that issue.
I used a small funnel to store about half a quart of leftover oil-based polyurethane and was able to easily push the product up to the top of the bag forcing all the air out before closing the bag. The bags arrive with lots of directions and even plans for building a small stand to facilitate filling bags.
In retrospect I suspect I have been studiously avoiding any use of varnish or polyurethane for fear of failure. I used polyurethane years ago, but don’t recall it being a total fail. Maybe it’s my constant battle with floating yellow lab hair.
I’ve used a variety of hand applied rubbed finishes to get around using a more difficult finish. When I made the large ottoman tray I opted for water based polyurethane to avoid mineral spirits clean up. I watched a video showing how to dilute the finish with 50% water and applying with a cloth and I loved the technique and the result.
Since I had leftover water based poly and I used the water based poly with the same technique to get a beautiful finish on the bench I made for the entry – I just worry about how durable it is.
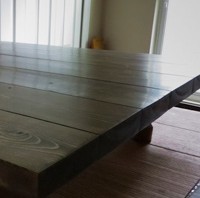
I recently built a living room table in the same style at the entry bench. When it came time to finish the table for the living room I opted for oil based polyurethane for a more durable water-resistant finish. While I would like people to use coasters, drips happen. Especially in humid Florida.
I hoped to emulate the same technique I used with the water based poly and read articles by people who mix a 50/50 oil based poly/mineral spirits and apply with a cloth. I applied minute coats that appeared almost non-existent after 6 coats. The table base looked okay, but the table top made of 2 x 6 pine seemed to be soaking it up so there was no finish.
Back to the drawing board. I found a video where a guy thinned poly by 25% with mineral spirits and applied it carefully with a foam brush in one direction only. I thought applying polyurethane with a foam brush was pretty much considered heresy, but I was ready to wrap up this project and dreaded the clean up of using a brush.
I poured some of the finish in a plastic cup, thinned it 25-30% with mineral spirits, and applied it carefully in one direction with a foam brush making sure I didn’t squeeze any bubbles from the brush. I checked for runs or excess and brushed problem areas in one direction until it looked like there was a uniform coating.
I went in to check it the next morning and was thrilled. The surface was gorgeous. I sanded lightly with 600 grit paper, wiped it down and applied two more coats of the oil-base polyurethane with a new foam brush each time.
The table top and base have a perfect satin finish with no bubbles, drips, runs or other flaws. I had no idea that would be possible with foam brushes that you can throw out after use instead of cleaning. I figure 6 coats of hand applied and 3 coats of brush applied should provide a nice protective finish.
Now the table parts are sitting protected in the spare bedroom to dry for 30 days before moving it into the living room to use. Then I’ll screw the table top to the base and put it in the living room. I can’t wait.
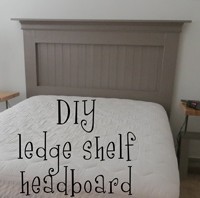
I’ve been wanting to change my bedroom for months and have gone through so many iterations of headboard designs that it was getting ridiculous. I wanted it to be coastal. I wanted to be able to build it alone and get the materials home in my Xterra and most importantly I didn’t want it to cost all that much. I really should have name my site the FRUGAL DIY Girl…
Plan
Once I had arrived at the plan for the bedside tables I could move forward with the headboard. The open style of the tables meant I could have a large, solid headboard and it wouldn’t be too overpowering.
I decided on using primarily 2 x 6 for strength and low cost instead of 1 x 6. I purchased verified a pack of 8 ft. x 4 in. x 5/16 in. Knotty Pine Edge V-Plank Kit (6-Piece) from HD cut into 24″ pieces would be more than enough to be the back panel. I have 1 8′ piece left over. Some trim and a 1 x 6 for the top shelf was all I would need besides paint.
8 ft. x 4 in. x 5/16 in. Knotty Pine Edge V-Plank Kit (6-Piece Pack) from Home Depot
Layout
I checked and double checked the height of my mattress and boxspring to make sure the leg height would be right. I wanted to wall showing (obviously) but most of that bottom board showing.
Assembly
I had to get creative during the assembly process. I continued using my Harbor Freight pocket hole jig I purchased and I’m finally getting somewhat decent at pocket holes. I refused to pay the ridiculous price for a plastic Kreg jig and I needed one that clamped the wood and held the board while drilling.
Since I don’t have any clamps large enough for a headboard I used ratcheting tie down straps to hold everything tight while I assembled the frame.
When the frame was assembled I put the headboard face down on the floor and glued and nailed the planks starting in the middle and working out to each side.
After the center section was on I added trim molding across the top and the 1 x 6 board to the top. Filled holes, caulked gaps, and painted Benjamin Moore Barnwood in high gloss enamel which is a grayish brown, brownish gray. I love the color.
I will not put anything on paint or finish until it’s dried for 30 days. Too much work to build and paint something and then get impatient and ruin the finish by putting decor items on too early. I have to figure out what color fabric to wrap the box spring in (see Bed legs alternative to bed frame) and what I want to do for lamps on the DIY Industrial adjustable bedside tables, but I will want some coastal items on the top shelf on the headboard and possibly a clamp on reading lamp. I’ll worry about that when the paint has cured.
I’ve done a lot of searching for ideas for a new headboard and side tables and ran across this image on Better Homes and Gardens:
Let me count the ways: I loved the pedestal open bedside tables instead of something closed and solid. I loved that the headboard was rustic and wider than the bed so it served as a frame. I really loved the lights mounted on the headboard but that’s a whole other issue to be tackled later.
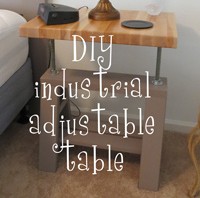
The table base
I did a little looking around the internet and found these at Beekman 1802:
Oh my. They even show is being used as a bedside table. Unfortunately the price for each table is $600. Only $1200 for two. Since I didn’t have access to or budget for the metal table bases I started searching for a way I could make an industrial adjustable bedside table base and found it on Ana White.
I thought about making the adjustable bar stool for the table base, but opted for the additional stability the table top would have with two supports.
The table top
I have two 36” x 24” Butcher block tops left over from the UPS massacre after I ordered from grizzly.com when making the kitchen island for my previous house.
UPS dropped the first two tops crunching corners so grizzly got pictures of the damage from me and kept sending replacements. The 3rd try they double boxed and doubled the corner protection. This box was also dropped hard enough to crunch the corners of the box, but the butcher block was undamaged. Finally. All to say I was left with 2 tops that had damaged corners. Not horrible damage, but bad enough I didn’t want them for the island in a house I was trying to sell.
By the way – I would have liked to bring the island with me but the people who bought the house loved it so much they insisted the island be part of the deal.
Constructing the bases
This is the first time for me to work with angle cuts and Ana White offered no clue about how to clamp the parts for assembly. Maybe other folks are smarter and more experienced at woodworking than I am… So I came up with a block that I used for clamping the legs. I clamped the block to the 2 x 6 table top and the leg to the block and then check to make sure they were square.
The rest of directions can be found on the link to Ana White above. The base is made of 2 x 4’s with a 2 x 6 top and 1 x 4 used for the shelf.
One suggestion – sand the pieces before assembly because they are a bugger to get to once assembled. Both sanding and painting were a pain. I think the next time I would even paint the pieces and then touch them up after assembly.
After they were painted all that remained was the hardware and tops.
Adjustable hardware
I thought the information on Ana White for the hardware required for these adjustable tables was sketchy at best and really not sufficient to know what to do. I went to the store and tested ½” flanges with ¾” threaded rod and the rod threaded in just fine. Lowes and HD both wanted over $10 per flange. Seriously??? $10 dollars for a flange. $40 for this project alone? I checked online and I could get 10 flanges for $29 off Ebay so I ended up with 10 flanges. I think I’ll add a pipe towel bar to my kitchen cart and possibly a pipe curtain rod for my sliding glass door to use the extra flanges. Or if someone needs flanges they can email be 🙂
After the flange size and threaded rod size were solved I needed to find the other parts. HD sells a pack of 4 ¾ inch washers, lock washers, and nuts for under $5. Lowes wanted $1+ for each washer and nut so I went with the pack. Ana White said you needed 8 nuts, but if you can find where the 4 extra nuts were used in the pictures you have better eyes than I do. The second set of nuts does show on the bar stool pictures.
I measured the tables and determined 18″ rods would be perfect. I bought 2 36″ sections of 3/4″ threaded rod and cut them in half with a hack saw. That was more fun than a barrel of monkeys but they don’t sell 18″ sections of rod. I read online that nuts wouldn’t go on over the cuts but that proved to be untrue. I threaded the good ends into the flange and was still able the add nuts to the bottom cut ends of all four pieces.
The table top had a little wobble so I had decided to lock them down tight by adding the nuts at the bottom of the threaded rod and snugging it up against the bottom support before I saw the second nut on the Ana White bar stool picture. I even used all the lock washers here so nothing went to waste from the HD package of nuts and washers. That always makes me happy.
Table tops
A friend cut the butcher block for me on a table saw so I had 2 roughly 18″ x 24″ tops. I put the raw cut edge facing the wall on both tables. I carefully measured and attached the flanges to the bottom of each top, screwed in the threaded rod and inserted into the bases. As I said above the tops moved a little so I added nuts and lock washers to the bottom and that firmed everything up.
The openness of the tables is just what I wanted. No matter what I do with mattresses I will be able to change the table top height of the Industrial adjustable bedside tables. The table top size is perfect. Now all I have to do is figure out what I want to do as far as lamps…
After spending months researching alternatives to a bed frame I stumbled across universal Bede’s at us-mattress.com. With all my research, how had I never seen them before? Here’s their description:
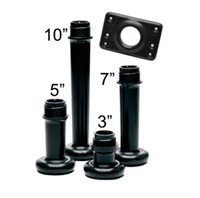
Are you tired of metal bed frames limiting the space underneath your bed? I don’t blame you! Here’s a tip – get rid of that metal frame and experience the new generation of mattress support! These bed legs are made from 100% recycled plastic and are available in four different heights so you can customize the amount of storage space under your bed.
The Universal Bedlegs System easily attaches to the box spring utilizing two components: the threaded base plate and the bed leg. The threaded base plate installs directly onto the box spring and the leg simply screws into the threaded area of the base plate to complete the installation. Once the base plate is secured to the box spring using a power screwdriver, you can easily resize the height of your bed without any tools by simply attaching a different size leg. Please note that this system only works with box springs that have a wooden center support and 2.25″ wood sides. This product is not compatible with box springs that have metal center supports.
• Made from 100% recycled plastic
• Available in four heights: 3″, 5″, 7′ and 10″
• Optional headboard brackets will accommodate most headboards
Includes:
Twin: 6 Threaded Leg Stems, 6 Base Plates, 24 Philips head screws
Full: 9 Threaded Leg Stems, 9 Base Plates, 36 Philips head screws
Queen: 9 Threaded Leg Stems, 9 Base Plates, 36 Philips head screws
King: 12 Threaded Leg Stems, 12 Base Plates, 48 Philips head screws
They are also available on Amazon in more colors and at $60. I wanted black so I went with the cheaper price. The 7” queen set was $55 and free shipping so I ordered them.
I had seen other furniture legs online, but they were at least $8-10 each and needing 8-9 of them I didn’t really want to spend $100 just for legs. $55 seemed pretty reasonable for what I thought were metal legs.
What I failed to note and was shocked to discover when the package arrived is the product is made of plastic. Didn’t read very closely, did I? The pictures looked metal, I thought metal, and didn’t see plastic. I mean – who would support a bed on plastic brackets and legs?? Apparently I would since I didn’t know what else to do. I didn’t want a heavy wood frame, I didn’t want to eliminate the box spring with a platform in humid Florida (I think the mattress needs to breathe), and I was sick to death of bed frames and bed skirts and was ready for a totally different look.
Installation and reinforcement
I leaned the mattress and box spring against the wall and disassembled the bed frame that was heading to the spare bedroom. Less than a year old and the fiber cover was already loose a quarter of the way around the box spring. I put the box spring on the floor bottom side up and since the fiber cover was already so loose I removed it from 3 sides.
I examined the structure and was appalled. Knotty 1 x 3’s – knots are always weak spots. I thought paying almost $1000 for a mattress and box spring would get me something fairly decent. Considering I had to do a warranty claim on the original mattress because it broke down so badly and these were new replacement pieces less than a year old and clearly not of good quality, I guess you have to pay a lot more. Lesson for next time.
I ran to HD and bought 1 x 4’s to add some strength to the frame since I was taking the metal support away. I glued and screwed the boards in. I hoped this would add a little strength to the frame. I stapled the fiber covering back in place, ran a row of binding tape down the center and stapled that so the fiber wouldn’t sag in the middle.
Before installing the leg brackets I figured out the best placement and cut away padding so they would fit flat against the frame. Each bracket installs with 4 screws. When they were installed I added adhesive back Velcro hook around the entire bottom edge of the box spring and stapled it down. I planned to have Velcro loop on the edge of whatever bedskirts I make so they can be easily changed. I didn’t want to permanently “upholster” it and be stuck with the same color all the time – this way I will be able to change it out.
Flipping it over
The installation instructions tell you to have 2 people to flip the mattress over so you don’t snap off the legs on one side. I got around this by putting the box spring up on 8” boxes. When I went to lay the mattress on the floor one edge was caught on the boxes so it was 1” off the floor. Then it was just a simple matter of lifting the edge of the box spring to remove the boxes. No broken legs (mine or the bed) and only one person to flip it.
The jury is out
I have no idea if these legs are going to work long-term, but I’m going to give them a try. I have considerable concern about my crappy box spring with no metal support for it, which is no fault of the legs. I don’t know if I’ll slide the bed and a leg will end up breaking off since they’re plastic, although the bed does slide fairly easily across the carpet. I don’t know if I’ll stub my toes on the legs and end up hating where they’re place.
So far there are no suspicious noises from the bed frame – no creaking or cracking sounds, thank heaven, but I sure won’t put it to the test by jumping up and down on the bed. Hopefully 9 legs under the bed will adequately support the spring, mattress, and me.
I do know I love the look with NO BED SKIRT. The legs don’t look obviously plastic. I like the black with the barnwood headboard. I want a plain white coverlet and pillow shams and then a bunch of coastal pillows on the bed. I’m still totally undecided about the color for the fabric cover for the box spring, but I’ll figure it out. I may have to get everything else in place before the right color become apparent to me.
I may make 6” rolling drawers and paint them the same color as the headboard for storage under the bed.
I will post a follow-up in a few months about how the legs and frame are holding up.
I have planned on making a living room table following the same design as bench I made for the entry. You can see the details on the bench here.
I think it’s only fair to point out the reason I make “rustic” pieces — it’s because I don’t have the tools or the know-how to produce a finely crafted piece of furniture. Rustic fits me and my style better anyway.
In designing it I had to start with the top and then back into the measurements for everything else. I wanted the top to be between 32-34” square. I decided on 2 x 6’s for the top since six 5.5” boards would total 33”. No other dimension lumber seemed to work out right.
Once I had the top size and determined the desired overhang of the top on the base I could start designing the base. Based on the couch and chair the table would be sitting next to I decided on 22” legs so the top of the table would be 23 ½” high. There’s a wide range of acceptable heights for living room tables so I picked what seemed like the perfect height for my furniture.
By the way – 2 untreated 8 foot 4 x 4’s were enough for the bench legs in the entry and these table legs with a small piece left over.
Assembly
Same basic assembly as the bench. I am not gutsy enough to cut all pieces in advance. I prefer to cut things as I go so I can measure and make sure the exact size of the piece I need.
I made a mistake with the supports and didn’t realize it until it was too late – the glue had already set up and I wasn’t going to rip it apart. I added an additional board so I would have an additional board to connect the top to. See the boo boo? The 2 boards that are flush with the bottom of the apron were supposed to be flush with the top so I added on top running perpendicular to them. Oh well — worse things could have happened. I’m still finding woodworking to be an adventure fraught with lots of mistakes.
After cutting the 2 x 6 boards for the top I glued and screwed them together using pocket hole screws. I’m still working on getting comfortable with my Harbor Freight pocket hole jig and so far I am so glad I did NOT spend the money to get a Kreg. The HF jig is definitely one of their products and is far from a piece of junk — which I believe is reflected in the fact they never really put it on sale, just a couple of dollars off.
Applying finish
I decided to leave the top and the base separate for finishing and would attach the top after 30 days of drying time. I used water based poly on the bench and decided on oil base for the table since glasses might drip on it and I wanted the most durable finish possible.
I really wanted the top to be nearly perfect so I did some experimenting with methods of applying the poly. You can read about that here. I am really happy with how the satin poly turned out. It’s so nice I will be proud to have the table in my living room.
Finished table
That’s all I have until the end of the 30 day drying period. I will attach the top to the base and get placed in the living and add more pictures of the finished DIY rustic living room table then. See you in 30!
In the meantime I’ll be trying to figure out what I want to do as far as a lamp for the new table.
I am a big advocate of good tools for painting since they make a huge difference to how difficult it is, how long it takes, and how it turns out. Buy good tools and take care of them and they will last for years and years. So I thought I’d run down my favorite paint tools and why I think they’re essential.
Paint
It doesn’t matter how great your painting tools are if you’re applying poor paint. Bad paint isn’t just a pain to apply — it’s a pain to have on the walls since it doesn’t clean up (it wipes off instead) and then it will be a horror to cover when you decide to paint again using a better paint.
I don’t mean paying $70-100 per gallon either. Read reviews like the ones available on the following links and decide. Both say Ace Royal is a great paint for the money. You don’t want paint that spatters and takes multiple coats to cover. Most people need paint that’s scrubbable too.
I bought a quality fiberglass extension pole for rollers a long time ago, have used it too many times to count, and it’s still in great shape even though a little paint spattered. I don’t mean something like a broom handle, but a light-weight non-flexing pole that is expandable. What’s important is that the pole locks so it doesn’t slide when extended and the threaded part holds the roller frame tightly so it doesn’t loosen all the time. Painting stairwells and ceilings while standing on the floor (or stairs) is worth it’s weight in gold. They cost around $25.
Roller frames and rollers
Don’t go cheap on the frames. Screeching frames are no fun. Good ones, if cleaned after each use, they will be nice to use for years. I recommend everyone have at least 9″, 6″, and 4″ for different projects.
Don’t go cheap on roller covers either or you may have lint and fuzz coming off on your walls. This is another time quality product can be cleaned and reused for years. I have to admit I wish I could just pull off the used roller and pitch it in the trash, but that is so not environmental I make myself do the dreaded roller washing after painting. Anyone know a quick easy way to clean rollers and brushes?
Pelican Pail and Liners
I’ve only had my Pelican Pail for a couple of years and don’t know how I worked without it before. It has a magnet that holds a brush in place and it’s designed for hanging a 4″ Wooster roller frame from the edge. It makes cutting in a room so much easier that painting a room takes less time. I love the thing and really enjoy disposing of the messy liner when I’m done for the day.
Roller pan liners
I have found a transparent green liner that is rigid enough to use alone and wash if you want to reuse. Walmart has them for around $1.50 so it doesn’t break my heart to dispose of them. The flimsy ones you have to put in a metal tray are more trouble than they’re worth in my book.
Edge painter
Rather than precariously reach from a fully extended extension ladder to get that corner spot at the top of the stairwell use your extension pole and the Trim Smart from Mr. Longarm. It’s a life saver — literally. I recently painted my kitchen that has cabinets on the walls where the cathedral ceiling peaks. There was no way I could get a ladder so that I was anywhere within striking distance of cutting in the ceiling for several feet on either side of the peak. I went out to the garage, dug out my Trim Smart, put it on my extension and got it painted without killing myself. Just be careful to not load too much paint on it so it squeezes out in places you don’t want it. I used my 4″ roller to apply paint to the pad. Just playing it really safe since I couldn’t reach the spot to fix it if I messed it up.
Shur-Line Gallon Store and Pour Paint Can Lid
This ad for the Store and Pour Can Lid says you can store paint long-term with this lid, but I haven’t tried that. I use it while painting for several reasons.
It makes pouring paint incredibly clean and neat.
It keeps the edge of the can clean so you can use the original lid for storage and get a really good seal with no paint running down the side of the can.
The lid keeps the paint sealed up while you’re working so it doesn’t start drying out on top even if you take a break.
It washes up easily so it can be used over and over again.
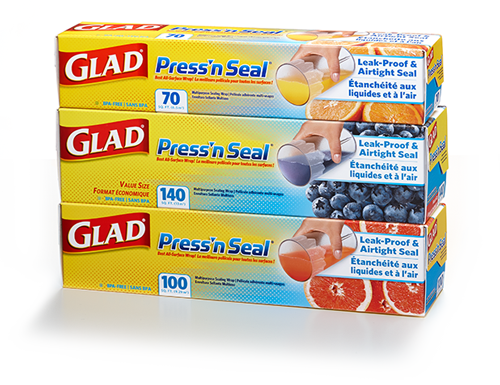
Glad Press’n Seal
Weird painting tool, but this is my latest painting discovery. I have painted an almost obscene amount an awful lot of cabinets and bookcases using a small roller pan for multiple coats of primer and paint on each project. That could add up to an almost obscene amount of clean up which tends to make me cranky.
I tried foil for the small roller pan with okay results. Then I decided to try Press’n Seal and fell in love with it. It’s sticky so it stays in place, but pulls up easily when you’re ready to clean up.
I also use Press’n Seal to wrap brushes and rollers before dropping them in a zip lock bag and sticking them in the refrigerator overnight. It keeps the paint wet and contains it so I just have to peel off the plastic and dispose of it before painting another coat.
If you’re working around things like a toilet tank that you’d rather not slop paint all over you can wrap it in Press’n Seal until the paint is dry.
It’s a great paint tool and I keep a large roll on hand for projects.
Roller pan line with Press’n Seal4″ roller wrapped in Press’n Seal
If you have any favorites let me know — I’m always looking for ways to making a paint job easier.