I wore a new shirt this morning to go get my drivers license and deftly dropped the black ball point pen when completing the application and put a nice ink mark on the shirt. I was bummed.
I got home and tried what I’ve done in the past — hairspray. It doesn’t matter if it’s the cheapest stuff they sell or expensive designer hairspray.
Put a towel (that you don’t mind staining) under the ink spot. Have another rag towel ready. Spray the hairspray on the ink spot and directly blot the spot without moving the towels around. Carefully move both the bottom towel and top towel to a clean spot — the ink is liquified at this point so it will transfer from the towel to the garment easily. You don’t want to make the problem worse.
Spray the spot and blot again. Repeat this moving to clean spots on the towels, spraying, and blotting until all the ink is gone.
When the ink stain is completely removed rinse the hairspray from the garment and wash as you usually would.
No fancy cleaners, no harsh acetone — just hairspray. It’s worked every time for me.
As promised by Giani the replacement paints arrived Monday morning.
In the meantime I had figured out how to get the appearance I wanted. If you use a large section of sponge (like half of one) you get a blotchy circles look. If you use the edge of a thinner piece of sponge and use it repeatedly you get a speckled, not blotchy look. This is a case where less really is more.
After you cover the area with the big splotches using a large piece of sponge, switch to a small sliver of sponge to break it up into a finer, speckled look.
I was amazed how little it took to break up big, blotchy patches into a small speckled look. I ended up using this technique to add back some black primer, to add the brown from the new can of paint, to cut down on the Inca Gold that I felt was way too white for the appearance I wanted, and to put back the metallic copper highlights I wanted. I had purchased a Martha Stewart jar of metalic copper that I wanted in my countertops.
OCD warning: Man, where do you stop? Once I started getting the look I wanted I kept dabbing here and dabbing there with all the colors and finally had to mentally grab hold of myself and say “enough is enough!” I had a nice blend of the matte black background, a little Inca Gold, a decent amount of the Feldspar brown to lighten the overall appearance, and speckles of chocolate.
Initial process
I didn’t like the idea of trying to do all colors at one time. I did the primer, then I did 2A, the metallic copper paint, 2B, and finally 2C. I loved the appearance up until 2C — that’s when I should have started using a sliver of sponge edge. I don’t think Giani makes this painfully clear in their videos. In my opinion if you use a big section of sponge there’s no getting around a big and blotchy look.
My error
I think I made a mistake when I called Giani because the new chocolate paint was just as watery when covering the other lighter colors as the original can. No matter how much I stirred and shook the can it seemed to separate when dabbed on the lighter colors and and the edges had a watery almost like the paint was separating. I have no idea if it’s a function of the dark brown pigment — the black certainly was a solid cover — but it separated and didn’t give a solid coverage of the light colors in a lot of places.
That complaint aside, the bottom line is despite the watery brown, I was able to get exactly the look I wanted that’s all the really matters. Well, that’s not all that matters — Giani customer service was awesome. I like a company that stands behind their products.
Top coat
I watched the Giani video on how to apply the top coat and don’t think there’s much that can be added to what they said. It’s humid here so I really didn’t have any problems applying the top coat since fast drying wasn’t an issue. My big fear was dog hair — I wanted to get the top coat on and dried before hair floated in it from one of my yellow labs. They were exiled to other rooms while the paint and top coat was wet.
Due to the high humidity I kept everything off the counters for a few days and was very careful with them for the first 3 weeks. I may have gone way too far with this, but I preferred that to trashing all the work I’d put into doing the countertops.
Result
You can see more pictures of the counters on my posts for the backsplash and final kitchen update. I’m a little disappointed with the pictures since they don’t really show the shiny copper accents that area beautiful. The top coat give the counters a gorgeous depth.
I am so happy with the look of my counters that I find myself smiling every time I walk into my kitchen. Of course who wouldn’t? I’ve gone from washed out ugly to rich color and depth added by the topcoat. It’s a huge improvement.
Follow up note on Top Coat: I ended up with brush stokes in the top coat on the left edge of the sink. It was really bugging me so I used 600 grit sandpaper to smooth out the brush strokes and then carefully applied two coats of top coat to the sanded area. As it dried it all leveled out and there is no lap line where the new coats met the old coats. It’s nice to know you can do repairs if needed.
Also, after this touch up I set a condensating glass on it before it was completely dry and the condensation raised blisters in the top coat. Talk about panic. I thought I’d really messed up the top coat. I left it alone and came back a couple hours later to find the blisters had all settled back into the surface and you couldn’t see where the glass had been. What a relief.
Process: if part way through the process you think your counters look awful — don’t panic! If you looked at the pictures of the watery brown paint you can see things looked pretty bad and I was scared I had made a huge mistake or would have to start all over. I’m still not happy with the watery brown paint, but I love the countertops.
Results 2 months later: The countertops still look awesome. I am careful with them — I don’t let water stand on them and don’t put things on them that I think could scratch. I suspect I’m being paranoid and will post how they are doing a few months from now.
While I am thrilled with how my Shaker cabinet update looks, ease of cleaning, and durability so far, I had yet to solve the problems of ugly countertops and back splash. As you can see in the image on the right the white cabinets need some color contrast instead of the washed out looking counters.
Since this is a house I don’t plan to stay in, I am doing all the improvements at the most frugal cost possible and still look good. After researching I decided to try the Giani Granite paint rather than replace the counters. $70 and a lot of work instead of hundreds of dollars for new counters sounded like a deal.
The steps involved:
1. Clean with SOS or Brillo pads: The picture above shows the counters after I had cleaned them with SOS pads and rinsed them multiple times to make sure the soap residue was removed.
2. Tape off the walls and cabinets: The next prep step is to tape off the counters before painting. The wall edges were a no brainer, but taping the sink was trickier. After trying to tape off the edges by lining the tape up (with unsatisfactory results) I decided to firmly tape the edges with tape extending over the formica and then use a skill knife to carefully cut the tape away from the sink. I was very pleased with the precision this process allowed. FYI — when Giani suggests 2 rows of tape above the back splash they know what they’re talking about. I accidentally dabbed paint above my one row of tape. Fortunately I hadn’t finished the back splash yet so I wasn’t heart-broken about the paint that went above the tape.
taping sink and then cutting edge away gave a very clean edge that didn’t allow paint to bleed underCompletely taped and ready to paint primer
3. Apply the primer: I found the black primer a little intimidating simply because it’s so black. I have an important suggestion before doing this step. PREPARE WHERE YOU WILL CLEAN UP THE BLACK PAINT. After applying the primer the kitchen sink was out of the question so I decided the tub in my bathroom was the safest option. The soap I needed was under the sink (behind my very white cabinets) and I had to push the shower curtain aside (with its snow-white liner) while I had black paint on me. I was able to get set up without getting black paint on anything, but I was stressed. Every little splash as I was washing things scared me too. The primer is very, very black. Better still — take the Giani advice and line your paint tray with foil. I wish I would have.
As far as the primed surface — the primer dries to a matte black finish.
4. The first coat of Giani minerals: Since I purchased the chocolate-brown kit my first coat was a gold. I cut the round sponge that came with the kit in half after looking at all sides of the ball and picking the side the had the most open cells instead of a side that had exposed tubes of the cells so it would provide good speckling. I attached a small piece to a pencil to get into the corners and tight areas. I ended up cutting another that provided a fairly straight edge to get the top of the back splash and along the wall. After I got the technique down I found the process fun. Except for behind the sink and faucet. That area was a bugger to do.
Working on the first coatFirst coat complete – the paint is a matte finish
5. The second coat: My second was a cream color. I was much happier with the look of the counter when it was darker and figured I would want to darken it up some, but I had to wait for the final coat which is a chocolate-brown to see what I wanted to do.
Counters with 2nd coat of cream-colored Giani minerals
6. Final coat of paint: the last coat is a layer of chocolate-brown. This is where the problems started. I shook the can, I stirred the can, but when I poured out the paint it was far more watery than the other two coats. I shook it more, stirred it more and it was still watery. I probably made a bad decision and went ahead and applied the watery paint.
It was a completely different experience from the other coats. It blotched, it ran, it ran out. There was plenty of paint, but I think the sponge absorbed a lot more due to the watery consistency and I was barely able to finish all the counters even with putting less on the last 2/3’s of the surface.
Where the previous layers had been a nice speckle, this layer looked blotchy and didn’t want to cover. I was concerned.
Watery looking brown paintClose up of the watery appearance
Giani customer support
As soon as I washed up my tools and took a good look at my counters I got online and found the number for Giani. I called and told them about the watery paint and blotchy appearance and asked what I could do. They were very concerned about my problems and offered whatever paints I wanted to correct the problem and make me happy with the counters. They offered to FedEx more of the chocolate and gold paint as well as another sponge. Where customer service seems to be dying a terrible death in the US, these folks know the true meaning of the concept.
Unfortunately it was Friday so the earliest I ccould get the paints would be Monday which means I have to live with a torn up kitchen for a few days. I just don’t see what other choice I have since the counters are so important.
Our are had what I would call almost monsoonal rains yesterday. I watched from the window in dismay as the gutters on both the front and the back of the house overflowed and were washing out maple seeds. I was aware the gutters would need to be cleaned in the fall. I didn’t think about cleaning them recently, especially since the roofers had cleaned them out when they did the roof in March.
Not sure a pictures shows how much water was on the floor
First surprise
The basement floor of this house is half finished out and half garage. Late in the morning there was a lull in the storms so I thought I’d better get the dogs outside for a pit stop. I opened the door to garage and was greeted by a swimming pool effect — there was water all over the floor. I ran around to make sure it wasn’t damaging anything. The water appeared to be coming in the front of the wall and while there were boxes stored there I had put them on 2 x 4’s to be safe. I needed to pick up one box and everything else looked okay.
I started to get upset about the flood of water and then thought “Hey, it’s the garage. It could be worse and be in the house. The house!”
Second surprise
I ran back inside and found I had squishy carpet. along the wall bordering the garage. Oh joy.
I quickly moved furniture so I could pull back the carpet and padding. I pulled them up and flopped them over a folding chair so they could dry.
Third surprise
I stepped onto what I expected to be concrete and found water standing on (and in) foam.
Carpet and padding are already pulled and I’m working on scraping foam off the concrete
Apparently there had been foam backed carpet glued to the floor at one point of the house’s life and someone had pulled the carpet out leaving about 1/4″ of sopping wet foam firmly glued to the floor. How was I ever going to get things dried out with the foam there? It would have to come off.
I got a putty knife and started scraping. My test knife was the narrow 1 1/2″ size and while it worked, it was going to take forever. I went out and got a couple wider putty knives. Try as I might, the wider knives flexed and didn’t get under the foam and truly scrape it clean. I was going to have to do the entire area with the narrow
The little putty knife is the only one that would get down and get the foam cleanly off the concrete 🙁
knife. Groan.
Several hours later I had the wet foam removed from the floor a couple of feet into bone dry areas. I removed the carpet strips that were completely wet and soft. I threw out a section of the padding because I had no idea how I’d get the water out of it and I figured it wouldn’t be too expensive to get some at Lowe’s. The floor inside was mopped up. I used a broom to push most of the water out of the garage and mopped up what remained. I sprayed bleach water along the baseboards in an effort to deter mold. Fans were set up and things appeared to be drying nicely.
Another heavy storm started around 7:00 PM. Again I watched the gutters overflow. I ran downstairs and there was more water than there had been before. I had to pull the carpet back further and scrape more soggy foam off the floor. The garage was a swimming pool again.
Goody — I get to do the same clean up twice in one day.
Concerns
I don’t know if the flooding was caused by the sheer volume of water or the plugged up gutters dumping an enormous amount of water right along the house. When I moved here in January we pretty much had 3 solid months of rain with no flooding in the basement.
As luck would have it the guys showed up to finish the rails on the stairs to the deck in back the next morning. They offered to clean the gutters for me. I got up on a ladder and saw there were little maple trees growing in the gutters — there were a lot of maple seeds mattered into stinky masses. Yuck.
I will be vigilant about gutter cleaning and keep my fingers crossed that the flooding doesn’t happen again. At least I won’t have to scrape the foam again.
I absolutely, unequivocally adore FiOS. I was in one of the lucky first neighborhoods to get it and it was flawless for the years that I had it. When I decided to move, I was terribly disappointed it wasn’t available in the area to which I was moving. I hope to someday live where it’s available again.
That said — beware of the cancelling process. Especially if you’ve made the decision to not spend the money on a Verizon phone line. I had internet only – no TV, no phone.
I was talking a few months ago to someone who works for Verizon and he commented it’s amazing they stay in business with the dumb things they do. I would concur.
Weeks before my move I checked with Verizon via telephone on how to cancel my service. I was told to return the modem to the local Verizon store.
It was something I dreaded. I wanted internet until the last possible moment which meant I needed to turn in the modem after the movers took my stuff and before I left for good the next morning. I was completely exhausted when I walked into the Verizon store nearest my home and was promptly told “Oh we don’t take modems here. Only certain stores taken them and the nearest one is blah, blah blah.” I had way too much to do to do a tour of the Dallas area seeking a Verizon store which would actually take the damn thing.
I called Verizon on the way back to the house and the guy on the phone said he’d cancelled my account and wanted my new address to send a shipping box in which I could return the modem. Sounded perfect because that meant I didn’t have to deal with it before getting out-of-town.
The day after I arrived at my new home I boxed up the modem and power supply and got it on its way to Verizon. Problem taken care of.
Not even close.
I realized a couple of months later I was still being billed by Verizon. I called and after being transferred five times I explained my problem. 45 minutes later someone finally said they had indeed received the modem and they would cancel my account and start the refund process.
I was billed again the next month. I called again and queried at the end of the call requesting my account be closed and a refund processed — Don’t you need my new address? Oh no, they weren’t able to change the address. The account was closed so no changes were possible. At this point I figured I had about 2 hours of phone time into this issue.
They said they would send all correspondence to my old address. A final bill would go there and then a couple of months later a check would be sent there as well.
Working very had to not get hostile I explained that I hadn’t lived there in three months and my mail forwarding had expired. They had to change my address. Another half hour on the phone, transferred to three more people and the person finally thought they had the address updated.
The final bill did come to my new address. Two months later when I still hadn’t received my refund check I gritted my teeth and called again. My refund check had just been processed and I should have it in a few days.
It took more than a few days because they addressed the check to the old address, but fortunately the USPS forwarded it on to me.
Five months to cancel the account and get a refund for 3 months of billings after it had been cancelled. With the incompetence of the people I spoke to and the clumsiness of their system I too am surprised they stay in business. In my opinion FiOS is a great product, but Verizon needs to bring up the rest of their systems to match it.
A few years back I had the operating system drive in the computer then die at an inopportune time. Is there ever a good time?
I did what I had done in the past. I’m not sure if this is out of sheer stubbornness or belief that it’s doable, but I tried the drive over and over again using a boot disk until it came on one time so I could get the important data off of it.
I replaced that PC since it was outdated and when I shopped for the replacement I wasn’t terribly concerned about hard disk space since I planned to have only the operating system and programs on that C: drive. The drive that contains the operating system and programs runs a lot more since if the computer is on, that drive is in action. Which logically means it’s the most likely drive to fail. If only the operating system and programs are on it, no big deal. Get a new drive, install the operating system and programs (no small feat by any means if you’re a heavy PC user) and you’re back in business.
Never again would I entrust important data to the drive that runs the system.
So where’s all the data?
I have a lot of data. I have tons of images, I have an immense music library, I have a lot of documents, I design websites. All of these (anything that isn’t the operating system or programs) are stored on redundant external drives so I have at least 2 copies in case of drive failure.
I know some recovery specialists recommend burning stuff to DVDs since they aren’t vulnerable to disk failure. I would rather invest in hard drives than have stacks and stacks of DVDs. If I had all my data on DVDs it would literally be stacks and stacks.
Latest disk failure
A drive where I store video files was giving indications it was about to give up the ghost. I suspected this not only because it was failing to showing up in Windows Explorer on occasion, but also because of its age — this drive had been attached to my previous PC so it had put in years of service above and beyond the call of duty.
I thought about being proactive and ordering a new hard drive before it failed so I could copy all the videos off of it, but procrastinated and it went belly up yesterday. Really belly up.
As in the past I tried over and over plugging the USB cable in, powering it down and powering it up. Nothing. I held it to my ear and hurt it ticking away. A certain sign of a really dead hard drive.
I considered dropping it and freezing it. I’ve had friends tell me they’ve recovered data this way, but I figured it was already damaged internally and dropping it or adding moisture from the freezer would only exacerbate problems. I researched online and found plenty who warned against this procedures.
Stubbornness
There wasn’t anything on the drive that I couldn’t live without and I considered giving up. But then that stubborn streak reared it’s ugly head and wouldn’t let me.
In the end I resorted to my tried and true method. I continued to reconnect the USB, power it down, over and over and over, ad nauseam.
And guess what? It came back on. It not only came back on, but it stayed on and allowed me to copy every living last file off of it to a drive that had open space. Cool!
Guess what I did this morning? I researched and ordered a new hard drive so I can copy all my video onto a separate drive again.
Protecting yourself
Keep redundant backups. Many external drives come with automatic backup software to make it easy. If you don’t have a lot of data, burn it to DVD. There is also software to clone you drive.
If it starts showing signs of failure or is over 3 years old, be proactive — get another drive and copy the files before you loss stuff.
If you haven’t done any of the above and you have a drive fail, don’t give up. Keep trying over and over to access the drive and you may end up being pleasantly surprised. It may take some time, but it will be a heck of a lot cheaper than taking it to a data recovery specialist and a lot less painful than losing everything.
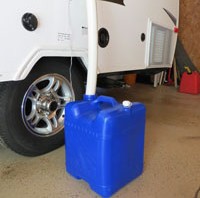
I’ve been trying to figure out a decent way to get my gray water from the kitchen sink in my Rockwood A128S to the Aqua-Tainer I purchased from Amazon.
I did a lot of online research and looked at pictures posted by a lot of different picture. I didn’t want to go with a hose attached to the gray water outlet because it would cause the sink to drain so slow, but I also didn’t want it to be complicated or expensive. With the help of a very nice employee at Lowe’s today I think I came up with a great solution at a great price.
Three pieces: an adapter, an elbow, and flexible pvc spa pipe. They fit so snugly together I’m going to try the assembly without gluing to see if it works fine that way. All for a total of $7.16
1-1/2-in Dia 90-Degree PVC Elbow Fitting
0.80
1-1/2-in Dia PVC Cleanout Adapter Fitting
1.20
1-1/2-in PVC Spa Flex Hose
5.16
Total
7.16
And I think it looks great. I like the white PVC with the camper as opposed to black like many have used. It takes all of a minute to assemble and light weight to store. I would have to check on how to seal the hose into the Aqua-tainer if I’d like to chain a couple containers together.
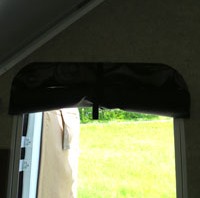
I just bought a Rockwood A128S – one of the little A frame, hard side, pop up campers. Mine has a small screen in the door, but I wanted more air flow when the heat or air wasn’t needed. An open door isn’t an option for me because I’m a mosquito magnet. I kid you not — if there’s a mosquito within a hundred miles it will find me and bite me. I feel like when I walk outside they all communicate to each other gleefully “Dinner is served!”
I had some left over solar screen material that I like. It’s sturdier than fiberglass so it will hold up to handling a lot better. I might even block some heat.
Materials for project:
Screening (I chose solar screen)
Webbing strap 12-15″
Buckle or Velcro for strap
Black loop Velcro for screen
White adhesive back Velcro for door frame
The decorative board over the door is easy to remove. The buttons are snaps and pop off. Then you remove the screw and other part of the snap.
After measuring the frame around the door I cut the screen to 20 ¾” wide by 70” long and took it out to the camper to mark the locations for the black loop Velcro with a chalk marker. I didn’t want to accidentally place Velcro with the walls fold. I sewed the 2” pieces of black loop Velcro on the marked locations. I didn’t put Velcro on the top corners because the corner screws of the door board would hold them.
Before going back out to the camper I brought the board that tops the door in and placed it on the top edge of the screen, rolled the screen up and then figured out how I wanted the strap mounted. I wanted the buckle on top on a short length to it wouldn’t fall down past the board trim. I rolled up the screen to see how long the strap needed to be. I wanted a ladder buckle instead of Velcro so I could snug the screen down.
Back out to the camper and I started applying the white adhesive back Velcro at the bottom of the door frame. The metal on the bottom was narrow so I cut the Velcro strips in half to fit.
I worked up from the bottom, holding the screen up and marking the door frame where the black hook Velcro fell with a china marker. I could then let the screen lay down while I applied the white adhesive back Velcro to the door frame.
When the screen was attached to all the Velcro spots I cut a small hole in the strap so the center screw could go through. It was a little tricky holding the board with the screw partially through, centering it on the screen and forcing the screw through the strap. Holding all this while getting the board screwed back onto the wall would have been a whole lot easier with another set of hands but I managed.
Once the center screw was in it was a matter of making sure the corners were trimmed enough, getting the screws in the right place through the screen so it was taut and straight and then getting them screwed back into the wall.
I was pleased how unobtrusive the white Velcro appeared on the door frame when the screen was rolled up (didn’t get a picture of it yet). I figured black would have stuck out like a sore thumb. I also tested to make sure the camper closed up with the rolled up screen. No problems there.
Screen in placeScreen stored
I haven’t been camping with it yet so see how it does keeping insects out and dogs in. I post a note when I get back on how it performed.
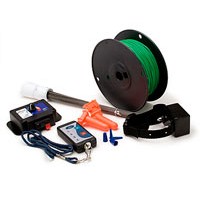
My dogs are trained for an electric fence. When they were puppies I purchased an Innotek Contain and Train SD-3000. Innotek has come out with much fancier systems now, but I’m still happy with what I have.
I like Innotek — they stand behind their products. The collars are the most expensive part and if one fails (and they have) you can do a trade-in at a much lower cost than buying a new collar.
This system also comes with an adjustable transmitter. The dog collars beep well before the dogs gets a shock. The width of that area where it gives the warning beep can be adjusted. I love this feature. My dogs hear the beep and high tail it back into safe territory.
Previous install
The house in Texas was an easier install for several reasons. It was a smaller yard. There were large ground cover areas that I could just run the wire through instead of burying it. But most importantly it had a concrete driveway with seams. I designed the layout for the fence incorporating one of these seams to run the wire through.
I put all the flags out, and did a lot of training, but my girls were so good they’d never cross the line to see what happens. I hated doing it, but I had to take them across the line so they’d get zapped. One zap was all it took. Neither of them will continue when either of their collars beeps.
The bad part — forget taking your dog down the drive to go to the street for a walk. They would look at me with an expression that said “Uh, uh. We KNOW what happens if we walk up that way. No way we’re going.” They won’t risk getting zapped again. So I have to load them in the SUV and go to a park. Not a bad thing. Safer on paved trails anyway.
Next install
I brought the transmitter and collars, purchased more wire, and faced a much more difficult install. I had a lot more yard to cover and no ground cover to cheat with. I also had an asphalt drive way to cross.
I would advise sitting down and drawing out where you want the fence to go, where you’ll access the electricity, and what obstacles you have to get around or through. The wire has to be a continuous loop for it to work.
The transmitter is not water proof so I put it in the detached garage and drilled a hole through the wall to run it outside.
Transmitter in detached garageWires coming out of garage
Where ever you put the transmitter you have to start there, go around the yard in a circle and return to the transmitter.
The man who is mowing my grass (in lieu of buying a riding mower) graciously offered to loan me a gas edger, so I used it to dig a little trench all the way around the perimeter. It did a good, but not perfect job, so while burying the wire I had to do some digging in places. But all together so much better than doing it all with a shovel.
My big dilemma was still the asphalt driveway. I figured I wasn’t the only person to face this so I started researching on the internet and found there were ways to protect the wire running over the drive. I ordered the product on the left from Amazon and it’s perfect. It’s black so it looks good on the drive and it sits over the wire and protects it from car tires. And it doesn’t slip
strip across asphalt drive
around. I’ve had it out for a few weeks and it’s staying put.
It was a full two-day exhausting project, but it’s in and working. Most of that time was scooting along the ground cramming the wire down into the crevasse. I figured out some tools that made it a little bit easier.
Not to worry about cutting the wire in the future. I regularly check to make sure the red light on the transmitter is lit. If it’s not it could very well mean the wire has been cut. If did anywhere near the wire, I always check to make sure I have cut the line. I’ve had line cut before and fortunately there’s a way to find the break and repair it.
I’ve now made the same mistake on two installations. At the old house if the walked to close to the front door their collars would beep. I think it was 2 years before my younger dog would retrieve a ball from that particular corner. I apparently didn’t get the wire far enough from living room corner of the house here and if I forget to remove their collars they will get a beep in the living room. Not a good situation, so make sure you get the wire far enough from all points of the house.
We’re all glad the fence is in
This house is on a busy road and there’s no way I would let my dogs loose so they’d been on a leash to do their business since we moved here. I could tell they were really tired of it. They’re happy to be back on their collars and have time to leisurely sniff around the yard. I’m happy knowing they can’t end up on the road to get squished. I just have to check the batteries in their collars to make sure they’re still signalling the dogs when they’ve walked too far.
Training
When I first installed the fence my dogs were so good about not crossing the line that they never got zapped. I ended up dragging them each across the line so they could see what happened. One time was all it took for my Labs — they never wanted that to happen again.
There’s an inconvenience to this type of fence. Because I had the line across the driveway, there was no way to exit the yard to go for a walk. Walks entail loading them up in the vehicle and taking them someplace to walk. Not an awful problem if there are walking paths nearby.
An inconvenience for the dogs – squirrels figure out the dogs can only go so far and will stand just outside their perimeter and chatter at the dogs, really taunting them. I never would have guess that would happen.
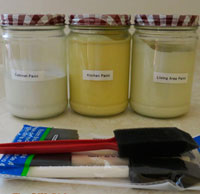
I’ve recently seen some name brand touch up paint containers. They leave me wondering how tightly they seal and how long the paint lasts. I believe in handy to use touch up paint for the rooms you’ve painted in your house. No more trucking out to the garage, maybe having to let the paint warm up. No stirring cans, dealing with possible rusted cans. Just reach under the sink and dab a little paint where you just scraped the wall.
I started doing this when my son was little so when he hit the wall with one of his toys it was no big deal. I had the paint if I owned the home and I asked for the paint when I rented. People I rented from were thrilled to death when they did the final walk through because the walls always looked so good. An added bonus — it makes it easy to touch up the paint when you take pictures down and patch the holes.
I’ve talked about this in other posts. It was a life saver when I was preparing to move in January and I left them for the new owner.
If I empty a jar that has a rubber seal around the lid like peanut butter or pickle jars, I wash them thoroughly and save the jars for paint. Pictured above, I have a jar for touching up my newly painted kitchen cabinets, the kitchen walls, and the living area walls.
I tried hand written paper labels in the past, but over time the paint name gets wiped off and if you have close colors you’re not quite sure which one to use. If you use the wrong one, it evident as soon as it dries.
I keep the jars stashed under the kitchen sink in the back where they’re out of the way and I keep a handful of small foam brushes with them. When I need to touch up a spot I shake them really well, do the painting, wipe off the tip rim of the jar and put the lid back on. The rubber seals keep the paint fresh for a long, long time, are basically free, and beat the heck out of wrestling with rusty paint cans.

 I got home and tried what I’ve done in the past — hairspray. It doesn’t matter if it’s the cheapest stuff they sell or expensive designer hairspray.